Playstation 2 HubDrive construct.

Status
Not open for further replies.

AnimeMun

Member
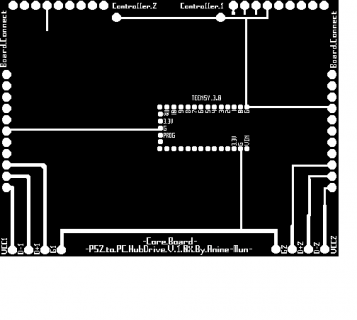
Hello, I'm starting work on building a custom hub to use both PS2 controllers and memory cards on a personal computer by hardwiring it straight to the motherboard via a free JUSB header. I'm at my mother's right now so I don't have access to the actual work I've mapped out so far. What I'm wondering is if it would be better to use the Teensy 3.0 in place of the ATMEGA328 I was planning on using in my construct. If so I'd appreciate some hints on which transistors and resistors or other parts that I should think about using with it to make it work. Any programs for it will also be appreciated.

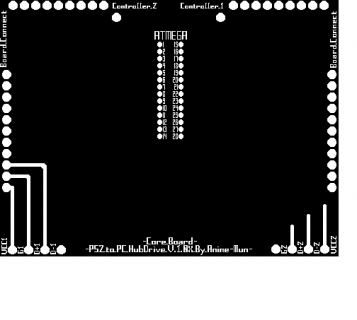
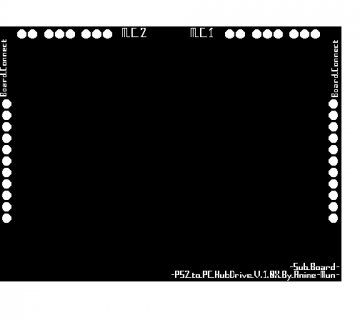
I guess I should begin with what I'll be working with. First and foremost I'll be using the actual controller brick (http://store.richspsxparts.com/pl2copobl.html) from a burnt out Playstation 2 original model, I already tested the part and its still in working order. Secondly I'm going to custom print two circuit boards that will connect to the brick, the microcontroller being on the main board which will be attached to both the motherboard header connector and the actual controller ports and a sub board which will take care of the memory card connections that will connect through custom headers to the main board. In addition I will be cutting the original shell to fit in a 5.25 inch drive bay and fit it with drive rails so it will be in a drive bay on my computer.

Once finished I'll post the finalized design and construct information in what I'll hope to be the final post in this along with a video of it working. By the end of tonight I'll post up what I've gotten plotted with the ATMEGA so far. The board concepts will be in a black and white BMP file. Easily editable so any ideas can be plotted on very easy.
 
Is that a replacement part for an original Playstation 2? It looks like it's designed to work only with whatever is inside a Playstation.

That page has a nice photo, but no technical documentation like a pinout or an Arduino library. Is there any info technical available anywhere about how to interface to it? If not, I'd guess the odds of using it with *anything* other than the original Playstation system are slim, at best.

Then again, if it's well documented or someone has reverse engineered it and published an Arduino library, it'll probably be pretty easy. But I didn't see any library on that page you linked.

I did find these pages with a quick google search, but I'm not familiar enough with the Playstation hardware and terminology (I've never owned any Sony gaming system) to know if they're applicable....


http://www.societyofrobots.com/robotforum/index.php?topic=11299.0

http://www.billporter.info/2011/03/...n-2-controller-library-troubleshooting-guide/

http://www.wegmuller.org/arduino/Arduino-Playstation_gameport.html
 
I can provide the pinout later tonight but I used that photo of the replacement part since that is the original part I'm working with. However the actual pins for the contacts with both controllers and memory cards go all of the way through the block so a connection could be made to bypass the ribbon cable port at the very bottom. In fact I've already wired out the actual block to attach. 8 pin set ups for the memory cards and 9 pins for the controllers. I'm still scouting out what each of the contacts for that proprietary memory card does and is turning out to be the hardest part of the job as there is much more risk of burning out the memory card than there is the controller.

Here is what the pinout from the actual controller is and what I used to wire my block to be prepared for my board. http://makezineblog.files.wordpress.com/2008/06/ps2_controller_pinout.jpg?w=500&h=400

Like I said though, I'm still at my mother's so most of what I'm working from is on my home computer. I'll try to delve deeper into the software side and see if I can find anything specific as well.
 
I used this pinout when I did my ps2 controller. I also have a nice library I just updated for arduino1 ide. I can upload it tomorrow night. Make sure you use 3.3v. The standard controller will work with 5v, but I killed 2 wireless controllers before I moved to 3.3v!
 
Alright, here is how I have my brick wired up in addition to the wiring for the USB headers that I got from a hub that was installed in a random free case I found that I have no intention of seriously using. There is also the beginning of the design process of my board. I realize there will be several refinements before I actually print this board. I'm leaving plenty of room for error while the design phase is ongoing. Hence the V.1.0X as this is still in prototype alpha stages.

Mcmahan, thanks for the start, I will start implementing those aspects now. Although if there are suggestions for doing this with the Teensy 3.0 instead of the ATMEGA328 I will definitely take that into account considering the cost measures for the project as well as stability of the build, I just started setting up the copper I'm gonna use for the core board now. Although I'm not gonna actually print until I get some good resin amongst other things. Yes I'm planning on completely building this PCB from the ground up as I don't want to risk mistaken short outs or the soldering process ruining the board.

I know its gonna be a rough process to clear out all the offending aspects around the circuits then filling each cavity with the proper resin. However I think with this being my first self made boards why not go insane with it. Better to have one hard core prototype than to end up having a cruddy test type that costs more in the long run. In other words I will have the archetype in my computer and if someone doesn't feel like making their own and pays me to make the parts I've designed then I'm more than willing to do that. Although they'll have to buy the brick and do their own casing. Which reminds me, once its all said and done I'll have to tally up the costs for everything. Yes I'm doing this for fun but I doubt its going to end up being the cheapest avenue of doing this process. But my computer will look much more awesome this way.
0523131333b.jpg0523131334a.jpg0523131333e.jpg0523131333c.jpg
 

Attachments

  • HUBDRIVE V1.0XAMCORE.png
    HUBDRIVE V1.0XAMCORE.png
    6.8 KB · Views: 294
  • HUBDRIVE V1.0XAMSUB.png
    HUBDRIVE V1.0XAMSUB.png
    6.7 KB · Views: 299
Last edited:
Any luck with the PS2 controller? I can't get mine working right with the T3. I don't want to deal with it, so I'm kinda hoping someone else does all the work for me!
 
Any luck with the PS2 controller? I can't get mine working right with the T3. I don't want to deal with it, so I'm kinda hoping someone else does all the work for me!

Not yet, still trying to work out mapping for the memory card and saving up for for my T3 and other materials. Got the base copper needed for the main plate parts already. It would help a lot if I could get a hold of pin reads for a PS2 card to port to tiny leads. I have figured out so far how to map out the two controllers easier from what you've provided.

EDIT: Uploaded modifications with Teensy 3.0 as base, mapped out ground lines for core board along with other basics. Not finished lining up numbers. I'm also not afraid of cutting off certain connections on the core board as I can map out some good short cuts that should work between parts of the board. Perhaps even finding some ways to cross connections between the two separate boards. I'll even take some back board tips for resistors to help with these bridges if one would think them necessary. I hope now that there is a little more interest that this could be a little more community mapped. Credit will be given of course.
 

Attachments

  • HUBDRIVE V1.0XAMCORE.png
    HUBDRIVE V1.0XAMCORE.png
    6.9 KB · Views: 339
Last edited:
I'll take another look at the PS2 controller this week...I'll be sitting in a hotel every night so I'll need something to do.
 
I haven't worked on my projects for a while. I was just checking to seen if anyone has ported the psx lib yet?
 
Status
Not open for further replies.
Back
Top