MEMS i2c microphone SPH0645LM4H with teensy audio library

Status
Not open for further replies.

Georg

New member
Hi,
I tried to connect the new i2s microphone from adafruit with the teensy (without audio board). The MEMS Breakout board is a Adafruit I2S MEMS Microphone Breakout - SPH0645LM4H, but it did not work :confused:.

The problem is, that the FFT values are always 0.0. I
Maybe it's a problem of the clock? Adafruit writes in there tutorial, that the clock BCLK should be between 2-4Mhz. But the teensy BCLK runs with 1.41MHz. Is it somehow possible to change this clock? or did someone use this breakout board already with the teensy?

Connections:
Micro -> Teensy
SEL -> Not connected (tried also GND or 3V (changes channel of mono microphone)
LRCL -> 23
DOUT -> 13
BCLK -> 9
GND -> GND
3V -> 3.3V

Code:
Code:
#include <Audio.h>
#include <Wire.h>
#include <SPI.h>
#include <SerialFlash.h>

// GUItool: begin automatically generated code
AudioInputI2S            i2s1;           //xy=139,91
AudioAnalyzeFFT1024      fft1024;        //xy=467,147

// Create Audio connections between the components
//
AudioConnection c2(i2s1, 0, fft1024, 0);
// GUItool: end automatically generated code


// The scale sets how much sound is needed in each frequency range to
// show all 8 bars.  Higher numbers are more sensitive.
float scale = 60.0;

// An array to hold the 16 frequency bands
float level[16];

// This array holds the on-screen levels.  When the signal drops quickly,
// these are used to lower the on-screen level 1 bar per update, which
// looks more pleasing to corresponds to human sound perception.
int   shown[16];


void setup() {
  delay(200);
  Serial.println("Start Setup");
  // Audio requires memory to work.
  AudioMemory(12);
  //i2s1.begin();
  fft1024.windowFunction(AudioWindowHanning1024);
  Serial.println("End Setup");
}


void loop() {
  if (fft1024.available()) {
    // read the 512 FFT frequencies into 16 levels
    // music is heard in octaves, but the FFT data
    // is linear, so for the higher octaves, read
    // many FFT bins together.
    level[0] =  fft1024.read(0);
    level[1] =  fft1024.read(1);
    level[2] =  fft1024.read(2, 3);
    level[3] =  fft1024.read(4, 6);
    level[4] =  fft1024.read(7, 10);
    level[5] =  fft1024.read(11, 15);
    level[6] =  fft1024.read(16, 22);
    level[7] =  fft1024.read(23, 32);
    level[8] =  fft1024.read(33, 46);
    level[9] =  fft1024.read(47, 66);
    level[10] = fft1024.read(67, 93);
    level[11] = fft1024.read(94, 131);
    level[12] = fft1024.read(132, 184);
    level[13] = fft1024.read(185, 257);
    level[14] = fft1024.read(258, 359);
    level[15] = fft1024.read(360, 511);
    // See this conversation to change this to more or less than 16 log-scaled bands?
    // https://forum.pjrc.com/threads/32677-Is-there-a-logarithmic-function-for-FFT-bin-selection-for-any-given-of-bands

    // if you have the volume pot soldered to your audio shield
    // uncomment this line to make it adjust the full scale signal
    //scale = 8.0 + analogRead(A1) / 5.0;


    for (int i=0; i<16; i++) {
      Serial.print(level[i]);

      // TODO: conversion from FFT data to display bars should be
      // exponentially scaled.  But how keep it a simple example?
      int val = level[i] * scale;
      if (val > 8) val = 8;

      if (val >= shown[i]) {
        shown[i] = val;
      } else {
        if (shown[i] > 0) shown[i] = shown[i] - 1;
        val = shown[i];
      }

      //Serial.print(shown[i]);
      Serial.print(" ");
    }
    Serial.println("");
  }
}

Thanks,
Georg
 
Did you ever end up finding a solution? We have the same microphone now and are trying to get it to work.
 
I recently changed the I2S slave code to use BCLK = LRCLK*64. Master mode still uses BCLK = LRCLK*32, but I intend to change it sometime "soon"....
 
I’m running Teensyduino 1.40 and the I2S Master code does indeed now support BCLK = LRCLK*64.

I’m not a fan of the I2S microphone from Adafruit because (IMHO) it violates the I2S specification. See discussions that I’ve started:
https://forum.pjrc.com/threads/47010-I2S-Microphone-(SPH0645LM4H-B)
https://forums.adafruit.com/viewtopic.php?f=19&t=125101

I’ve had good luck with this microphone:
https://store.arduino.cc/usa/ics43432-i2s-digital-microphone

It works just fine with the AudioInputI2S class. You can’t use it at the same time as the Audio Shield since they’d both want to be connected to I2S0 RX. I haven’t looked at the AudioControlSGTL5000 class in detail. Maybe you can disable it’s I2S output? It would also be possible to connect the microphone to I2S1 RX. But, the Quad I2S class does not yet support BCLK = LRCLK*64.

I’ve hacked up a Quad I2S class with BCLK = LRCLK*64. But, it doesn’t yet support dual I2S inputs while in master mode as I haven’t needed that combination. You’re welcome to take a look:
https://forum.pjrc.com/threads/45394-SPDIF-Input-and-Output

hi gfvalvo, i am also running teensyduino 1.40.

you are using:
.. https://www.pjrc.com/teensy/td_libs_AudioOutputI2S.html
and not
.. https://github.com/hughpyle/teensy-i2s
?

i purchased the mic at https://forums.adafruit.com/viewtopic.php?f=19&t=125101 and i purchased two mics at https://www.tindie.com/products/TleraCorp/ics43434-i2s-digital-microphone/ as well as their development board (the Butterfly STM32L433 Development Board team seems to offer great support, planning to see if i can get stereo recording 16kHz sample rate 32-bit sampling working with their board).

got it, cannot use mems mics on teensy at same time as audio shield, as they both want to be connected to I2S0 RX.

pasted below is the code i use on adafruit feather mo (unhorse code) and it works great for 8kHz, 32-bit sample size (i’m getting errors with 16kHz, maybe because i am logging the output via serial cable to mac). do you have or have you seen code that works with a teensy minus the audio shield? the teensy example code is for recording with the audio shield. i saw a forum entry from Paul that said use the example code and remove references to the audio shield, but when i do that, i get a blank recording.

Code:
/*
 * 
 * https://github.com/kriswiner/Butterfly/blob/master/ICS43434_USBSerial.ino
 * 
 This example reads audio data from an Invensense's ICS43434 I2S microphone
 breakout board, and prints out the samples to the Serial console. The
 Serial Plotter built into the Arduino IDE can be used to plot the audio
 data (Tools -> Serial Plotter)
 */

#include <I2S.h>

void setup()
{
  Serial.begin(230400);
//  Serial.blockOnOverrun(false);
  delay(5000);

  // Start I2S at 8 kHz with 32-bits per sample 
  if(!I2S.begin(I2S_PHILIPS_MODE, 8000, 32))
  {
    Serial.println("Failed to initialize I2S!");
    while(1);                                                                        // Do nothing
  }
/*  Serial.println("I2S initialized!");
  Serial.println("Send a '1' to start recording data");
  while(1)
  {
    if(Serial.read() == 49) {break;}
  }
  */
}

void loop()
{
  if (Serial.available() > 0)
  {
    // call function if command 1' received
    if (Serial.read() == 49)
    {
      readI2sDataStream();
    }
  }  
}

void readI2sDataStream()
{
  while(1)
  {
    // Read the I2S data stream and write it to serial
  
    uint32_t size;  
    size = I2S.available();
  
    uint8_t data[size];
    I2S.read(data, size);
    Serial.write(data, size);
  }

  return;
}
 
I have no experience with the hughpyle library. The microphone I linked works great with the PJRC audio library at 44 KHz sample rate. It uses an ICS-43432 device from InvenSense. The one you purchased from Tindie uses a similar InvenSense device, so I image it should also work.

Did you have your microphone set to output on the Left or Right I2S channel? Did you record the correct channel? Why not try the Teensy Mono Peak Meter example. Just modify it for I2S input rather than the ADC. Connect microphone to the I2S0 RX input (Data, BCK, and LRCLK) - no Audio Shield. Try both Left and Right outputs from the I2S object.

I only have T3.2 devices, so I'd need the Audio Shield for SD recording. When I get time, might create a derived version of the AudioControlSGTL5000 class that allows disabling Audio Shield's I2S output. Then I could use both I2S mic and SD for recording. I'm sure it will record just fine. Probably won't be very soon though.
 
Also, when you tried the Record example, did you comment / uncomment the proper SDCARD_ #defines so as to choose the SD Card on the T3.5/3.6 rather than the Audio Shield?
 
thanks gfvalvo, your questions and suggestions made the difference, i'm able to record 16 bit 44.1khz in stereo! starting with PeakMeterMono was the right place. a simple enough sketch to make sense of audio system designer tool and figure out the pins (the designer tool says one thing, the example code says another).

if anyone else using mems mics with teensy (without audio shield), following code worked for me (source of code in first line):

Code:
// https://forum.pjrc.com/threads/46150-Recording-Stereo-Audio-to-SD-Card?p=158682&viewfull=1#post158682
// 16 bit 44.1khz

#include <Audio.h>
#include <Wire.h>
#include <SPI.h>
#include <SD.h>
#include <SerialFlash.h>

// GUItool: begin automatically generated code
AudioInputI2S            i2s1;           //xy=168,145
AudioRecordQueue         queue1;         //xy=360,62
AudioRecordQueue         queue2;         //xy=389,145
AudioConnection          patchCord1(i2s1, 0, queue1, 0);
AudioConnection          patchCord2(i2s1, 1, queue2, 0);
// GUItool: end automatically generated code

AudioControlSGTL5000     sgtl5000_1;     //xy=265,212


// which input on the audio shield will be used?
const int myInput = AUDIO_INPUT_LINEIN;
//const int myInput = AUDIO_INPUT_MIC;


// Use these with the Teensy Audio Shield
// #define SDCARD_CS_PIN    10
// #define SDCARD_MOSI_PIN  7
// #define SDCARD_SCK_PIN   14

// Use these with the Teensy 3.5 & 3.6 SD card
#define SDCARD_CS_PIN    BUILTIN_SDCARD // 254?
#define SDCARD_MOSI_PIN  11  // not actually used
#define SDCARD_SCK_PIN   13  // not actually used

// Remember which mode we're doing
int mode = 0;  // 0=stopped, 1=recording, 2=playing


// The file where data is recorded
File frec;

void setup() {
  // record queue uses this memory to buffer incoming audio.
  AudioMemory(120); // 60

  // Enable the audio shield, select input, and enable output
  sgtl5000_1.enable();
  sgtl5000_1.inputSelect(myInput);
  sgtl5000_1.volume(0.5);


  // Initialize the SD card
  SPI.setMOSI(SDCARD_MOSI_PIN);
  SPI.setSCK(SDCARD_SCK_PIN);
  if (!(SD.begin(SDCARD_CS_PIN))) {
    // stop here if no SD card, but print a message
    while (1) {
      Serial.println("Unable to access the SD card");
      delay(500);
    }
  }

  startRecording();
}


void loop() {
  if (millis() > 20000 && mode == 1) {
    stopRecording();
  }
  else {
    if (mode == 1) continueRecording();
  }
}

void startRecording() {
  Serial.println("StartRecording");
  if (SD.exists("RECORD.RAW")) {
    SD.remove("RECORD.RAW");
  }
  frec = SD.open("RECORD.RAW", FILE_WRITE);
  if (frec) {
    Serial.println("File Open");
    queue1.begin();
    queue2.begin();
    mode = 1;
  }

}

// write all 512 bytes to the SD card   
void continueRecording() {
  if (queue1.available() >= 2 && queue2.available() >= 2) {
    byte buffer[512];
    byte bufferL[256];
    byte bufferR[256];
    memcpy(bufferL, queue1.readBuffer(), 256);
    memcpy(bufferR, queue2.readBuffer(), 256);
    queue1.freeBuffer();
    queue2.freeBuffer();
    int b = 0;
    for (int i = 0; i < 512; i += 4) {
      buffer[i] = bufferL[b];
      buffer[i + 1] = bufferL[b + 1];
      buffer[i + 2] = bufferR[b];
      buffer[i + 3] = bufferR[b + 1];
      b = b+2;
    }
    elapsedMicros usec = 0;
    frec.write(buffer, 512);  //256 or 512 (dudes code)
    Serial.print("SD write, us=");
    Serial.println(usec);
  }
}

void stopRecording() {
  Serial.println("StopRecording");
  queue1.end();
  queue2.end();
  // flush buffer
  while (queue1.available() > 0 && queue2.available() > 0) {
    queue1.readBuffer();
    queue1.freeBuffer();
    queue2.readBuffer();
    queue2.freeBuffer();
  }
  frec.close(); // close file
  mode = 4;
}
 
Glad it worked for you. Of course, at 44.1 KHz you'll chew up SD card space a lot faster :)

Since you're not using the Audio Shield, you can delete / comment-out the following:

Code:
AudioControlSGTL5000     sgtl5000_1;     //xy=265,212

const int myInput = AUDIO_INPUT_LINEIN;

  sgtl5000_1.enable();
  sgtl5000_1.inputSelect(myInput);
  sgtl5000_1.volume(0.5);
 
works with commenting out the audio shield related code. updated sketch:

Code:
// https://forum.pjrc.com/threads/46150-Recording-Stereo-Audio-to-SD-Card?p=158682&viewfull=1#post158682
// 16 bit 44.1khz

#include <Audio.h>
#include <Wire.h>
#include <SPI.h>
#include <SD.h>
#include <SerialFlash.h>

// GUItool: begin automatically generated code
AudioInputI2S            i2s1;           //xy=168,145
AudioRecordQueue         queue1;         //xy=360,62
AudioRecordQueue         queue2;         //xy=389,145
AudioConnection          patchCord1(i2s1, 0, queue1, 0);
AudioConnection          patchCord2(i2s1, 1, queue2, 0);
// GUItool: end automatically generated code

// AudioControlSGTL5000     sgtl5000_1;     //xy=265,212


// which input on the audio shield will be used?
// const int myInput = AUDIO_INPUT_LINEIN;
//const int myInput = AUDIO_INPUT_MIC;


// Use these with the Teensy Audio Shield
// #define SDCARD_CS_PIN    10
// #define SDCARD_MOSI_PIN  7
// #define SDCARD_SCK_PIN   14

// Use these with the Teensy 3.5 & 3.6 SD card
#define SDCARD_CS_PIN    BUILTIN_SDCARD // 254?
#define SDCARD_MOSI_PIN  11  // not actually used
#define SDCARD_SCK_PIN   13  // not actually used

// Remember which mode we're doing
int mode = 0;  // 0=stopped, 1=recording, 2=playing


// The file where data is recorded
File frec;

void setup() {
  // record queue uses this memory to buffer incoming audio.
  AudioMemory(120); // 60

  // Enable the audio shield, select input, and enable output
   // sgtl5000_1.enable();
   // sgtl5000_1.inputSelect(myInput);
   // sgtl5000_1.volume(0.5);


  // Initialize the SD card
  SPI.setMOSI(SDCARD_MOSI_PIN);
  SPI.setSCK(SDCARD_SCK_PIN);
  if (!(SD.begin(SDCARD_CS_PIN))) {
    // stop here if no SD card, but print a message
    while (1) {
      Serial.println("Unable to access the SD card");
      delay(500);
    }
  }

  startRecording();
}


void loop() {
  if (millis() > 20000 && mode == 1) {
    stopRecording();
  }
  else {
    if (mode == 1) continueRecording();
  }
}

void startRecording() {
  Serial.println("StartRecording");
  if (SD.exists("RECORD.RAW")) {
    SD.remove("RECORD.RAW");
  }
  frec = SD.open("RECORD.RAW", FILE_WRITE);
  if (frec) {
    Serial.println("File Open");
    queue1.begin();
    queue2.begin();
    mode = 1;
  }

}

// write all 512 bytes to the SD card   
void continueRecording() {
  if (queue1.available() >= 2 && queue2.available() >= 2) {
    byte buffer[512];
    byte bufferL[256];
    byte bufferR[256];
    memcpy(bufferL, queue1.readBuffer(), 256);
    memcpy(bufferR, queue2.readBuffer(), 256);
    queue1.freeBuffer();
    queue2.freeBuffer();
    int b = 0;
    for (int i = 0; i < 512; i += 4) {
      buffer[i] = bufferL[b];
      buffer[i + 1] = bufferL[b + 1];
      buffer[i + 2] = bufferR[b];
      buffer[i + 3] = bufferR[b + 1];
      b = b+2;
    }
    elapsedMicros usec = 0;
    frec.write(buffer, 512);  //256 or 512 (dudes code)
    Serial.print("SD write, us=");
    Serial.println(usec);
  }
}

void stopRecording() {
  Serial.println("StopRecording");
  queue1.end();
  queue2.end();
  // flush buffer
  while (queue1.available() > 0 && queue2.available() > 0) {
    queue1.readBuffer();
    queue1.freeBuffer();
    queue2.readBuffer();
    queue2.freeBuffer();
  }
  frec.close(); // close file
  mode = 4;
}
 
Are you able to play back the RAW file?

works with commenting out the audio shield related code. updated sketch:


Hi tmratwork

so I tried your code and i am getting a file in the SD card but unfortunately, the RAW file does not have any signals, meaning there is no sound when i play it.
I was wondering if you have encountered the same problem during your implementation. I used the same mic as yours and I followed the hardware connection suggested by PaulStoffregen.

It would be very helpful for me if you could get back to me!

Thank you!!
 
Hello gfvalvo, I am trying to make the same set-up work but I get no values other than zeros from the mic ICS-43432.

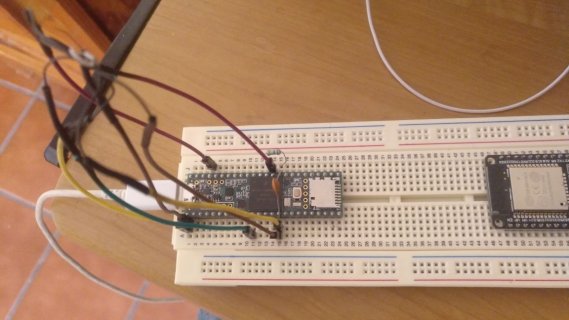
Let me show you my set-up, may be you can help me finding where is the problem.

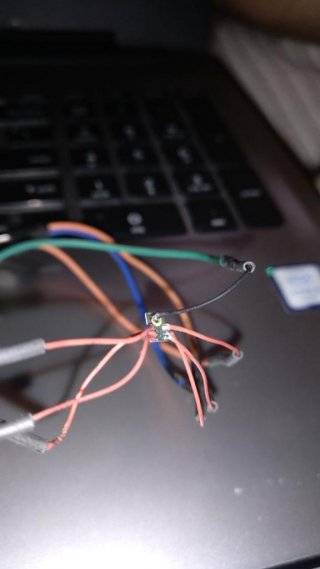
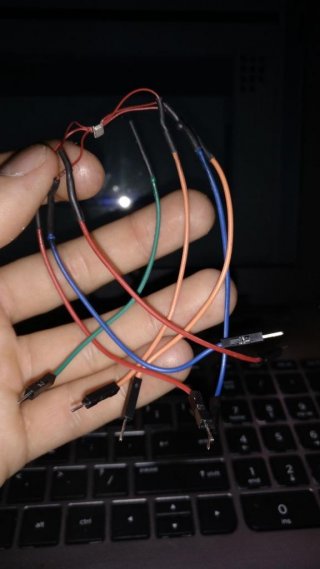
First of all this is a picture of how I did to take out some jumper-conections from the mic

Sol.jpg
Cable.jpg

Micro -> Teensy 3.6
SEL -> GND
LRCL -> 23
DOUT -> 13
BCLK -> 9
GND -> GND
3V -> 3.3V

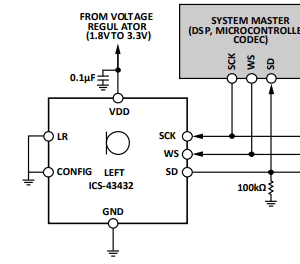
I'm using a capacitor and a resistor which were recommended by the DataSheet of the mic. With or without these elements I get the same zero values.

1.PNG
Pro.jpg

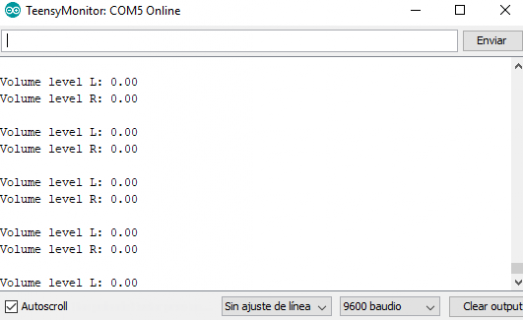
I implement the RMS analyzer for my code, I analyze both channels, here is my code:
Code:
#include <Audio.h>
#include <Wire.h>
#include <SPI.h>
#include <SD.h>

AudioInputI2S            i2s1;           
AudioAnalyzeRMS          rms1;
AudioAnalyzeRMS          rms2;
AudioConnection          patchCord1(i2s1, 0, rms1, 0);
AudioConnection          patchCord2(i2s1, 1, rms2, 0);

void setup() {
  Serial.begin(9600);
  AudioMemory(4);
  delay(1000);
}

void loop() {
  if (rms1.available() && rms2.available())  {
    
        float volume_level_l = rms1.read() * 100.0;
        float volume_level_r = rms2.read() * 100.0;

        Serial.print("Volume level L: ");
        Serial.println(volume_level_l);

        Serial.print("Volume level R: ");
        Serial.println(volume_level_r);
        Serial.println();
  }
 
}

And this is the result

Captura.PNG

I have tried with two mics and is the same result for both.

Im using Teensy Loader 1.41 and Arduino 1.8.5
 
Status
Not open for further replies.
Back
Top