USB-MIDI to Digital Pin(HIGH) code

Status
Not open for further replies.

kriista

Member
So I've got a Teensy 3.0 which I bought specifically for this USB-MIDI to Relay box I'm building.

Here's what the hardware itself looks like (all repurposed/vintage parts!):
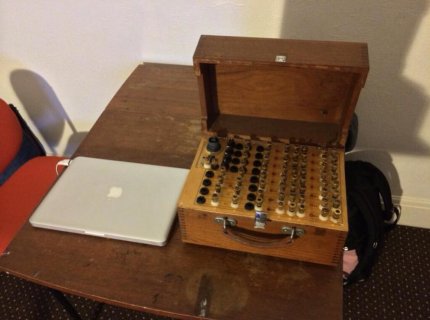
Screen Shot 2014-02-25 at 5.56.50pm.jpg

The guts are set up such that when each relay receives 5v it fires.

So what I'm trying to do with the Teensy code is read MIDI note messages and set corresponding digital pins to HIGH.

I'm thinking of using MIDI notes 60-75 and digital pins 1-16, so pressing MIDI note 60 will set digital pin 1 HIGH, and releasing it would set it back to LOW.

I had made a thread about an earlier version of this project which I found super useful in wrapping my head around how easy USB-MIDI is to do with Teensy (amazing!) here:
http://forum.pjrc.com/threads/24085-USB-MIDI-device-(all-inputs-outputs)?p=34576

The main takeaway was looking at this page:
http://www.pjrc.com/teensy/td_midi.html

On there I see code that does what I want pretty much, EXCEPT it's only working with one digital pin. Because of how the functions are set up, I actually don't know how to modify this code so it does what I said above (map MIDI notes to digital pins).

This is the LED controlled by MIDI code:

Code:
// USB MIDI receive example, Note on/off -> LED on/off
// contributed by Alessandro Fasan

int ledPin = 13;

void OnNoteOn(byte channel, byte note, byte velocity)
{
  digitalWrite(ledPin, HIGH);
}

void OnNoteOff(byte channel, byte note, byte velocity)
{
  digitalWrite(ledPin, LOW);
}

void setup()
{
  pinMode(ledPin, OUTPUT);
  usbMIDI.setHandleNoteOff(OnNoteOff);
  usbMIDI.setHandleNoteOn(OnNoteOn) ;
  digitalWrite(ledPin, HIGH);
  delay(1000);
  digitalWrite(ledPin, LOW);
  delay(1000);
}

void loop()
{
  usbMIDI.read();
}

Any help here would be appreciated!
 
Hi Krista

You can use the note parameter of the event handler function to determine which pin to set up

you can make a simple switch block like

Code:
switch(note){
case 60:
 digitalWrite(1,HIGH);
 break;
case 61:
 digitalWrite(2,HIGH);
 break;
 ... etc
}

and in the same manner for the noteOff with
digitalWrite LOW

maybe you would also want to check first if the channel is the specific one, so you don't trigger from any other accidental midi notes, and also that velocity is over 0(for note on)
 
I'm happy for it to read off all MIDI channels to simplify things (I don't use much MIDI gear anyways).

Still unclear on a couple of bits.

Is switch() an in-built function here or defined just for this?
Does it live inside the main loop or is this just a function that I would declare up top and usbMIDI.read() would take care of the rest?
How do I differentiate between note on/offs or would it just be logic checking for velocity too?
 
a switch statement is built in c++ programming language, pretty much like the if statement (it is basically a collection of if statements)
it checks the values of the variable in the parenthesis, and executes the bit that matches. http://www.cprogramming.com/tutorial/lesson5.html

OnNoteOn and OnNoteOff are interrupt handlers, those functions will be executed automatically whenever a noteOn or noteOff message is received, so you don't have to worry about that

your code would look something like this

Code:
void OnNoteOn(byte channel, byte note, byte velocity)
{
  if(velocity>0){
   switch(note){
      case 60:
        digitalWrite(1,HIGH);
        break;
      case 61:
        digitalWrite(2,HIGH);
        break;
      //... etc
    }
  }
}

void OnNoteOff(byte channel, byte note, byte velocity)
{
     switch(note){
      case 60:
        digitalWrite(1,LOW);
        break;
      case 61:
        digitalWrite(2,LOW);
        break;
      //... etc
    }
}

void setup()
{
  pinMode(ledPin, OUTPUT);
  pinMode(1, OUTPUT);
  pinMode(2, OUTPUT);
  pinMode(3, OUTPUT);
  //.. etc
  usbMIDI.setHandleNoteOff(OnNoteOff);
  usbMIDI.setHandleNoteOn(OnNoteOn) ;
  digitalWrite(ledPin, HIGH);
  delay(1000);
  digitalWrite(ledPin, LOW);
  delay(1000);
}

void loop()
{
  usbMIDI.read();
}

if the switch case is confusing you, you can maybe do something like

Code:
if((note>=60)&&(note<=75)){
 int oPin=note-59;
 digitalWrite(oPin,HIGH);
}
 
Last edited:
Thanks for all the help!

Hah, I should have known that. I've been learning javascript online and it went over that at some point (www.codeacademy.com).

Ok, I've filled in the gaps, but I'm getting errors in the Arduino IDE:

Code:
This report would have more information with
"Show verbose output during compilation"
enabled in File > Preferences.
Arduino: 1.0.5 (Mac OS X), Board: "Teensy 3.0"
Teensy_Code.ino: In function 'void setup()':
Teensy_Code:163: error: 'usbMIDI' was not declared in this scope
Teensy_Code.ino: In function 'void loop()':
Teensy_Code:173: error: 'usbMIDI' was not declared in this scope

Here is the full code:

Code:
int ledPin = 13;

void OnNoteOn(byte channel, byte note, byte velocity)
{
  if(velocity>0){
   switch(note){
      case 60:
        digitalWrite(1,HIGH);
        break;
      case 61:
        digitalWrite(2,HIGH);
        break;
      case 63:
        digitalWrite(3,HIGH);
        break;
      case 64:
        digitalWrite(4,HIGH);
        break;
      case 65:
        digitalWrite(5,HIGH);
        break;
      case 66:
        digitalWrite(6,HIGH);
        break;
      case 67:
        digitalWrite(7,HIGH);
        break;
      case 68:
        digitalWrite(8,HIGH);
        break;
      case 69:
        digitalWrite(9,HIGH);
        break;
      case 70:
        digitalWrite(10,HIGH);
        break;
      case 71:
        digitalWrite(11,HIGH);
        break;
      case 72:
        digitalWrite(12,HIGH);
        break;
      case 73:
        digitalWrite(13,HIGH);
        break;
      case 74:
        digitalWrite(14,HIGH);
        break;
      case 75:
        digitalWrite(15,HIGH);
        break;
      case 76:
        digitalWrite(17,HIGH);
        break;
    }
  }
}

void OnNoteOff(byte channel, byte note, byte velocity)
{
   switch(note){
      case 60:
        digitalWrite(1,LOW);
        break;
      case 61:
        digitalWrite(2,LOW);
        break;
      case 63:
        digitalWrite(3,LOW);
        break;
      case 64:
        digitalWrite(4,LOW);
        break;
      case 65:
        digitalWrite(5,LOW);
        break;
      case 66:
        digitalWrite(6,LOW);
        break;
      case 67:
        digitalWrite(7,LOW);
        break;
      case 68:
        digitalWrite(8,LOW);
        break;
      case 69:
        digitalWrite(9,LOW);
        break;
      case 70:
        digitalWrite(10,LOW);
        break;
      case 71:
        digitalWrite(11,LOW);
        break;
      case 72:
        digitalWrite(12,LOW);
        break;
      case 73:
        digitalWrite(13,LOW);
        break;
      case 74:
        digitalWrite(14,LOW);
        break;
      case 75:
        digitalWrite(15,LOW);
        break;
      case 76:
        digitalWrite(17,LOW);
        break;
    }
}

void setup()
{
  pinMode(1, OUTPUT);
  pinMode(2, OUTPUT);
  pinMode(3, OUTPUT);
  pinMode(4, OUTPUT);
  pinMode(5, OUTPUT);
  pinMode(6, OUTPUT);
  pinMode(7, OUTPUT);
  pinMode(8, OUTPUT);
  pinMode(9, OUTPUT);
  pinMode(10, OUTPUT);
  pinMode(11, OUTPUT);
  pinMode(12, OUTPUT);
  pinMode(13, OUTPUT);
  pinMode(14, OUTPUT);
  pinMode(15, OUTPUT);
  pinMode(16, OUTPUT);
  usbMIDI.setHandleNoteOff(OnNoteOff);
  usbMIDI.setHandleNoteOn(OnNoteOn) ;
  digitalWrite(ledPin, HIGH);
  delay(1000);
  digitalWrite(ledPin, LOW);
  delay(1000);
}

void loop()
{
  usbMIDI.read();
}
 
haha ok maybe the second method would have saved you all the typing!
by the way you can also set the pinModes inside a loop to further make the code more compact

You have to first set the USB Type to "MIDI" under the Tools menu in your Arduino IDE.


PS: Teensy 3.0 is running on 3.3V so the highs of the digital pins will be below 5v!
 
Last edited:
It looks as if you are mostly set on the coding stage (and yes for a simple run of 16 digital outs, the computed pin number is much better:
Code:
if((note>=60)&&(note<=75)){
 int oPin=note-59;
 digitalWrite(oPin,HIGH);
}

Since you are using USB MIDI you don't need to check for the special velocity value of zero on NoteOn (USB MIDI does not use running status).

The next thing you will need is a way to drive the relays. You mentioned 5V - is that what the relays need? Teensy 3.x uses 3.3V, and most relays will need more current than a microcontroller can supply. Check out this article which explains using transistors from digital outputs to drive relays (its written from the point of view of a 5V micro driving 12V relays, but the principle is the same).

http://www.w9xt.com/page_microdesign_pt7_transistor_switching.html
 
Last edited:
Ah, I didn't see the 2nd bit when I first nabbed the code. That makes sense.

So for the noteOffs it would be the same but just set (oPin, LOW)?

The hardware part was built by someone else and uses transistors to drive the relays. I hadn't considered the 3.3v though so hopefully that isn't an issue.
 
Status
Not open for further replies.
Back
Top