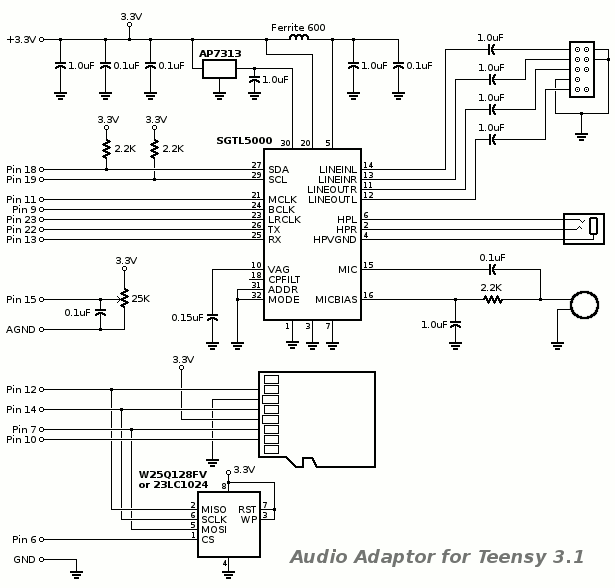
Audio adapter schematic

Status
Not open for further replies.
Yes I also was trying to get a schematic to clarify how things connect up, but could not find one online.
The adaptor shield plugs into teensy3.1 pins as shown on the linked document in last post.
The problem I had was Pin13 on teensy plugs into RX on the adaptor board. This gave me crackling and cutting out of the sound.
I was wondering has anyone else this problem...?? so I wasnt using the mic so I disconnected it.
 
Hi guys,

I havre several Teensys, and am seriously considering the audio adapter for a data acquisition/control project; may be able to help a bit.

The pins on the adapter match the pins on the Teensy 3x: Note that the audio board's GND and its 3.3V match the teensy pinout GND (next to pin "0") and its 3.3V, next to pin "23". There are 14 pins on either side of both the audio board and the Teensy.

In answer to Teenfor3: Pin 13 is connected to the Teensy's LED, and if the I2S digital audio path is enabled in the SGTL5000, then any attempt by the teensy to drive the LED will cause problems with the audio stream. Many sketches drive the LED as a diagnostic output, so maybe your program does too. Consider either not driving the LED or not using the input side of the digital audio stream in the SGTL5000.
 
Hi All.....

The link to the documentation for the adaptor is on 'tzif' 1st post to this thread.
The connections for the adaptor-teensy are labelled and circled black. Only 15 pins used.
Can we assume the other pins not circled black are free to setup as GPIO or whatever.
That why I would like to see a schematic....Is there one available...?
TX is supposed to be lineout...this will be mono.....from what...the SGTL5000 chip??....What does the audio Jack Socket do??...I get sound to L&R speakers.
RX is linein/mic assume to the SGTL chip.?
Yes thanks, LenSamuelson, I understand what you are saying about the LEDpin but its not clear from the docs. currently I dont use that pin.
Also Pin6 on adaptor is labelled MEMCS....assume chip select for memory chip if used. In the PlayWavSDcard example sketch it says "AudioMemory(5);" does that mean it would use pin 5 for MEMCS...Is the diag. or the sketch wrong..??? or am I reading it wrong.
Has anybody a Schematic. Please..???


.
 
All of the information required is on the page tzif linked to in the OP of this thread, you do not need a schematic - an explanation of various terms (and possibly a reference of common(ish) signal names) perhaps; If you don't know what Tx/Rx/MemCS are about then ask but clamouring for the schematic is next to pointless if anybody just gives it to you and doesn't explain any of the terms or references.

The SGTL5000 is a stereo codec and it is fully utilised as stereo. Sorry Teenfor3 but TX is not (specifically or only) lineout nor mono, nor is RX (specifically or only) linein. Furthermore MEMCS on pin 6 has very little relationship with AudioMemory(5) - a little reading on each item will help more than the schematic, googling terms can help arm you with better questions for the bits that still elude after some reading.

As hints; AudioMemory(#); is a command to preserve blocks of memory to use in audio processing. RX & TX are the actual audio data in each direction at 16 bits per sample, LRCLK is the left/right clock and effectively states which channel the current bits being transferred belong to, BCLK is the bit clock and MCLK is being used as the source of all other clocks relating to Audio. SCLK belongs with MISO and MOSI being the SPI bus which is used to access the SD card (SDCS) and the flash memory (MEMCS)
 
Hi again,

Though a schematic would be good to serve as a final authority to answer these questions, I believe Paul's intent for the audio board is that its connection with the Teensy is mostly digital.
  • There's an SPI connection for the SD socket and optional (unpopulated) SPI flash: SCLK, MOSI, MISO, MEMCS, SDCS;
  • I2S digital audio connection: TX, RX, LRCLK, MCLK, BCLK
  • I2C for control: SDA, SCL
  • Analog "Volume control" potentiometer input to to the Teensy as a convenience, so a human can tell the Teensy what volume is desired, so software can drive digital volume controls in the SGTL5000

From the SGTL docs,
  • SYS_MCLK: System master clock
  • LRCLK I2S frame clock
  • BCLK: I2S bit clock (I'm pretty sure but not certain... Paul labels this signal "BCLK", the SGTL calls it "I2S_SCLK")
  • DOUT: I2S data output from SGTL5000 to Teensy (Paul's board calls this TX)
  • DIN: I2S data input from Teensy to SGTL5000 (Paul's board calls this RX)

I believe the I2S digital pathway is the only way sound data moves between the Teensy and the SGTL5000 chip. The *analog* MIC, and LINE-in and LINE-out likely do not connect with the Teensy. Paul's page says:
Audio data uses I2S signals, TX (to headphones and/or line out) and RX (from line in or mic), and 3 clocks, LRCLK (44.1 kHz), BCLK (1.41 MHz) and MCLK (11.29 MHz). All 3 clocks are created by Teensy3.

The SD socket and SPI memory share MOSI, MISO and SCLK, and each has a separate chip select, MEMCS and SDCS.

I believe the other Teensy pins are available for other purposes, such as GPIO, etc.

Hope this helps.
 
Last edited:
Hi again, Thanks for info.

OK, I misread the sentence

"Paul's page says:......
Audio data uses I2S signals, TX (to headphones and/or line out) and RX (from line in or mic), and 3 clocks, LRCLK (44.1 kHz), BCLK (1.41 MHz) and MCLK (11.29 MHz). All 3 clocks are created by Teensy3. "

I see its all the one sentence and all relating to the signals on the I2S and not connection to actual headphones or mics.
 
Obviously I need to draw up a nice schematic.....

The audio board is identical to the SGTL5000 datasheet's suggested schematic, with a SD card and SPI flash chip connected to 5 I/O pins (separate from the SGTL5000), and a pot connected to +3.3V, A1 and AGND.
 
Here it is. This shouldn't be any real surprises if you've looked at the schematic on page 59 of the SGTL5000 datasheet.

Let it no longer be said the lack of a schematic is holding you back from creating awesome audio projects!

schematic_audio.gif
 
Thanks very much, Paul. I didn't know it followed the schematic on page 59 until you mentioned it on this thread, but now we can see easily what is connected to what. I know it may not help with programming but I think it helps my basic understanding of the project. I am new to Teensy and there are a lot of libraries functions etc....I find it hard knowing where to start.....and how it is all structured..?????....any guidance where to go as well as the tutorials...??
.
 
Paul and all the others
It amazes me all the time to meet people that the only thing that drives them is to help each other

I want to tell you all thank you for your help
You sure made my design go smoother

I guess that it wont be long until I will be the one to help others here in this platform

Paul let me assure you that I am definitely going to build an awesome audio project and thank to you guys I made another step

See you soon
from shiny Jerusalem
 
Hi Paul, thank you for the schematic, however is there a PCB layout diagram anywhere for the Audio Shield? My assistant had a little accident with a drill and some of the SMD components on an audio shield were knocked off(!). It looks like a couple caps or resistors so we might be able to replace them here with stock parts but I need to know what values they are. Thank you!
 
We need to know what these components are (marked in red) and their values. Is there a way to see these on a PCB layout or do we need to download Eagle? teensy3_audio_pins_marked.png
 
Check connectivity between pads for the broken off components: they probably connect LineIn and LineOut signals to the connector. If this guess is right, they are 1.0uF filter capacitors.
 
Thanks Paul! Hopefully a PCB component diagram will be published some day but I suppose not many folks will need it.
 
Hello. I know I am a bit late to the thread, but has anyone managed to get a .sch and a .brd file for this adapter? Also, will this work with the Teensy 4.0?
Thank you very much.
 
Status
Not open for further replies.
Back
Top