OSHPark'ed a simple thermocouple amplifier breakout board (AD849x)

Status
Not open for further replies.

christoph

Well-known member
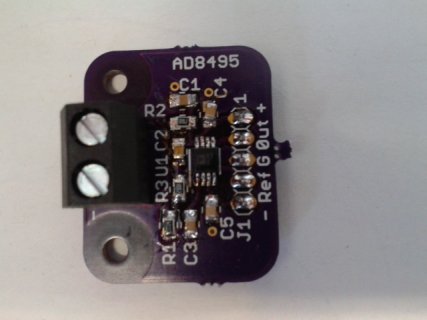
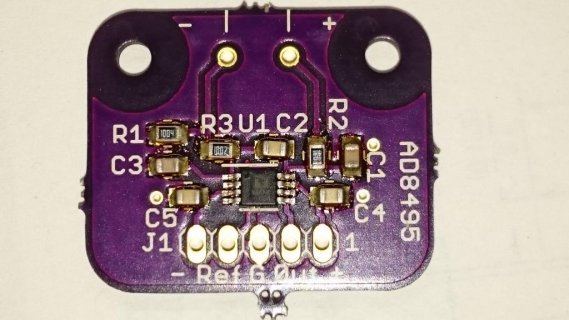
Because I wanted to try OSH Park and needed a breakout board for the AD8495 thermocouple amplifier, I created one and had it made.

Naked and good-looking:
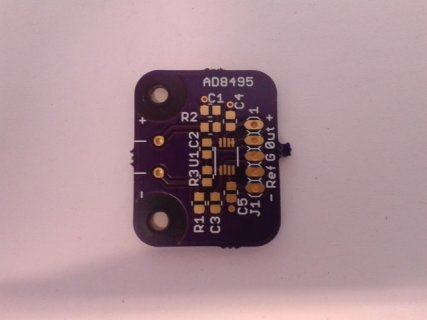
20140704_091714.jpg

Assembled and ugly:
20140704_100601.jpg

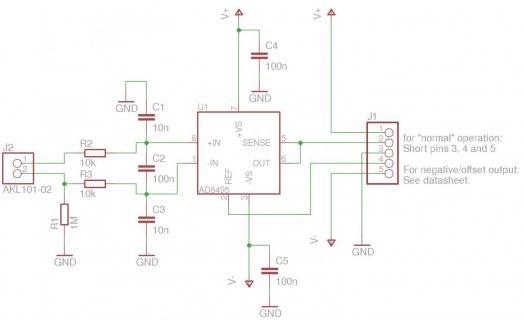
Schematic:
schematic.jpg

  • It is very similar to the adafruit breakout board, but supports dual supplies and a reference input for offsetting the signal.
  • All caps and resistors are 0805, which is the smallest I can hand-solder without freaking out.
  • Non-plated mounting holes for M2.5 screws that can be enlarged for M3, and the free area around them is large enough for an M3 washer.
I prefer M2.5 screws on perfboard because holes for M2.5 usually don't destroy the surrounding pads. When I mount breakout boards to any plain plate, I prefer M3 - that's why I wanted the board to support both.

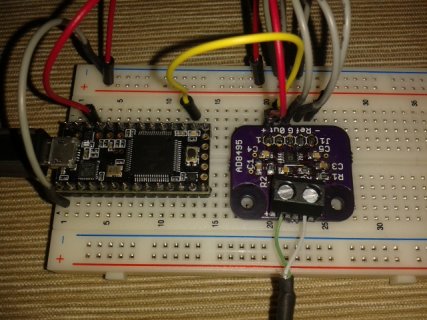
I tested it with an AD8495, type K thermocouple and a Teensy++, which worked right away.

Hackaday project page: http://hackaday.io/project/1758-AD849x-breakout-board
OSH Park: https://oshpark.com/shared_projects/QypWyps2
github: https://github.com/crteensy/AD849x-breakout-board

Regards

Christoph
 
Last edited:
Hi Christoph, nice work. I have been using 0603 passives and am toying with the idea of going to 0402 with the help of this device. I got it for $185 delivered. So far I have used it to reflow solder a couple of circuit boards with solder paste. For larger breakout boards hand soldering is fine. But for really small boards, like the kind I am designing to ride on the Teensy 3.1, reflow soldering is the way to go and this machine makes it easy.
 
I've made this hand-solderable because it can be used to build a reflow oven controller (I know, many designs are around). Then let the oven do the small parts.

That's much more fun than buying a ready tool that works out of the box!
 
Hi Christoph, nice work. I have been using 0603 passives and am toying with the idea of going to 0402 with the help of this device. I got it for $185 delivered. So far I have used it to reflow solder a couple of circuit boards with solder paste. For larger breakout boards hand soldering is fine. But for really small boards, like the kind I am designing to ride on the Teensy 3.1, reflow soldering is the way to go and this machine makes it easy.
For that money you can get yourself a small inexpensive toaster oven and hack it with the help of an Arduino Reflow Oven shield and then still have enough money for a decent hot air rework station. IMHO much better than that questionable Amazon stuff. I don't have a hot air rework station, but have used the said shield in conjunction with a rather expensive Panasonic Toaster Oven and it's worked beautifully on my LED shields

You can see several 0402 on that LED board. While I can place these by hand with my home manual made vacuum pick-and-place tool I would use 0603 in a next revision as I am much faster in placing these and they need less fiddling.
 
Last edited:
I'm currently thinking about a homemade forced convection reflow oven or hot air station. Should be fun!
 
it's worked beautifully on my LED shields

Yes, your boards are indeed delightful!

I am more interested in getting my designs prototyped than makeshifting tools; I have found this Amazon product to meet my needs and like most of my store-bought tools, it's capable of better results than I am able to get from it. Or as I say about all of my rifles, they shoot better than I do!

I say make away if you will, for those like me who just want to get the job done this Aoyue device works well enough and the cost is fairly modest IMHO.
 
I am more interested in getting my designs prototyped than makeshifting tools;
....and the cost is fairly modest IMHO.

Yup, same here. It's always a balancing act ! Actually if something would have been available to reflow 4-6 of my boards at a time within an acceptable price range and acceptable quality I would have bought an of-the-shelf reflow oven. Alas the market for such devices is pretty small.
I agree, for the money the Aoyue device(s) are a good deal and should certainly be adequate to reflow your Teensy shields.
 
Here's a small demo with a K-type thermocouple. As the board supports dual supplies which are not used in this setup, Gnd, Ref and - are tied together. Out goes to the Teensy 3.1's A0 input and + to the supply voltage:
20140823_190907.jpg
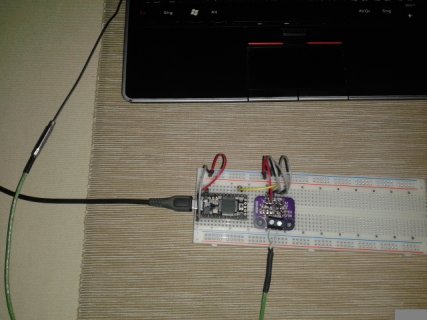
I used it to measure the temperature of my laptop's outlet air:
20140823_190856.jpg
Result: About 59 degrees Celsius

Sketch using pedvide's ADC library:
Code:
#include <ADC.h>

const int readPin = A0; // ADC0

ADC *adc = new ADC(); // adc object

void setup() {

    pinMode(readPin, INPUT);

    adc->setAveraging(32);
    adc->setResolution(16);

    adc->setConversionSpeed(ADC_HIGH_SPEED_16BITS);
    adc->setSamplingSpeed(ADC_HIGH_SPEED);

    adc->startContinuous(readPin, ADC_0);

    delay(500);
}

void loop()
{
  static const uint8_t period = 49; // for 25 updates per second
  static elapsedMillis t = period;
  if (t >= period)
  {
    t -= period;
    uint16_t value = (uint16_t)adc->analogReadContinuous(ADC_0);
    // The amplifier outputs 5 mV per Kelvin
    Serial.printf("t = %5.2f °C\r",value/65535.*3.3/5e-3);
  }
}
 
I built a small reflow oven similar to this one and used it to solder another two of these boards - they turned out great and they even work! Now I can go for the really cool parts.

DSC_0063_small.jpg

The only problem I found with this board/chip/solder paste combo (the solder paste is about 2 years old) is that some solder paste was under the AD8495 and formed a small ball. This lifted the chip a bit, but all pins have contact with their pads. This might really become a problem with other parts. If anyone can comment on this, I'm happy about any recommendations.
 
I just have some general recommendations. Firstly, I have learned that the hardest part of SMD board assembly is applying the solder paste properly on fine pitch pads. The pads on your board don't really qualify as fine pitch but the lesson is the same. I use solder paste in a syringe and have found the nozzle diameter to make all the difference. I bought a selection of nozzle sizes and currently use 23 gauge IIRC. They go down to 27 or maybe even higher gauge (inversely proportional to inner diameter). The small gauge does two things. I can control the flow of solder paste much better when expelling through a smaller orifice and, of course, application is much more precise. So instead of smearing globs of solder paste in the general area of the pads, I can now apply solder paste either only on the copper in cases like this thermocouple chip with rather large pads or at least keep the solder paste very near the pads with 0.4 mm pitch pads. This has greatly cut down on the number of solder jumpers and the amount of rework required after reflow. Maybe stencils is the better way but I haven't tried it and I am skeptical it is even feasible with the appallingly small boards I am wont to build.
 
FWIW, I use the Rocketscream shield and it works great too.

My biggest issue with a toaster-oven based approach is managing the temperatures well. I added a lot of insulation to my oven (inside the cavity as well as inside the case) to reduce the thermal mass of the cavity and reduce external surface temperatures. I also used a big heat sink for the SCR. My next mod will likely be to hook up the quartz tubes to operate independently of each other (i.e. top vs. bottom). Idea being to use the bottom ones for the pre-heat cycle and adding the top ones for the reflow phase, for example.

My toaster uses quartz tubes which by design were wired in series with a fat Diode (i.e. limiting the tubes to a 50% duty cycle) and consume a max of 1400W when operating. The SCR does the same thing as the Diode re: limiting the tubes to 1/2 wave cycles.

The cooldown continues to vex me, i.e. to meet spec you pretty much have to babysit the oven and open the door on cue. The rocket scream shield has a beeper for that purpose. I may retrofit a fat blower to do a better job but the implementation is not easy. That is, how to avoid leakage during operation while also capturing some of the evaporating flux. Will likely require more modifications to shell.

Ideally, the blower would be steel / Al and pull air out of the cavity and through a filter. However, you have to be careful. The kinds of media that do a good job filtering flux gases (i.e. HEPA filter with activated carbon) typically cannot handle high temperature. Additionally, you have to ramp up the air flow slowly / carefully or you might displace small components. You could cheat by using a power blower setup but the positive pressure inside the enclosure would likely hurt your chances of capturing flux gases reliably. It's the reason that most home furnaces use flue gas inducer blowers vs. power burners.
 
Last edited:
My syringe has a 0.68mm nozzle, but I can get one with 0.41 mm - I'll just try that. My next projects might have smaller pitch and possibly hidden pads, so I need to improve the quality of my results before I can really expect that to work.

I use a fat solid state relay for controlling the heater, which is working fine. I get half-wave resolution with it, and it doesn't even get warm because it's rated at 25A continuous current.

Regarding cool down, I thought about injecting ambient air with a small compressor if the oven temperature is above its target plus a small margin, like 5 K. There's still a small 12V compressor and a solenoid valve in one of my boxes. A plastic bottle (1.5 liters or something like that) might serve as a buffer for that, so I can basically flush the whole oven with fresh air if required.

The (radial) fan from my oven could serve in a re-built oven with evened-out air flow and a better control of the fan speed. The small board I soldered gets blown around easily with the current fan speed and overall setup, because the fan induces a vortex-like flow in the oven. Smooth top-down air flow would be better I think.
 
Status
Not open for further replies.
Back
Top