teensyduino in Code::Blocks: how to create a simple project

Status
Not open for further replies.

christoph

Well-known member
Here's how to use Code::Blocks to create a simple teensyduino (Teensy 3.0 or 3.1) project.

Prerequisites:

Shortcut:
Zipped project template with instructions in the project notes: View attachment cb_teensyduino_120_simple.zip
The zipped project differs a bit from the tutorial below. The zipped project doesn't have debug and release targets (because we can't use a hardware debugger on the teensy), but targets for teensy 3.0 and teensy 3.1 instead.

Setting up a teensyduino project in Code::Blocks is not easy, but I'll try to make this as simple to understand and follow as possible. The good news is that you can create a project template after you have created this project, and reuse it. Then it's quick and easy!

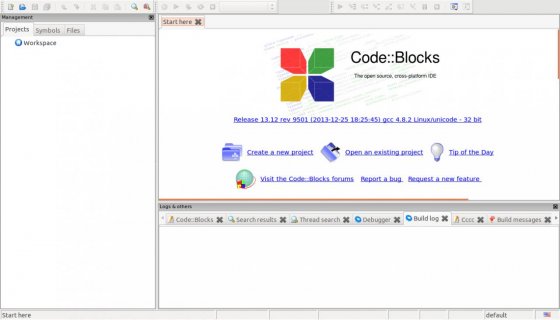
  1. In the welcome screen click on "Create a new project" (or use File->New->Project...) to open the project wizard:
    01_welcome.jpg
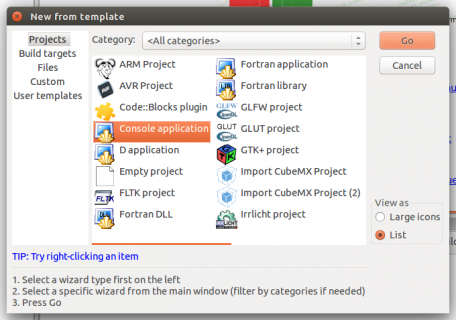
  2. Select "Console Application" and click on "Go":
    02_new_from_template_console.png
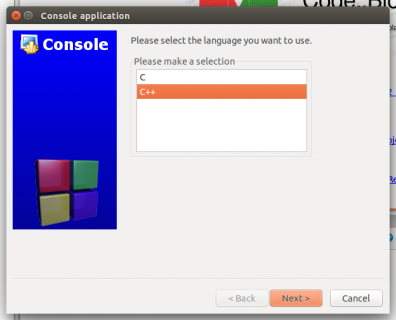
  3. Select "C++":
    03_console_lang_selection.png
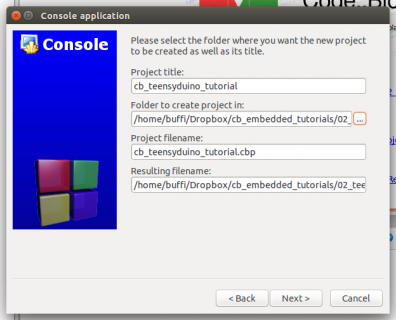
  4. Pick a project name and base folder:
    01_project_name_and_folder.png
  5. Select your teensyduino arm gcc compiler. If you haven't configured it yet, abort and do that now (how?). It's also possible to change the compiler later, but beginners might run into problems with that.
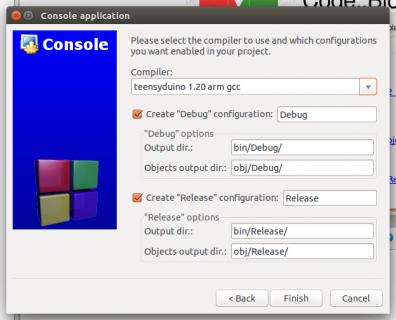
    02_compiler_selection.png
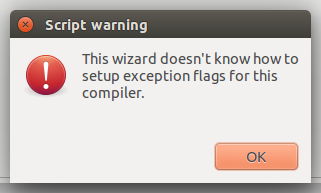
    If Code::Blocks complains that it doesn't know how to set exception flags for this compiler: That's ok, we'll do that later.02_1_exceptions_warning.png
  6. You should see an almost empty project now. It's time to add the teensyduino core sources. Right-click the project root and click on "Add files recursively":
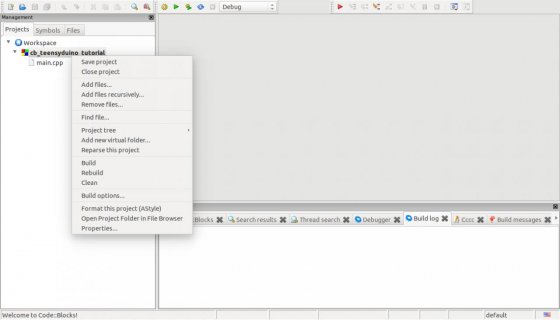
    04_project_root_right_click.jpg
    Select the teensyduino core base folder (<arduino root directory>/hardware/teensy/cores/teensy3):
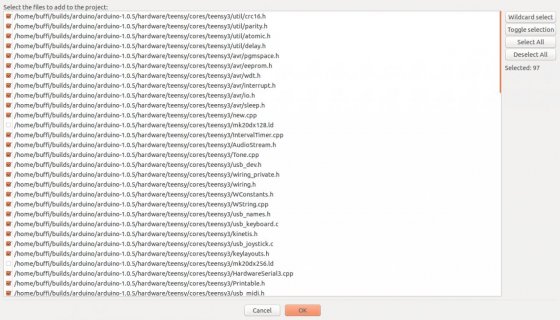
    05_add_recursively_core.jpg
    You can leave everything as it is and add the files to both targets (Debug and Release):
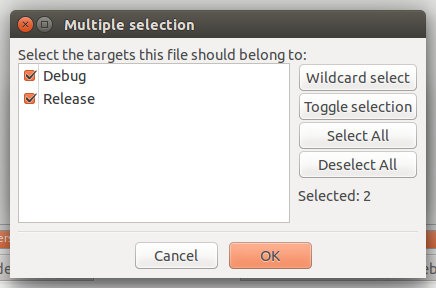
    06_target_selection.png

Now we have the files and compiler set up, but Code::Blocks doesn't know what compiler flags to set, where include files should be searched for, and so on. These will be covered in the next post.
 
Last edited:
Build options can be set for the top-level project and each target. Most options are equal for all targets, though.
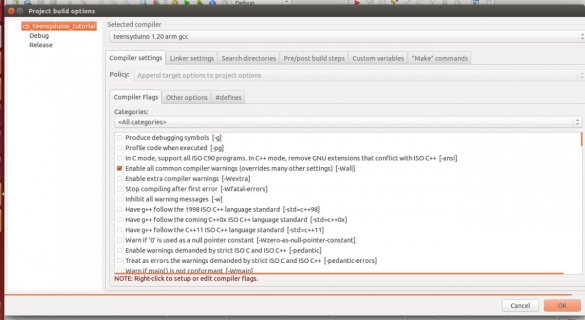
  • Right-click the project root again and go to the build options. Select the top-level item in the target tree on the left:
    07_build_options.jpg
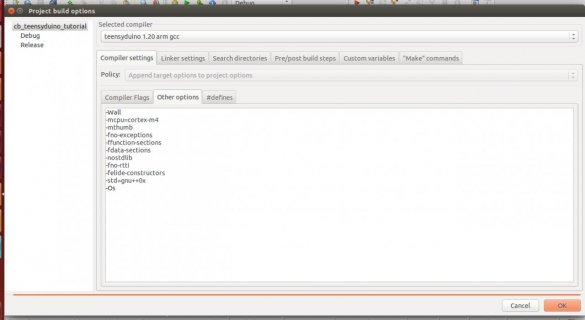
  • Tab: Compiler Settings -> Tab: Other Options:
    08_build_compiler_other.jpg
    Here are the options for copy/pasting from the browser:
    Code:
    -Wall
    -mcpu=cortex-m4
    -mthumb
    -fno-exceptions
    -ffunction-sections
    -fdata-sections
    -nostdlib
    -fno-rtti
    -felide-constructors
    -std=gnu++0x
    -Os
    Code::Blocks will move some of these to the "Compiler Flags" tab and inform you about this.
  • Tab: Compiler Settings -> Tab: #defines:
    Code:
    ARDUINO=105
    TEENSYDUINO=120
    __MK20DX256__
    F_CPU=96000000
    USB_VID=null
    USB_PID=null
    USB_SERIAL
    LAYOUT_GERMAN
    If you want to build for the Teensy 3.0, change __MK20DX256__ to __MK20DX128__.
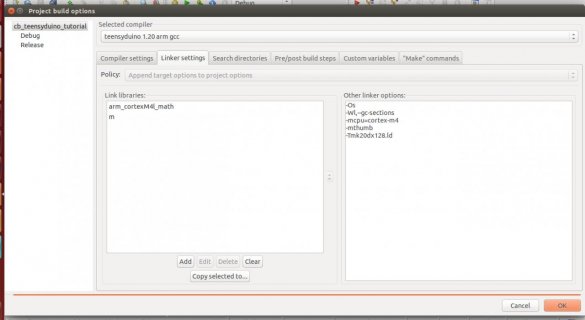
  • Tab: Linker Settings -> Link libraries:
    08_build_linker.jpg
    Click on "Add" and add "arm_cortexM4l_math" and "m".
    Also add these "Other linker options":
    Code:
    -Os
    -Wl,--gc-sections
    -mcpu=cortex-m4
    -mthumb
    -Tmk20dx256.ld
    Again, change the linker script name option to "-Tmk20dx128.ld" if you want to build for a Teensy 3.0.
  • Tab: Search directories -> Tab: Compiler
    Add <arduino root directory>/hardware/teensy/cores/teensy3 to the list of compiler search directories. When prompted, don't let C::B turn this into a relative path!
  • Tab: Search directories -> Tab: Linker
    Same as for the compiler search directories. Again, don't keep as a relative path.
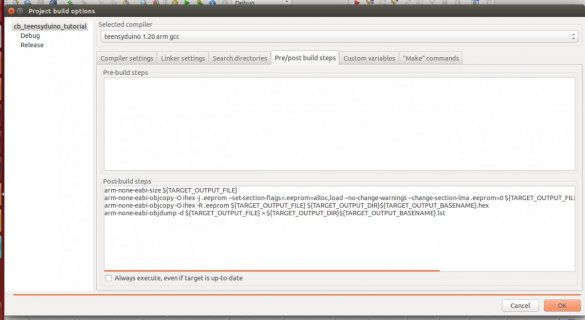
  • Tab: Pre/post-build steps:
    10_post-build.jpg
    These are the magic commands for copy/paste:
    Code:
    arm-none-eabi-size ${TARGET_OUTPUT_FILE}
    arm-none-eabi-objcopy -O ihex -j .eeprom --set-section-flags=.eeprom=alloc,load --no-change-warnings --change-section-lma .eeprom=0 ${TARGET_OUTPUT_FILE} ${TARGET_OUTPUT_DIR}${TARGET_OUTPUT_BASENAME}.eep
    arm-none-eabi-objcopy -O ihex -R .eeprom ${TARGET_OUTPUT_FILE} ${TARGET_OUTPUT_DIR}${TARGET_OUTPUT_BASENAME}.hex
    arm-none-eabi-objdump -d ${TARGET_OUTPUT_FILE} > ${TARGET_OUTPUT_DIR}${TARGET_OUTPUT_BASENAME}.lst
The top-level options are fine now, but the individual target need some fine-tuning.
  1. Debug Target: Go to "Compiler Settings" -> "Compiler Flags" and enable "Produce debugging symbols [-g]"
  2. Release Target: Go to "Compiler Settings"-> "Compiler Flags" and enable "Strip all symbols from binary (minimizes size) [-s]"
Hit OK to close the build options. In one of the above steps we have configured arm-none-eabi-size, arm-none-eabi-objcopy and arm-none-eabi-objdump to manipulate the build output - but they won't find the output file yet. How this is named is given in the "Project Properties".

  1. Right-click the project root again and open the "Project Properties" window:
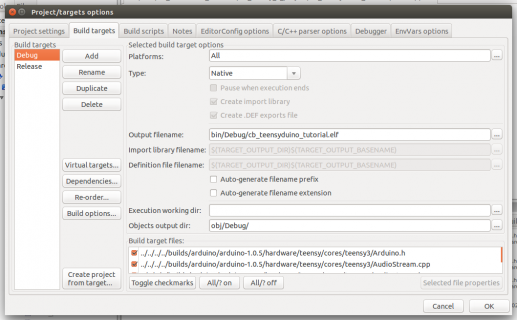
  2. Tab: Build Targets:
    Adjust the Debug target properties as shown in the screenshot
    11_properties_Debug.png
    • Type: Native
    • Uncheck "Auto-generate filename prefix"
    • Uncheck "Auto-generate filename prefix"
    • append .elf suffix to "Output filename"

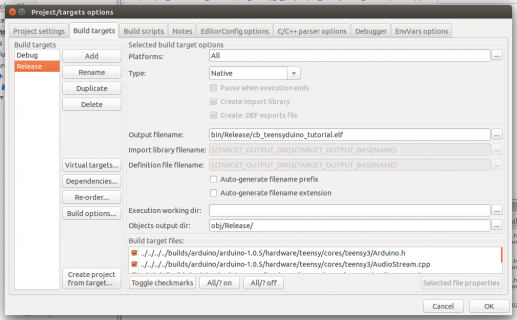
    Adjust the Release target properties as shown in the screenshot
    12_properties_Release.png
    • Type: Native
    • Uncheck "Auto-generate filename prefix"
    • Uncheck "Auto-generate filename prefix"
    • append .elf suffix to "Output filename"

Hit OK to close the project properties window.

In the project tree, navigate to the main.cpp and open it by double-clicking (if it isn't open already). Here's the classic blinky code:
Code:
#include <WProgram.h>

void setup()
{
  pinMode(LED_BUILTIN, OUTPUT);
}

void loop()
{
  digitalWriteFast(LED_BUILTIN, !digitalReadFast(LED_BUILTIN));
  delay(500);
}
Replace the "hello world" code with this.

Hit CTRL-F9 to compile and link. You will get some warning about compiler flags that are invalid for C files, but Code::Blocks passes all flags (including the C++-specific ones) in each compilation command. There are ways to customize this, but it's actually not necessary.

The way things are built in this project is quite different from the way arduino does it. arduino compiles a core.a library which is linked against, and it will also build each "external" library (like SPI for example) as one library and link against it. That's also possible with Code::Blocks, but much more complex. Somewhen in the future I might also describe how this can be done, but adding libraries is also possible with the default build scheme. I'll describe that in the next tutorial.

Leave this project as it is. The next tutorial will cover the conversion to a project template, so you don't have to go through all this again!
 
Last edited:
Turning this into a template

Creating a template from an existing project is actually very very simple. With the project open and activated (when multiple projects are open in C::B, one of them is bold in the project tree view. That's the active one.) go to File->Save project as template... and fill in the blanks. The only information you need to provide is a title for the new template and that's it.

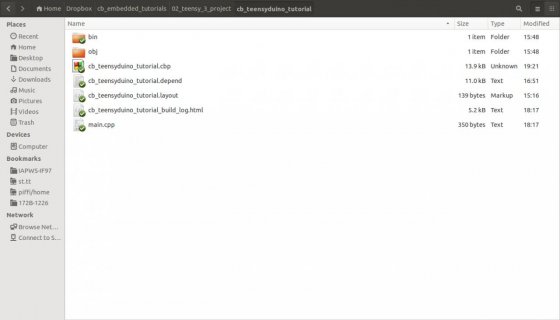
However, as the template will contain all files the original project contained, it will also duplicate the original directory structure. This structure starts at the common base directory of all files. Depending on how "far apart" your arduino root directory and the project directory were, this can have a very nasty outcome. So let's go to the project root directory in a file browser:
01_project_directory.jpg

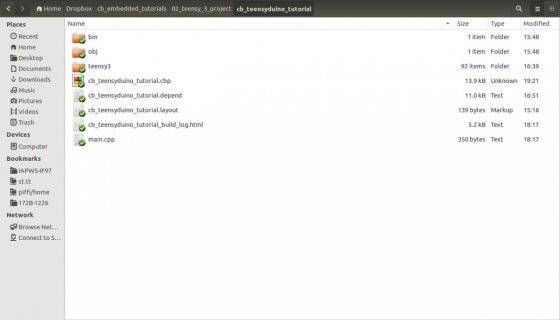
All the core files are still in the arduino folder. Recursively copy <arduino root directory>/hardware/teensy/cores/teensy3 to the project root directory, the result should look like this:
01_project_directory_core.jpg

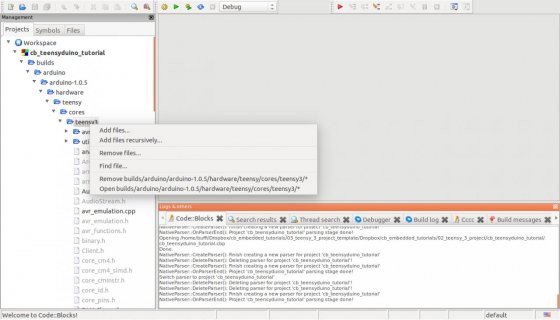
Now, in the Code::Blocks project, remove the original teensyduino core files from the project. In the project tree, navigate to the teensy core directory, right-click it and select "remove <arduino root directory>/hardware/teensy/cores/teensy3/*":
02_remove_core.jpg

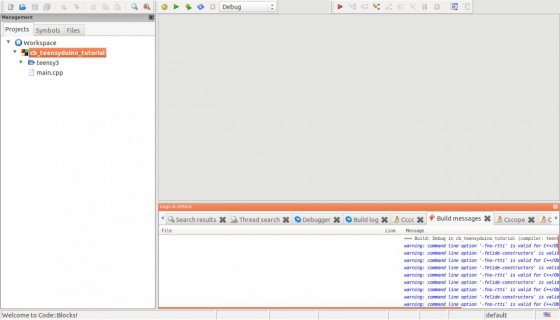
The whole arduino folder should disappear from the tree and the remaining folder structure should get simplified to show only main.cpp.

Right-click the project root and "Add files recursively". Select the teensy3 folder in the project root directory, enable all disabled checkmarks (i.e. add all files to the project) and add the files to both targets. This is slightly different than in the previous example project because we want the template to include the linker scripts. Code::Blocks doesn't include .ld files automatically when adding files recursively. The result:
02_added_core.jpg

The compiler and linker search paths must be adjusted in a similar way. Right-click the project root, open the build options. For the top-level (project) target.
Tab: Search directories -> Tab: Compiler: Remove the existing search directory and replace it with a relative path to the newly added teensy3 directory.
Tab: Search directories -> Tab: Linker: Remove the existing search directory and replace it with a relative path to the newly added teensy3 directory.

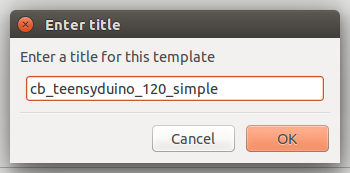
That's much better. A template generated from this project will be as simple as possible, so let's do that now. "File"->Save Project as template..." and pick a suitable name:
04_template_name.png

Hit OK. Close the project.

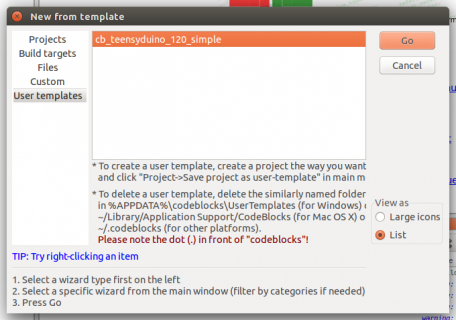
To test the newly created template, go to "File"->"New"->Project..." and go to the "User templates":
05_new_from_template.png

Hit "Go" and pick a place to store the new project. The project will be created and it will contain all the teensyduino core files.

Hit CTRL-F9 to build. You should get no errors.
 
Last edited:
I'm having bit of a problem. I used "arm_cortexM4L_math" for the linker library as noted in section 4 and got a "library not found" error. I then looked at the image supplied, and noted that it was "arm_cortexM4l_math". substituting that, I got the following:
Code:
Build started on: 14-12-2014 at 13:41.58
Build ended on: 14-12-2014 at 13:41.58
-------------- Build: Debug in TeensyNet (compiler: teensyduino1.20 arm gcc)---------------
arm-none-eabi-g++ -L/home/jimm/teensyduino20/hardware/teensy/cores/teensy3 -o bin/Debug/TeensyNet.elf obj/Debug/teensyduino20/hardware/teensy/cores/teensy3/analog.o obj/Debug/teensyduino20/hardware/teensy/cores/teensy3/AudioStream.o obj/Debug/teensyduino20/hardware/teensy/cores/teensy3/avr_emulation.o obj/Debug/teensyduino20/hardware/teensy/cores/teensy3/DMAChannel.o obj/Debug/teensyduino20/hardware/teensy/cores/teensy3/eeprom.o obj/Debug/teensyduino20/hardware/teensy/cores/teensy3/HardwareSerial1.o obj/Debug/teensyduino20/hardware/teensy/cores/teensy3/HardwareSerial2.o obj/Debug/teensyduino20/hardware/teensy/cores/teensy3/HardwareSerial3.o obj/Debug/teensyduino20/hardware/teensy/cores/teensy3/IntervalTimer.o obj/Debug/teensyduino20/hardware/teensy/cores/teensy3/IPAddress.o obj/Debug/teensyduino20/hardware/teensy/cores/teensy3/keylayouts.o obj/Debug/teensyduino20/hardware/teensy/cores/teensy3/main.o obj/Debug/teensyduino20/hardware/teensy/cores/teensy3/math_helper.o obj/Debug/teensyduino20/hardware/teensy/cores/teensy3/mk20dx128.o obj/Debug/teensyduino20/hardware/teensy/cores/teensy3/new.o obj/Debug/teensyduino20/hardware/teensy/cores/teensy3/nonstd.o obj/Debug/teensyduino20/hardware/teensy/cores/teensy3/pins_teensy.o obj/Debug/teensyduino20/hardware/teensy/cores/teensy3/Print.o obj/Debug/teensyduino20/hardware/teensy/cores/teensy3/serial1.o obj/Debug/teensyduino20/hardware/teensy/cores/teensy3/serial2.o obj/Debug/teensyduino20/hardware/teensy/cores/teensy3/serial3.o obj/Debug/teensyduino20/hardware/teensy/cores/teensy3/Stream.o obj/Debug/teensyduino20/hardware/teensy/cores/teensy3/Tone.o obj/Debug/teensyduino20/hardware/teensy/cores/teensy3/touch.o obj/Debug/teensyduino20/hardware/teensy/cores/teensy3/usb_desc.o obj/Debug/teensyduino20/hardware/teensy/cores/teensy3/usb_dev.o obj/Debug/teensyduino20/hardware/teensy/cores/teensy3/usb_flightsim.o obj/Debug/teensyduino20/hardware/teensy/cores/teensy3/usb_inst.o obj/Debug/teensyduino20/hardware/teensy/cores/teensy3/usb_joystick.o obj/Debug/teensyduino20/hardware/teensy/cores/teensy3/usb_keyboard.o obj/Debug/teensyduino20/hardware/teensy/cores/teensy3/usb_mem.o obj/Debug/teensyduino20/hardware/teensy/cores/teensy3/usb_midi.o obj/Debug/teensyduino20/hardware/teensy/cores/teensy3/usb_mouse.o obj/Debug/teensyduino20/hardware/teensy/cores/teensy3/usb_rawhid.o obj/Debug/teensyduino20/hardware/teensy/cores/teensy3/usb_seremu.o obj/Debug/teensyduino20/hardware/teensy/cores/teensy3/usb_serial.o obj/Debug/teensyduino20/hardware/teensy/cores/teensy3/WMath.o obj/Debug/teensyduino20/hardware/teensy/cores/teensy3/WString.o obj/Debug/teensyduino20/hardware/teensy/cores/teensy3/yield.o obj/Debug/Code::Blocks/TeensyNet/main.o -Os -Wl,--gc-sections -mcpu=cortex-m4 -mthumb -Tmk20dx256.ld -s -larm_cortexM4l_math -lm
/home/jimm/teensyduino20/hardware/tools/arm-none-eabi/bin/../lib/gcc/arm-none-eabi/4.7.2/../../../../arm-none-eabi/bin/ld: BFD (PJRC Build of GNU Toolchain from CodeSourcery) 2.24 assertion fail elf32-arm.c:12387
collect2: error: ld returned 1 exit status
Process terminated with status 1 (0 minute(s), 0 second(s))
0 error(s), 0 warning(s) (0 minute(s), 0 second(s))
 
I used "arm_cortexM4L_math" for the linker library as noted in section 4 and got a "library not found" error. I then looked at the image supplied, and noted that it was "arm_cortexM4l_math".
Thanks, I fixed that!
substituting that, I got the following:
Code:
Build started on: 14-12-2014 at 13:41.58
Build ended on: 14-12-2014 at 13:41.58
-------------- Build: Debug in TeensyNet (compiler: teensyduino1.20 arm gcc)---------------
arm-none-eabi-g++ -L/home/jimm/teensyduino20/hardware/teensy/cores/teensy3 -o bin/Debug/TeensyNet.elf obj/Debug/teensyduino20/hardware/teensy/cores/teensy3/analog.o obj/Debug/teensyduino20/hardware/teensy/cores/teensy3/AudioStream.o obj/Debug/teensyduino20/hardware/teensy/cores/teensy3/avr_emulation.o obj/Debug/teensyduino20/hardware/teensy/cores/teensy3/DMAChannel.o obj/Debug/teensyduino20/hardware/teensy/cores/teensy3/eeprom.o obj/Debug/teensyduino20/hardware/teensy/cores/teensy3/HardwareSerial1.o obj/Debug/teensyduino20/hardware/teensy/cores/teensy3/HardwareSerial2.o obj/Debug/teensyduino20/hardware/teensy/cores/teensy3/HardwareSerial3.o obj/Debug/teensyduino20/hardware/teensy/cores/teensy3/IntervalTimer.o obj/Debug/teensyduino20/hardware/teensy/cores/teensy3/IPAddress.o obj/Debug/teensyduino20/hardware/teensy/cores/teensy3/keylayouts.o obj/Debug/teensyduino20/hardware/teensy/cores/teensy3/main.o obj/Debug/teensyduino20/hardware/teensy/cores/teensy3/math_helper.o obj/Debug/teensyduino20/hardware/teensy/cores/teensy3/mk20dx128.o obj/Debug/teensyduino20/hardware/teensy/cores/teensy3/new.o obj/Debug/teensyduino20/hardware/teensy/cores/teensy3/nonstd.o obj/Debug/teensyduino20/hardware/teensy/cores/teensy3/pins_teensy.o obj/Debug/teensyduino20/hardware/teensy/cores/teensy3/Print.o obj/Debug/teensyduino20/hardware/teensy/cores/teensy3/serial1.o obj/Debug/teensyduino20/hardware/teensy/cores/teensy3/serial2.o obj/Debug/teensyduino20/hardware/teensy/cores/teensy3/serial3.o obj/Debug/teensyduino20/hardware/teensy/cores/teensy3/Stream.o obj/Debug/teensyduino20/hardware/teensy/cores/teensy3/Tone.o obj/Debug/teensyduino20/hardware/teensy/cores/teensy3/touch.o obj/Debug/teensyduino20/hardware/teensy/cores/teensy3/usb_desc.o obj/Debug/teensyduino20/hardware/teensy/cores/teensy3/usb_dev.o obj/Debug/teensyduino20/hardware/teensy/cores/teensy3/usb_flightsim.o obj/Debug/teensyduino20/hardware/teensy/cores/teensy3/usb_inst.o obj/Debug/teensyduino20/hardware/teensy/cores/teensy3/usb_joystick.o obj/Debug/teensyduino20/hardware/teensy/cores/teensy3/usb_keyboard.o obj/Debug/teensyduino20/hardware/teensy/cores/teensy3/usb_mem.o obj/Debug/teensyduino20/hardware/teensy/cores/teensy3/usb_midi.o obj/Debug/teensyduino20/hardware/teensy/cores/teensy3/usb_mouse.o obj/Debug/teensyduino20/hardware/teensy/cores/teensy3/usb_rawhid.o obj/Debug/teensyduino20/hardware/teensy/cores/teensy3/usb_seremu.o obj/Debug/teensyduino20/hardware/teensy/cores/teensy3/usb_serial.o obj/Debug/teensyduino20/hardware/teensy/cores/teensy3/WMath.o obj/Debug/teensyduino20/hardware/teensy/cores/teensy3/WString.o obj/Debug/teensyduino20/hardware/teensy/cores/teensy3/yield.o obj/Debug/Code::Blocks/TeensyNet/main.o -Os -Wl,--gc-sections -mcpu=cortex-m4 -mthumb -Tmk20dx256.ld -s -larm_cortexM4l_math -lm
/home/jimm/teensyduino20/hardware/tools/arm-none-eabi/bin/../lib/gcc/arm-none-eabi/4.7.2/../../../../arm-none-eabi/bin/ld: BFD (PJRC Build of GNU Toolchain from CodeSourcery) 2.24 assertion fail elf32-arm.c:12387
collect2: error: ld returned 1 exit status
Process terminated with status 1 (0 minute(s), 0 second(s))
0 error(s), 0 warning(s) (0 minute(s), 0 second(s))

Why the -s flag in your linker command? I use the -s flag only for the compiling (not linking) the Release target. I also found this: https://sourceware.org/bugzilla/show_bug.cgi?id=16698 maybe that's what you are seeing?

I can reproduce your error message when I add the -s flag to the Release target linker options. There's something wrong with your linker settings; please post them.
 
Last edited:
It looks like the -s flag was set in the Release compiler options. There was nothing I could find in the linker settings. Removing the flag in the Release and Debug compiler options allowed the file to build to completion.
 
That doesn't quite solve the problem - we still don't know how -s made it to the linker command. I'll keep an eye on this.
 
Steve, this is not focused on C::B for any specific platform. When I created the projects for this tutorial I was running C::B on my ubuntu netbook, but I can also test the exact same things on a windows machine. I used C::B for a test project (STM32) on win7.

If you are experiencing any specific problems, please post here. That said, I'm 100% sure that it works on windows as well.
 
I deferred my effort to get C::B for teensy and/or AVR to run on Win 7... went on the tangent of the new Microsoft Visual Studio Community edition (free for personal/commercial), w/Visual Micro. That cuts the cord with Atmel Studio. VS Community/VM is a trivial bring-up but not Linux-centric (!)

But my main focus last few months is on professional work where I'm using IAR and a great low cost SWD debugger pod (just data, clock, power, simpler than JTAG), with CMSIS/HAL code. Very nice development suite. Ah flash breakpoints, oh run-time variables and watch windows, trace history at full speed. The SWD / download pod is $27 versus what I paid for a J-Link several years ago!
 
Last edited:
... I'm using IAR and a great low cost SWD debugger pod (just data, clock, power, simpler than JTAG), with CMSIS/HAL code. Very nice development suite. Ah flash breakpoints, oh run-time variables and watch windows, trace history at full speed. The SWD / download pod is $27 ...

That sounds nice ... possibly a link to this inexpensive pod?

Thanks,
David
 
Tutorials for STM32 in C::B, including debugging with SWD, will come soon. I'm just not sure if I should post them here in the teensy forum.

I might also create an external blog or add them to my hackaday projects.
 
So, it could be "ST-LINK/V2" for $20.81. It says for STM8 and STM32. But does it work also for other brands (being SWD)?
probably.. depends on the USB driver and how that is/is not compatible with the IDE of your choice - or all these pods come with a basic utility to download, upload, etc., as a stand-alone program. Several vendors make them.. notably Segger. Then too there's the open source debugger community software - OCD and its drivers.

I wonder if the Teensy 3's SWD pins (clock, data) can be accessed? The SWD needs only these signals plus reset (which is on a T3 pad on the bottom), and 3v3/GND. The latter is used for sensing, not as a power source.
 
Last edited:
SWD_DIO and SWD_CLK are on PTA3 and PTA0, respectively. Those are the same pins that are used for JTAG, as specified by ARM (http://www.arm.com/products/system-ip/debug-trace/coresight-soc-components/serial-wire-debug.php):
SWD provides an easy and risk free migration from JTAG as the two signals, SWDIO and SWCLK, are overlaid on the TMS and TCK pins, allowing for bi-modal devices that provide the other JTAG signals. These extra JTAG pins are available for other uses when in SWD mode.

Those pins are directly routed to the Mini54. No way to access them externally. It's on my wishlist for the next Teensy...
 
I added a zipped "shortcut" with a project template that's ready to use.
  • Unzip anywhere
  • Follow the instructions in the project notes. They will pop up automatically when you open the project file in Code::Blocks.
  • The zipped version differs a bit from the one outlined here, as it doesn't have debug and release targets, but teensy 3.0 and teensy 3.1 targets.
 
Last edited:
SWD_DIO and SWD_CLK are on PTA3 and PTA0, respectively. Those are the same pins that are used for JTAG, as specified by ARM (http://www.arm.com/products/system-ip/debug-trace/coresight-soc-components/serial-wire-debug.php):


Those pins are directly routed to the Mini54. No way to access them externally. It's on my wishlist for the next Teensy...

how 'bout putting that wish on the Teensy-next wish list.

Using SWD on a $30 ARM board, 1MB flash, 200K RAM, gobs of peripherals - makes it so much easier and less frustrating than working with Arduino hand tools.
 
Let me answer your wish list comment with a question....

How exactly does C::B interface with debug? Does it talk only to gdb, which then talks to device-specific software on your PC? Or does C::B interface more directly with debug software or hardware.

I do have some plans for 2015, and no, I can not discuss details at this time, but I can tell you the way these interfaces work is important.
 
For my STM32 stuff, it talks to arm-none-eabi-gdb which then talks to device-specific software (st-util from texane). There are other options, but I don't yet have a deep understanding of debugging in Code::Blocks.
 
If Teensy-next could free-up the two SWD pins for a user's debug session, it would be so great.
Also, the SWD based debuggers need to toggle the CPU reset pin. That may affect Teensy-next as well if reset gets the mini-54 in the loop.
Using SWD recently (on other than Freescale) - it is so very convenient and time-saving, and easier to wire up than JTAG.
 
Guys, quick question. I am running up against the technical limits of the Arduino IDE and since I have previous C/C++ experience in Visual Studio, was wondering if Code::Blocks would be
a good embedded environment for development and debugging.
 
Status
Not open for further replies.
Back
Top