looking for very high density LED strip

Status
Not open for further replies.

neep

Well-known member
Hi all,

after a break I'm about to embark on a new LED toy project this winter. I'd like to go for a much higher resolution this time, after having worked with W2801 a few years back on some spin props. I see great strides have been made in addressing the WS2811/2812 strips using Teensy using the OctoWS2811 library. The density of these strips can go up to a pretty amazing 144 LEDs/m from what I can find on Aliexpress these days. However I'm looking for an even higher density, as I came across these:

http://lighttoys.cz/store/led-products/visual-poi-staff/

These have 80 LEDs packed next to each other within about 45cm of length. So translated to 1m that should come at about 178 LEDs/m. Has anyone seen off-the-shelf strips being sold like this? Also, they say that these LEDs are "360 degrees" and "custom made". Does anyone know what chip is used in this toy? It could also be that they had the PCBs custom made completely, of course.
 
Last edited:
From what I can tell (I've only glanced at the site) my guess is that those are custom made PCBs. I can't find a high resolution image of the thing, but I don't see any gaps - most strips I've seen have cut points every few LEDs - so my guess is a custom-job.
 
I agree. I think I'll stick to 144 LEDs/m strips for now, then. It's already quite a mindboggling density.
 
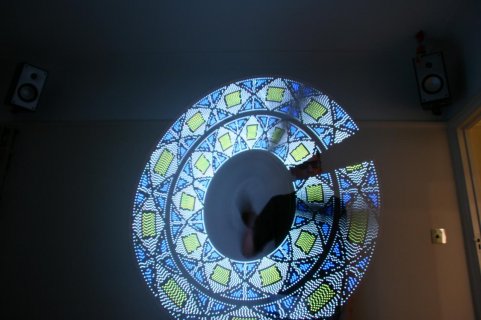
neep, don't try to use ws2811/12 for POV, it looks like a good solution, but isn't. the effect is poor. I built some to display images as pov from sd card and they were far too slow. pattern2.jpg

you can see from the image that the ws2811 used here give a very noticeable speckled effect. and this was a t a pretty slow rotation sped, and with optimised code.

For info, this was using the 144led/m strips, so this is the sort of coverage you could expect from the apa strips.

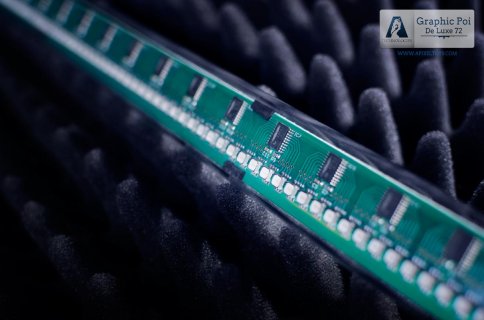
The light toys / pyroterra etc, all use custom pcbs and so far the close up images online have had the chip number scratched out.
this is an image for Apixel poigraphicpoiclosup.jpg


m
 
Last edited:
Interesting.

How warm do these dense POV's get under heavy use? I wonder at what point the LEDs would benefit significantly if the PCB substrate was switched from FR4 to Aluminum. I've seen such substrates used in high intensity LED lamps, in conjunction with fairly massive external heat sinks.

The good news is that Asian PCB suppliers are already offering Al-based substrates to hobbyists, though at a premium.
 
Last edited:
I'm also interested in the heat they produce, as this will have to go into a tight space. I'd have to read up on the power intake specs to make a calculation. I don't intend to run these on full power most of the time though. When using LED toys it's usually nicer to run at only 30% max capacity or so, as they are usually used at night and it's not so nice to blind yourself and others at parties :)
 
I'm also interested in the heat they produce, as this will have to go into a tight space.

there wasn't any issue with the heat being produced from the leds. These were used back to back with a strip of polycarb between, as the viewing angle was such that in performances there was no discernible loss of image to the audience. In the top image I posted, you can see where the poi twists it goes a little darker, so that gives an impression of the viewing angle of the 5050.

The led strips were housed in polycarb tube, with sealed ends, so a tight confined space, and no heat related issues occurred.

m
 
Right, so if that's true for 144 LED/m WS2812, then I would expect the APA102 in the same density to do better as far as heat goes.

https://cpldcpu.wordpress.com/2014/08/27/apa102/ says:

"The APA102C comes in a package very similar to the WS2812, while the APA102 comes in a package with an increased metallization area to improve heat conduction. The APA102 is more expensive, possibly owed to the more complicated package."

"In summary, the APA102 show significant promise compared to the de-facto standard WS2812:

They can be controlled with a standard SPI interface. No critical timing required and much faster than the one wire protocol.
They have an extremely high PWM frequency, allowing flicker-free POV applications.
They are available in a special package with better heat sinking."

It sounds like this is The One.
 
Yes, these LEDs sound spot on. I would have liked to have had these available a couple of years ago. They would have been my first choice for experimenting. Lightweight, little soldering required, easy to use format, good brightness, fast update of data, library available ( although I have not looked into that, but you say there is), reasonable price.
 
Neep, please post some image up once you have set up the apa102 strips. It will be good to see what they can do. For guidance on rotation speeds, we used a 0.5 sec per rotation timing as we did not use a Hall effect sensor or gyro, keeping it very simple. 0.5 sec equates to 120bpm which is the performance music tempo. I guess that you will be using gyro input however.
 
I certainly will report back here. I've ordered a 1m strip yesterday from Ray Wu:

http://www.aliexpress.com/item/2m-D...ED-M-with-144pixels-WHITE-PCB/1906733120.html

This should show up at my door within a month or so, hopefully. I also wish I had this 2 years ago, but that's how it goes. I had a good prototype run with the 2801 strips. I now also have new ideas and possibilities on constructing a better casing for my toys which will make prototyping much faster and better.

The rotation numbers will come in handy, thanks. Doing POV with poi or a large staff will probably always work better than the relatively short double staffs that I make as that is my preferred spinning tool. I also want to do programmable hoops, but what has always been the drawback there is the size of the computer. Even a Teensy just doesn't fit inside the ~16mm available within the polypro tubing that I prefer. I ordered a pair of programmable hoops using that size recently to study them. Not cheap, but should be a lot of fun to play with.
 
Regarding heat, just beware, the one with the larger heatsink is APA102 and the normal one is APA102C although on aliexpress apa102c is often labeled as apa102. The ones you ordered are the regular kind. (I'm pretty sure it'll be fine though)
 
I got the 1m APA102 strip delivered a few days ago. Haven't hooked them up yet but excited about doing so. I will post the result here as soon as I have any.
 
Here a short success story connecting an APA102 strip to a Teensy 3.1.

I ordered the following two components for my Teensy 3.1:

* 1m digital LED Strip APA102 144LEDs/m Adalight Ambi-TV IP65 black
* switching power supply 60 W, 12 A, 5 V

Hardware setup

The LED Strip comes with a 4 pole JSTSM Connector and 2 extra wires.
The connection scheme was as follows:

Connector
BLK --> GND (PIN 1)
YE --> CLK
GN --> DAT
RD --> Vcc

Extra wires
BLK --> GND
RD --> Vcc

Please be aware, that the colors could change.
The two extra wires are there for convenience only.

I connected the two extra wires to the power supply.
I futher connected the connector pins as follows to the Teensy 3.1:

CONNECTOR PIN1 (GND) --> Teensy GND
CONNECTOR PIN2 (CLK) --> Teensy 13
CONNECTOR PIN3 (DAT) --> Teensy 11
CONNECTOR PIN4 (Vcc) {not connected}

Helpful links:
https://www.pjrc.com/teensy/pinout.html
https://www.pjrc.com/teensy/td_libs_SPI.html

Hardware setup done !

Software setup

I use Teensy 3.1 with Arduino 1.06, Visual Studio, VisualMicro, teensyduino 1.21 (test version).

I used the the FastLED library Version 3.03.
Details are here:
http://fastled.io
Library download is here:
https://github.com/FastLED/FastLED

The library is impressive and uses C++ Templates a lot.

To properly control the APA102 LED strip the following line has to be present in setup:

Code:
FASTLED.ADDLEDS<APA102, 11, 13, BGR, DATA_RATE_MHZ(12)>(LEDS, NUM_LEDS);

where 11 is the DATA_PIN and 12 is the CLOCK_PIN.

Comment out the original configuration found in the example sketch starting with "FASTLED.ADDLEDS ..."
Please note, that this is the only line in the examples you have to adjust.

Now you can start to compile the example sketches shipped with the FastLED library using the configuration above.
The examples compile without errors / warnings and run after download to Teensy 3.1 nicely.

Another nice example using the FastLED library can be found here:
https://gist.github.com/kasperkamperman

This appears to be a good starting point for further experiments.
Andreas
 
Thanks Andreas. I think your code needs to be written like this, though:

Code:
FastLED.addLeds<APA102, 11, 13, BGR>(leds, NUM_LEDS);

At first I couldn't get any of the FastLED lib to compile but then realized I had to upgrade to 1.0.6/1.20 from 1.0.5/1.16.

Then the example code ran fine. Here is the result:

https://www.youtube.com/watch?v=iYvfNlGYCkQ&feature=youtu.be

I was pulling around half an amp at 5V for most of the test patterns.

I'm very excited about this stuff. Haven't done any high speed / POV tests yet, but intend to do so. Send me code if you want me to try something out and make a photo/video.
 
Last edited:
Adafruit is selling led strips based on the apa102 chip that they are calling DOTSTARs.
https://www.adafruit.com/categories/340
The highest density they sell is 144 per meter. They do sell the individual pixels so you could make your own strip but not sure your going to get much denser.

Edit: I read the data sheet on adafruit and the pixels are 5x5 mm so if you butt them up you could get really dense. Power and Ground would get a little tricky if too close.
 
Last edited:
Excuse my ignorance if its very obvious to others but arent the Teensy's outputs at 3.3V and these LEDs need 5V signals to work properly?
It is my understanding that you would need something like https://www.adafruit.com/product/1787 to get voltages strong enough for the strip of LEDs.
 
...arent the Teensy's outputs at 3.3V and these LEDs need 5V signals to work properly?...
Yes, and no. Yes it is 3.3v output, but you don't necessarily need to bump up the data signal. It really depend on a few things, like the length of cabling, the number of leds, the voltage difference between the +ve for the leds and the data signal. We have plenty of robustly performing kit not using logic level converters. It all depends...
 
@dannlank, that looks great, any chance of a still image of the rotation? would like to see how it compares RE other leds and that speckled effect. A still image is also useful to remove video artefacts.
Also, are you using const arrays or feeding images from sd card?
What refresh rate are you using - i.e. - is this feeding data as it comes in or are you throttling via delay()?

also, no level logic converter, which is interestingly good news. We have not been using logic level converters on our kit, and for small led numbers this seems reasonable.
 
Last edited:
Sure, I'll post some still images here in a bit. The problem I have with video or still images is that the leds tend to wash out to white in the image much above a brightness of 60 or so using FastLED.setBrightness. In the video, I've cranked the brightness down to just above where it cuts out completely. I will talk to a photographer friend to see what settings I should use on the camera.

I am using const arrays in SRAM at this point. SD cards would be the next logical step, or perhaps I could get smarter on the bluetooth app and send the image data that way. I wrote a little .Net application that parses bitmaps into byte arrays. When I get a spare minute I'd like to look into optimizing the array used to store these bitmaps. It's pretty bulky at 4 bytes per pixel!

The refresh rate is variable and throttled via delay. The default is 5ms, but this can be changed on the fly. This project uses an HC-05 bluetooth module and an android app built using MIT's App Inventor to control brightness and delay. There is a third setting I called intermission which controls the delay in the loop between intervals of rendering the image.

All of the code is in Thingiverse. There is a vast amount of room for improvement. I doubt I will have much time to revisit in the next month or so.
 
Re MIT app inventor, yes I also use this for simple android to teensy comms. Its a great tool. There is a thread on the forum regarding writing arrays to SD card for use with led setup, and I have also put some code up for using bitmaps from SD cards writing to POV poi, taking one row of the bitmap at a time. It pretty straight forward once you get your head around bitmap orientation.
 
Status
Not open for further replies.
Back
Top