7 inch TFT - Capacitive Touch Application Help Needed

Status
Not open for further replies.

balistreri.nick

Active member
Hello,

I am NEW to using the Teensy 3.1, and also the Arduino, so "be gentle" with me if I ask
really stupid questions.

Ok, I bought the Teensy 3.1 because I discovered it by accident researching information
for my usual 8051 projects.

I am interested in connecting a 7 inch TFT LCD display with a capacitive touch panel also.
I tentatively found a reasonably priced LCD display that had i2c and SPI functionality.

Click here..
http://www.buydisplay.com/default/7-inch-lcd-module-capacitive-touch-screen-panel-i2c-spi-serial

I've seen the following Color 320x240 TFT Display, with ILI9341 Controller Chip at the PJRC store
but I am not sure what libraries would work with the 7 inch display above.
https://www.pjrc.com/store/display_ili9341.html

Any help would be GREAT !!
 
For starters: the display that you bought use a different controller than the library that you linked.

that 7 inch display uses the RA8875, you can see that on the specification of the display. The 320x240 uses the ili9341 (that is why the name of the library is ili9341).

You need to use a RA8875 to get your screen working....

I found two libraries, I don't think they will be optimized for the Teensy. Test this one https://github.com/sumotoy/RA8875 and this one https://github.com/adafruit/Adafruit_RA8875
 
Thank you for your reply..

We have not actually purchased the 7 inch LCD I provided the link for because we were not sure it would work yet.

Question: Do you know of any 7 inch TFT LCD's with capacitive touch panels that are compatible with the ili9341 library?

Could you or anyone else recommend an LCD that has been tested with the Teensy 3.1?
 
Question: Do you know of any 7 inch TFT LCD's with capacitive touch panels that are compatible with the ili9341 library?
I don't think exists! ILI9341 it's for 2.2" mainly, I don't have datasheet but I don't think it's able to drive such large screens!
The only 7 inch I've seen around are RA8875 (4 wires plus 3 for Touch and int) or SED (16 bit plus several wires more, together with I2C for the capacitive touch will leave you with almost no port left).
 
Last edited:
the ili9341 chip is not powerful enough to drive a 7 inch display....

If you open the first link, the guy tested the library with teensy and the resistive version of the display that you want to use....

The capacitive controller chip is the FT5206, there are few libraries out there....

In summary.. the display will work, and is most likely that the capacitive IC will also work read this so you are aware of the library limitations.....
 
Hey everybody, thank you all for your patience and assistance.

Based on your replies, the 7 inch LCD we found "should" work, uses RA8875 controller, and there are at least (2) libraries which "should" work, but may need
to be optimized, or tweaked for the Teensy 3.1.
https://github.com/sumotoy/RA8875
https://github.com/adafruit/Adafruit_RA8875

Regarding the capacitive touch panel, the product in question uses the FT5206 controller and there "should" be libraries for that, once I dig deeper.

This is GREAT and I am sure I will be able to get this working.
If and when I do get it working, I will post any updates here for anyone else who may run into this in the future..

Thanks again everyone..
 
Hey Guys,

So far so good..
Since I'm new to Arduino and the Teensy, I'm a little confused about how to install the libraries
that you all have so kindly provided links for.

Also, once I have the libraries installed, the manufacturer of the TFT display has provided arduino
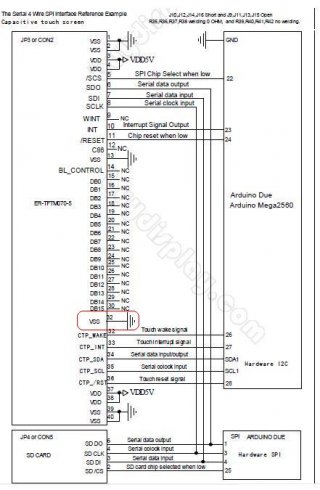
interface schematics including I2C and SPI interfaces. (See PDF link below)
http://www.buydisplay.com/arduino/ER-TFTM070-5_Arduino_Interfacing.pdf

The final question has to do with which interface method would work best, SPI, I2C, etc, and
how to configure the Tennsy and use the libraries?

I apologize for my ignorance.
 
Thank you very much for the advice.
I was able to install the drivers and I am working out the SPI connections with the manufacturers spec's.

Thanks again...
 
Hell Sumotoy,

Thank you for all the assistance.
I am trying to duplicate your test results using the East Rising 7 inch TFT LCD (ER-TFTM070-5)
and connecting it to a Teensy 3.1.

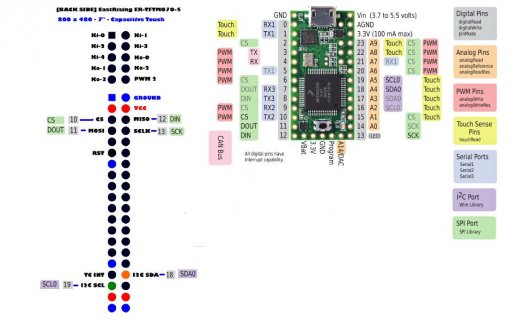
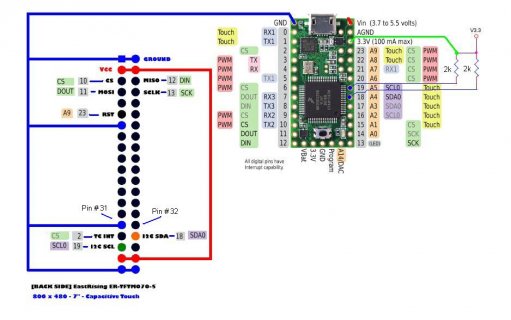
I have attached a JPG drawing that shows the connection diagram I am having trouble understanding.
I believe I have the SPI pins mapped correctly except I have a couple of pins on the LCD that I am not
sure where to connect on the Teensy 3.1 board. (See Below and attached)

ER-TFTM070-5 - Teensy 3.1
(5) CS - (10) CS
(6) MISO - (12) DIN
(7) MOSI - (11) DOUT
(8) SCLK - (13) SCK
(11) RST - ???

(33) TC INT - (18) SDA0
(34) I2C SDA - (19) SCL0
(35) I2C SCL - ???


https://github.com/sumotoy/RA8875/wiki/EastRising-and-Buydisplay-SPI-configuration-and-wiring

Schematic Teensy 3.1 &.JPG
 
Sumotoy,

I also found on you link below that you had trouble using the SD CARD that is built into the ER-TFTM070-5 LCD?
https://github.com/sumotoy/RA8875/wiki/EastRising-and-Buydisplay-SPI-configuration-and-wiring

I "really" need to use this SD CARD for my project so I can save IMAGE files and display them on the LCD.
Is there any way I can get the SD CARD working? Remove

JP4
NOTE: This SD holder has useless resistors and capacitors, it will not work with fast CPU and can create problems with SPI bus due capacitors, i STRONGLY suggest you forget it!!!!

1: -NC-
2: CS
3: MOSI
4: SCLK
5: GROUND
6: MISO
7: -NC-
8: Card Detection (optional)

HELP !!!
I "really" need to use this SD CARD for my project so I can save IMAGE files and display them on the LCD.
Is there any way I can get the SD CARD working? Remove the resistors and capacitors?
 
The SD holder mounted on buydisplay will not work, you can get working at incredible low SPI speed but sincerily I never get really working, they mounted capacitors, series resistors and prolly pullups.
Also, the RA8875 works in SPImode3, SD works in SPImode1.
To get an SD work you should isolate the RA8875 with the circuit I described in github wiki, get a quality SD holder (like the one mounted in the PJRC audio board) and mount very near Teensy (or you can use the SD card holder homemade adaptor described here .
But you have to isolate the RA8875 wiith a small circuit described here or it will not work!
Just a note, the RA8875 it's not the best chip to send images, it's extremely fast driving his accellerated geometric primitives, internal fonts, etc, etc. but receiving pixels it's a slow business.
The best way I found it's send an entire line, better than one pixel a time but still not efficent, I'm actually cannot find another way in datasheet, so don't expect to read large images in less a second on a 800x480 display, it will take not less than 3 secs using the max SPI speed and a SDholder very near to Teensy with a high speed SD card.
It's extremely important you put the SD card very near Teensy with the shotest wires you can.
There's an 2 examples that uses SDfat and the new Paul modified SD library optimized for Teensy in the library, both working.

The RA8875 has a separate SPI that can drive internally (very fast and using DMA) a SPI flash chip, it looks promising but it's a bit complicated since you have to program SPI Flash chip separately, I will test this option in near future since the library already support that.

About the RA8875 library...
The library can use any permitted Teensy 3.0,3.1 and LC configuration, it's compatible with the PJRC Audio Card and it's SPI Transaction compatible, it works well with the new SD optimized for Teensy library by Paul. Datasheet on hand the RA8875 has a SPI limit of 12Mhz but (after weeks of testing) actually I'm driving it at 22Mhz without problems by modulating SPI speed on some register so when you work with that SPI speed you always have to use short cables and good decoupling, it can work with a good quality breadboard but use always short cables and be sure contact it's good.

About the FT5206..
The RA8875 library already support it internally, don't need an external FT5206 library, just go to RA8875UserSettings.h file and uncomment #define USE_FT5206_TOUCH.
Chech the examples->_capacitiveTouchScreen->FT5206_touchScreen.ino example.


About wiring...
It's correct, but you missed the TC_INT pin for the Touch screen (try pin 2) and you MUST use 2 pullup resistors on SDA and SCL (2 x 2k2 resistors between each I2C line and 3V3).
Note that ER-TFTM070-5 uses a lot of current for backlight, you will need a separate supply! In that case you need to wire the RST pin as well (any free Teensy pin should work).
Some user configured ER-TFTM070-5 at 5V and they are able to drive it by 5v from Teensy but you can easily get garbage on screen because the voltage should be at list 4.8V and stable, not less.
If you have set ER-TFTM070-5 at 3V3 volt DO NOT SUPPLY with Teensy 3V3 out or you will destroy your Teensy!
 
Last edited:
Hello Sumotoy,

Thank you for all the helpful information.
In my project I need a 7 inch LCD with a capacitive touchscreen and an SD card to save images to be displayed.

I am wondering if maybe I selected the wrong LCD for my application?
Could you recommend any 7 inch LCD's that would work better to load images saved on an SD card?
 
Hello Sumotoy,

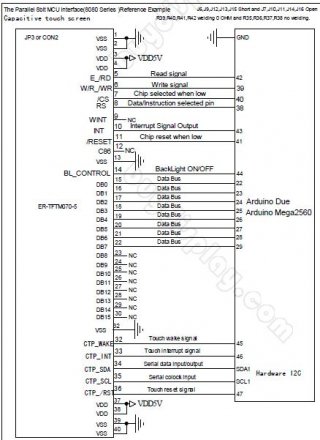
The manufacturer "East Rising" has several wiring diagrams for the Arduino and I have attached
the 8-bit wiring diagram to this.

Do you think connecting the ER-TFTM070-5 LCD to the Teensy 3.1 using the 8-Bit method would
display image files fast enough for my project? I would have to use a separate SD card as you suggested,
however, since the LCD is not using SPI, then I may not need to isolate the SPI?

ER-TFTM070-5 - 8-Bit Wiring Arduino.JPG
 
My library only support SPI connection with RA8875, I do not support any other method.
I don't think you will get much better results with 8 bit parallel mode, probably 16 bit mode it's a bit better but both are a waste of pin to me.
The reason it's simple, the RA8875 chip it's like a microcontroller, you send a command and you have to wait it finish it so you are forced to polling it's busy port or use an INT for that.
Sending data faster it will not help for images, the bottleneck it's the lack of a RA8875 macro for that.
The RA8875 it's a great controller, actually it's the only one that uses very tiny microcontroller resources (you can use a 800x480 16bit color display with 5 concurrent touches, actually impossible with any other display).
If you are cool with 3-4 sec loding time, you ca use it, or better try the internal SPI flash method that I never tested but should work, on-paper it can transfer images by using internal RA8875 DMA very fast.
To get faster speed you need to go to SSD series chip, they work with 16bit data so use a lot of pins but they can work as frame buffer so sending pixel data it's a fast business.
In contrast you will use a lot of microcontroller resources (and RAM), remember you are using a tiny microcontroller not a CPU with 1 or 2 gig ram like raspberry.
 
If the price it's not a problem there's alternatives that use a complete graphic subsystem (with SD card support) that you can drive by SPI or serial , but they cost a lot!
 
Hi Sumotoy,

You mentioned the following...

In that case you need to wire the RST pin as well (any free Teensy pin should work).

Once I assign a Teensy pin to the RST, how is that implemented in code?
 
Hello Sumoty,

GOOD NEWS !!! I got the hardware wired up and it appears to be working.

I did get several error messages when compiling the EXAMPLE called "FT5206_touchScreen.ino" which is located
in the folder called "_Teensy3" & "_capacitiveTouchScreen", which should be configured foir the Teesny 3.1 board.

The libraries are installed correctly, however, I am getting several compiler errors that I do not understand.

NOTE: Compiles OK on my alternate Windows XP system, having errors on Windows 8.1 laptop.
See error messages below..

Example folder
C:\Program Files (x86)\Arduino\libraries\RA8875-0.70\Examples\_Teensy3\_capacitiveTouchScreen\FT5206_touchScreen

Arduino: 1.6.4 (Windows 8.1), TD: 1.23, Board: "Arduino Uno" *** Not Sure why this sketch ID's for Arduino UNO ??? ***

Build options changed, rebuilding all

C:\Program Files (x86)\Arduino\libraries\RA8875-0.70\RA8875.cpp: In member function 'void RA8875::setFont(const tFont*)':
C:\Program Files (x86)\Arduino\libraries\RA8875-0.70\RA8875.cpp:1306:80: error: 'PROGMEM_read' was not declared in this scope
_spaceCharWidth = PROGMEM_read(&_currentFont->chars[temp].image->image_width);
^
C:\Program Files (x86)\Arduino\libraries\RA8875-0.70\RA8875.cpp: In member function 'void RA8875::_charWriteR(char, uint8_t, uint8_t, uint8_t, uint16_t, uint16_t)':
C:\Program Files (x86)\Arduino\libraries\RA8875-0.70\RA8875.cpp:1922:76: error: 'PROGMEM_read' was not declared in this scope
charW = PROGMEM_read(&_currentFont->chars[charIndex].image->image_width);
^
C:\Program Files (x86)\Arduino\libraries\RA8875-0.70\RA8875.cpp: In member function 'int16_t RA8875::_STRlen_helper(const char*, uint16_t)':
C:\Program Files (x86)\Arduino\libraries\RA8875-0.70\RA8875.cpp:2043:80: error: 'PROGMEM_read' was not declared in this scope
totW += (PROGMEM_read(&_currentFont->chars[charIndex].image->image_width));
^
C:\Program Files (x86)\Arduino\libraries\RA8875-0.70\RA8875.cpp: In member function 'void RA8875::_drawChar_unc(int16_t, int16_t, int16_t, const uint8_t*, uint16_t, uint16_t)':
C:\Program Files (x86)\Arduino\libraries\RA8875-0.70\RA8875.cpp:2078:34: error: 'PROGMEM_read' was not declared in this scope
line = PROGMEM_read(&*data++);
^
Error compiling.

This report would have more information with
"Show verbose output during compilation"
enabled in File > Preferences.
 
Last edited:
download the latest version of the library.
Also, you are compiling for UNO! This error was present before last version for 8Bit CPU
 
Hi Sumotoy...

I got the project working, for the most part, just a few odd things going on.
I have attached a few image files to this that are confusing.

1. The manufacturers spec's show Pin # 32 on the ER-TFTM070-5 LCD should go to GROUND
however, on the pin assignments on your GITHUB page, it looks like pin # 31 is connected to GROUND
I connected my project using pin # 32 to ground and it works.
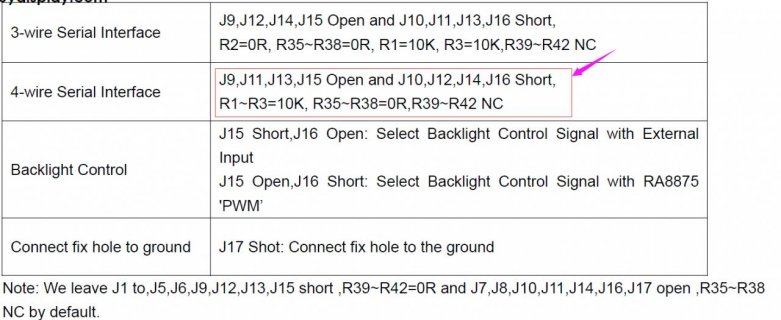
2. I contacted the manufacturer for more information about the jumper settings needed for the SPI 4-Wire
and they sent me the attached document with suggested jumpers and resistor values. I followed their
recommendations.
3. I figured out what was wrong with the compiler errors, my fault and thank you to everyone with the helpful
suggestions.

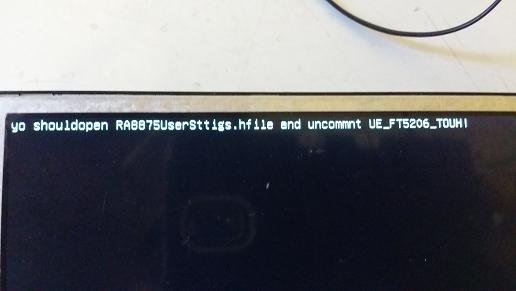
UPDATE: At this point I get the LCD to power up and display the following message.
"yo should open RA8875userstiggs.h fileand uncommnt UE_FT5206_TOUH" ????

See Snapshot below...
20150724_134905.jpg

Finally, I am powering the LCD externally with a 5vdc 1.0amp power adapter and connecting the Teensy 3.1
over USB. There seems to be a RESET issue and I cannot get the project to RESET properly unless I plug the
LCD 5vdc FIRST, and then, connect the Teensy 3.1 into USB, and then compile and download the Arduino Sketch
which seems to RESET the Teensy 3.1 properly and the LCD comes up with the error message mentioned above.

By the way Sumotoy, thank you VERY MUCH for all your great advice and your GITHUB page which has got me this far.

INTERFACE SETTING.jpgSchematic Teensy 3.1 &.JPGTFT.JPG
 
Hi,
All the grounds are connected together on the pcb so if you missed one or 2 nothing change, I've experienced this in my tests.
Same thing about the VCC lines, you can connect just the 1+2 for ground and 3+4 for VCC and ignore all the rest.
About the powerup sequence... It's normal that you power up the LCD first! The Teensy has to be able to initialize the display when it power ups but LCD it's not on, Teensy will start to initialize...nothing.
One solution it's power up both with the same supply.
I strongly suggest (in that case) to use always the RST pin, the RA8875 get ready sooner that Teensy and Teensy it's still able to reset it and initialize correctly.
About 7" supply (and why it needs a separate supply), the 7" model has a backlight that suck a lot of current, too much for any USB. I have a PC that is able to give more than 500mA on USB but I have noticed some garbage on screen from time to time, this was caused by the supply voltage that was not stable and modulate from 4.90V to 4.45V, setting brightness to 150 stabilized to 4.80V.
On Eastrising boards (and Adafruit) the backlight it's handled internally by RA8875 using an internal PWM generator and this is why (if RA8875 it's not correctly inited) it appears completely black with no apparent life, in contrast with other displays where you get the backlight on (at list) but thanks to this you can setup your display to consume less power by adding brightness(nnn) after initialization, I was able to supply this large 7" beast with a battery by using 150, 120 value.
Sorry for the horrible english of the message, I fix it in a min. This message appears when you open the capacitive touch screen example and your library it's not configured for that.
You should open: RA8875->_settings->RA8875UserSettings.h with a text editor and uncomment //#define USE_FT5206_TOUCH.
This tells library to include the FT5206 routines that handles capacitive touch screen. The 7" screen uses an external FT5206 chip as capacitive touch but RA8875 handles only resistive touch internally so this command enables the correct routines.

The RA8875UserSettings.h contains a lot user defines, this is necessary for tune the library in relations your needs. You will notice that once enabled #define USE_FT5206_TOUCH many examples will give you an error caused by the FT5206 routines that needs the wire.h to be included.
So if you got an error, just put #include <Wire.h> in the top of your sketch.

Post Note...
The strange message you got was caused by bad LCD initialization since the message on sketch it's correct. Please check the lenght of your wires and supply voltage during all initialization so see if change...
Also, if you have ANY SPI devices connected that share part of the RA8875 SPI lines, please disconnect.
 
Last edited:
Status
Not open for further replies.
Back
Top