Teensy 3.2 Teensyduino Tutorial #3

Status
Not open for further replies.

Geezer

Member
Just got my Teensy 3.2 yesterday and excited to have it work quickly (not like the horrendous experience with the Arduino Nano's which I've never yet been able to load a sketch on). Breezed through Tutorials 1 & 2 with only a slight delay learning how to hold the reset button for a bit before letting go. Been reading the Teensy forums all morning and this looks like good stuff!

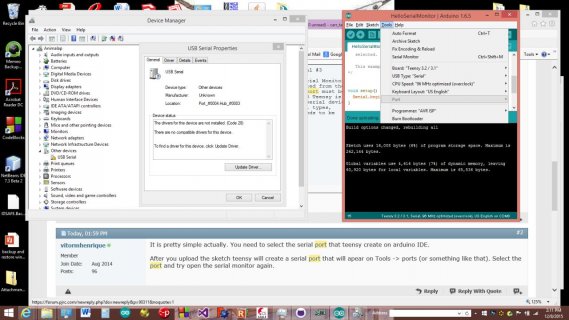
Perhaps, as a complete Noob, someone can explain to me why I can't get the Teensyduino Tutorial #3 (Serial Hello World) to work. Per instructions, I have copied the code from the example below. I get the load into the Teensy, unplug it and plug it in again (with the associated Windows sound that a USB device has been inserted) to ensure the sketch is running. But when I try to open the Serial Window in the Arduino IDE, I get the error, "no serial port name defined". Interestingly, and probably related, there is no option under "Tools" to choose a COM port. Device Manager shows:
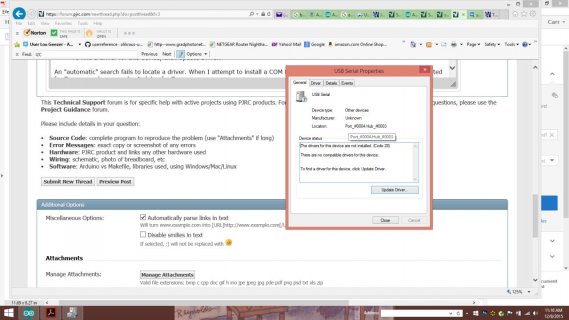
USB Driver error.jpg
The drivers for this device are not installed. (Code 28)
There are no compatible drivers for this device.

To find a driver for this device, click Update Driver.​

An "automatic" search fails to locate a driver. When I attempt to install a COM Port driver from existing drivers, there are none listed for Teensy, and none under Arduino for Teensy.

What am I missing?

PS, as a suggestion, I notice no mention of this Noobie error in the Tutorial #3 writeup http://www.pjrc.com/teensy/tutorial3.html. Also, in the Bootloader page, http://www.pjrc.com/teensy/jump_to_bootloader.html perhaps info on the 3.2 could be added? The markings on mine do not match anything listed on these various releases.

The Tutorial #3 code:
Code:
/* Serial Monitor Example, Teensyduino Tutorial #3
   [URL]http://www.pjrc.com/teensy/tutorial3.html[/URL]
   After uploading this to your board, use Serial Monitor
   to view the message.  When Serial is selected from the
   Tools > USB Type menu, the correct serial port must be
   selected from the Tools > Serial Port AFTER Teensy is
   running this code.  Teensy only becomes a serial device
   while this code is running!  For non-Serial types,
   the Serial port is emulated, so no port needs to be
   selected.
   This example code is in the public domain.
*/

void setup()   {                
  Serial.begin(38400);
}
void loop()                     
{
  Serial.println("Hello World");
  delay(1000);
}
 
It is pretty simple actually. You need to select the serial port that teensy create on arduino IDE.

After you upload the sketch teensy will create a serial port that will apear on Tools -> ports (or something like that). Select the port and try open the serial monitor again.
 
It is pretty simple actually. You need to select the serial port that teensy create on arduino IDE.

After you upload the sketch teensy will create a serial port that will apear on Tools -> ports (or something like that). Select the port and try open the serial monitor again.
USB Driver error 2.jpg
Thank you for the quick response. The problem is, the IDE Tools -> Port is still grey'ed out -- there are no ports to choose from. Windows Device Manager seems to confirm this by showing only one USB port and that not configured. I have verified I am correctly uploading code by changing speed on the Blink example. From this, I assume I am uploading the Tutorial #3 code correctly. Since the port appears not to exist, I assume the code is not running on the Teensy. Pushes of the Teensy's button and unplugging / reinserting the USB cable both yield Windows noises that USB was removed / reinserted, but no port visibility.

BTW, in view of Win10 issues, I should confirm this is Windows 8.1, 64 bit if that might matter.

I am still working on expanding my knowledge of, and applications for, the Teensy product. But the serial interface has me stumped at this point. Code follows:
Code:
/* Serial Monitor Example, Teensyduino Tutorial #3
   [URL]http://www.pjrc.com/teensy/tutorial3.html[/URL]
   After uploading this to your board, use Serial Monitor
   to view the message.  When Serial is selected from the
   Tools > USB Type menu, the correct serial port must be
   selected from the Tools > Serial Port AFTER Teensy is
   running this code.  Teensy only becomes a serial device
   while this code is running!  For non-Serial types,
   the Serial port is emulated, so no port needs to be
   selected.
   This example code is in the public domain.
*/

void setup()   {                
  Serial.begin(38400);
}
void loop()                     
{
  Serial.println("Hello World");
  delay(1000);
}
 
I think this is simillar to this thread

Just to make sure that teensy is runing you code do upload this sketch, it should blink the led while printing hello world to the serial. If you see the led blinking that meens that your computer is not finding the drives for teensy, that is strange, the work around is to try Paul recomendations on the link that I sent.

Code:
const int ledPin = 13;

void setup()
{ 
Serial.begin(38400);
pinMode(ledPin, OUTPUT);
}

void loop() 
{
Serial.println("Hello World");
digitalWrite(ledPin, HIGH); // set the LED on
delay(300); // wait for a second
digitalWrite(ledPin, LOW); // set the LED off
delay(300); // wait for a second
}
 
Last edited:
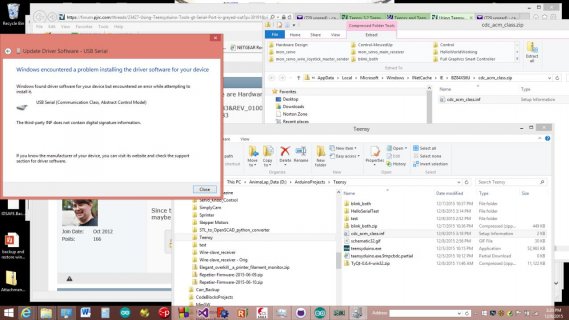
Outstanding! Were getting closer. The thread you highlighted above does seem very similar. And I, too, am not a Windows expert. (Like my profile says, I eschew anything with an OS.) However, perhaps I can find registry cleaner products to do the trick. Meanwhile, here is the result of attempting (unsuccessfully) to install that INF:
USB Driver error 3.jpg
 
UPDATE: please read Paul's comment below, this step should not be needed, despite it might work for you.

Try the following:

Go to Start - Then Command Prompt
Enter command "shutdown /r /o /f /t 00"
Click the "OK" button
System will restart to a "Choose an option" screen
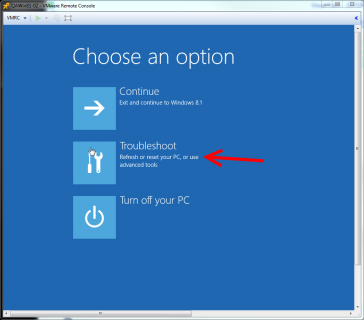
Then select "Troubleshoot" from "Choose an option" screen
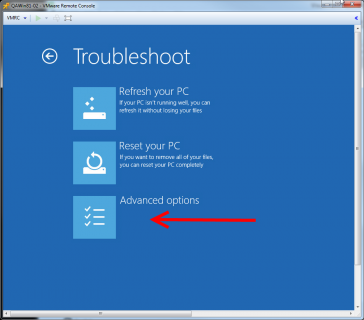
Then select "Advanced options" from "Troubleshoot" screen
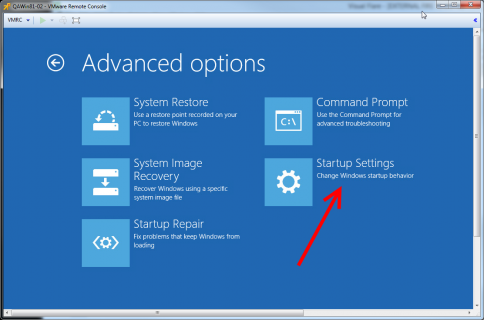
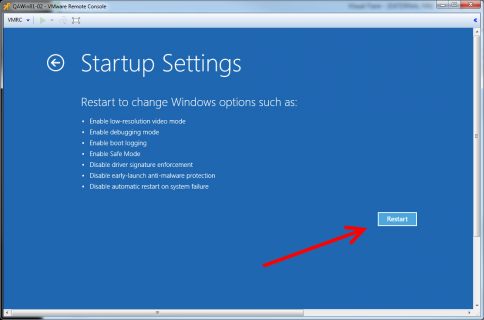
Then select "Windows Startup Settings" from "Advanced options" screen
Click "Restart" button
System will restart to "Advanced Boot Options" screen
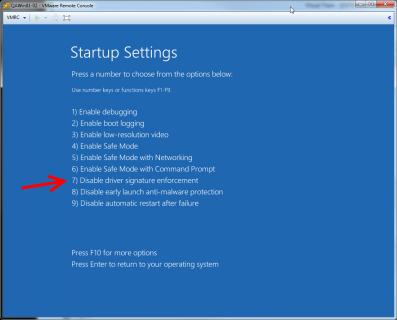
Select "Disable Driver Signature Enforcement"
Restart & install drivers...

Got this info here
 
Last edited:
Moderator edit: The Teensyduino installer has a signed INF. You should not need to disable driver signature enforcement.

Took few screenshots using a virtual machine.

1.png2.png3.png4.png5.png
 
Try the following:

Select "Disable Driver Signature Enforcement"
Restart & install drivers...
AWESOME! That worked!
Where's that button to vote for Karma points?! Thanks so much, both for the help, and for proving what a good idea it is, in general, to stay away from anything with an OS!
 
is Teensy printing on serial monitor?

Yes! I was able to load, flash, edit and reload that sketch you sent, and after changing the Windows troubleshooting settings to ignore the driver signature, the USB INF file loaded, the port appeared, and the serial monitor message shows up with the flashing LED.

Now it's on to dealing with 3.3V without risking overloading the onboard regulator, and how to bring out the bottom pads to a breadboard.... Those challenges I can handle.

Thanks again for your help!
 
hey Paul, maybe that happened because he downloaded an old version of the INF file that I linked through an old thread that you posted, could it be? If so what do you think about providing an updated INF file available for download in case something like this happens.
 
You're not supposed to have to do this unsigned driver step!

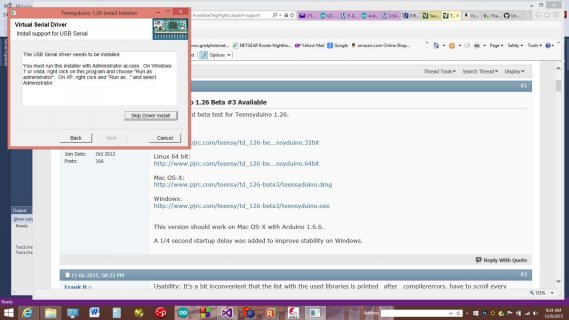
@Paul, I think this is where I got in trouble, trying to upgrade to the latest 1.26. For some (unknown) reason, the (Windows 8.1) install did not give me the option to properly install the driver. Now that I went through all those hoops to get it working, I'm not sure I want to! ("it works, don't fix it....) What do you think?
USB Driver error 4.jpg
Appreciate your responsiveness. I've a long history of dealing with Customer Support. You're good!
 
Status
Not open for further replies.
Back
Top