Is it possible to reconfigure joystick + button code to use pins out of order?

Status
Not open for further replies.

Drambit

Active member
I'm building an arcade stick, and I found it easier to solder wires to each side of the Teensy, so although I have only 16 switches and I am actually within the reaches of the software, the pins I'm using are 0, 1, 2, 3, 12, 13, 14, 15, 16, 17, 18, 19, 20, 21, and ground.

The example code is written to take pins 0-16 in linear order (I think, I'm still new to this.)

const int numButtons = 16; // 16 for Teensy, 32 for Teensy++

void setup() {
// you can print to the serial monitor while the joystick is active!
Serial.begin(9600);
// configure the joystick to manual send mode. This gives precise
// control over when the computer receives updates, but it does
// require you to manually call Joystick.send_now().
Joystick.useManualSend(true);
for (int i=0; i<numButtons; i++) {
pinMode(i, INPUT_PULLUP);

Is there any way to change the code to take 16 pins in completely random order without having to rewire the board?
 
The way you do it is you have a const array that gives the pin number.

I.e. instead of:
Code:
void setup () {
  Joystick.useManualSend(true);
  for (int i = 0; i < numButtons; i++) {
    pinMode (i, INPUT_PULLUP);
  }
}

You do:
Code:
const uint8_8 buttons[numButtons] = { 2, 3, 0, 1, /* ... */ };

void setup () {
  Joystick.useManualSend(true);
  for (int i = 0; i < numButtons; i++) {
    pinMode (buttons[i], INPUT_PULLUP);
  }
}

Can you explain what that actually changes in further detail? I kind of get the idea but I'm still very new to programming in general. Does it just change the variable "i" to be the sum of the switches (0, 1, 2, 3, 12, 13, 14, etc,) or is there more to it than that?
 
The array buttons contains the switch values you want to use. In my example, buttons[0] contains 2, buttons[1] contains 3, buttons[2] contains 0, buttons[3] contains 1, and I didn't bother defining the switches after that, but you would have to.

So in the fragment:
Code:
  for (int i = 0; i < numButtons; i++) {
    pinMode (i, INPUT_PULLUP);
  }

it would call the pinMode function first with 0, then with 1, then with 2, etc.

In the code using the buttons array, the index variable i is used to go into the array, so:
Code:
  for (int i = 0; i < numButtons; i++) {
    pinMode (buttons[i], INPUT_PULLUP);
  }

the pinMode function is first called with the argument 2 (when i is 0). The next call to pinMode, it is called with the argument 3 (when i is 1). The third call to pinMode passes the argument 0 (when i is 2). And so forth for the elements of the array.

That way you are going through the elements in order, but the array allows you to not have them in order.
 
I replaced
Code:
const int numButtons = 16;  // 16 for Teensy, 32 for Teensy++
with
Code:
const uint8_8 [numButtons] = { 0, 1, 2, 3, 12, 13, 14, 15, 16, 17, 18, 19, 20, 21, 22, 23 /* ... */ };
and all that happened was the program spit out this enormous error message that doesn't make any sense to me. I come back to this project once every few months and never manage to make any progress getting this damn thing to work. Every time I change anything, everything breaks.

Code:
Arduino: 1.6.7 (Windows 7), TD: 1.27, Board: "Teensy 2.0, Keyboard + Mouse + Joystick, 16 MHz, US English"

Complete_main:16: error: 'uint8_8' does not name a type
const uint8_8 [numButtons] = { 0, 1, 2, 3, 12, 13, 14, 15, 16, 17, 18, 19, 20, 21, 22, 23 /* ... */ };
^
C:\Users\Connor\Documents\Arduino\Complete_main\Complete_main.ino: In function 'void setup()':
Complete_main:25: error: 'numButtons' was not declared in this scope
for (int i=0; i<numButtons; i++) {
^
C:\Users\Connor\Documents\Arduino\Complete_main\Complete_main.ino: At global scope:
Complete_main:31: error: 'numButtons' was not declared in this scope
byte allButtons[numButtons];
^
Complete_main:32: error: 'numButtons' was not declared in this scope
byte prevButtons[numButtons];
^
C:\Users\Connor\Documents\Arduino\Complete_main\Complete_main.ino: In function 'void loop()':
Complete_main:45: error: 'numButtons' was not declared in this scope
for (int i=0; i<numButtons; i++) {
^
Complete_main:49: error: 'allButtons' was not declared in this scope
allButtons[i] = 0;
^
Complete_main:52: error: 'allButtons' was not declared in this scope
allButtons[i] = 1;
^
Complete_main:54: error: 'allButtons' was not declared in this scope
Joystick.button(i + 1, allButtons[i]);
^
Complete_main:69: error: 'numButtons' was not declared in this scope
for (int i=0; i<numButtons; i++) {
^
Complete_main:70: error: 'allButtons' was not declared in this scope
if (allButtons[i] != prevButtons[i]) anyChange = true;
^
Complete_main:70: error: 'prevButtons' was not declared in this scope
if (allButtons[i] != prevButtons[i]) anyChange = true;
^
Complete_main:71: error: 'prevButtons' was not declared in this scope
prevButtons[i] = allButtons[i];
^
Complete_main:71: error: 'allButtons' was not declared in this scope
prevButtons[i] = allButtons[i];
^
Complete_main:77: error: 'numButtons' was not declared in this scope
for (int i=0; i<numButtons; i++) {
^
Complete_main:78: error: 'allButtons' was not declared in this scope
Serial.print(allButtons[i], DEC);
^
exit status 1
'allButtons' was not declared in this scope

  This report would have more information with
  "Show verbose output during compilation"
  enabled in File > Preferences.
 
uint8_8 should be uint8_t ... (typo ... I usually say unint8_t and get an error too.. hopefully this is a jinx!)

the rest of those errors are scope errors (obviously)... I can't see your code, but I am guessing you have either failed to declare the variables before use, or have declared them in setup().
 
Code:
const uint8_t buttons[numButtons] = { 0, 1, 2, 3, 12, 13, 14, 15, 16, 17, 18, 19, 20, 21, 22, 23 /* ... */ };

void setup() {
  // you can print to the serial monitor while the joystick is active!
  Serial.begin(9600);
  // configure the joystick to manual send mode.  This gives precise
  // control over when the computer receives updates, but it does
  // require you to manually call Joystick.send_now().
  Joystick.useManualSend(true);
  for (int i=0; i<numButtons; i++) {
    pinMode(buttons[i], INPUT_PULLUP);
  }
  Serial.println("Begin Complete Joystick Test");
}

byte allButtons[numButtons];
byte prevButtons[numButtons];
int angle=0;

void loop() {
  // read 6 analog inputs and use them for the joystick axis
  Joystick.X(analogRead(0));
  Joystick.Y(analogRead(1));
  Joystick.Z(analogRead(2));
  Joystick.Zrotate(analogRead(3));
  Joystick.sliderLeft(analogRead(4));
  Joystick.sliderRight(analogRead(5));
  
  // read digital pins and use them for the buttons
  for (int i=0; i<numButtons; i++) {
    if (digitalRead(i)) {
      // when a pin reads high, the button is not pressed
      // the pullup resistor creates the "on" signal
      allButtons[i] = 0;
    } else {
      // when a pin reads low, the button is connecting to ground.
      allButtons[i] = 1;
    }
    Joystick.button(i + 1, allButtons[i]);
  }

  // make the hat switch automatically move in a circle
  angle = angle + 1;
  if (angle >= 360) angle = 0;
  Joystick.hat(angle);
  
  // Because setup configured the Joystick manual send,
  // the computer does not see any of the changes yet.
  // This send_now() transmits everything all at once.
  Joystick.send_now();
  
  // check to see if any button changed since last time
  boolean anyChange = false;
  for (int i=0; i<numButtons; i++) {
    if (allButtons[i] != prevButtons[i]) anyChange = true;
    prevButtons[i] = allButtons[i];
  }
  
  // if any button changed, print them to the serial monitor
  if (anyChange) {
    Serial.print("Buttons: ");
    for (int i=0; i<numButtons; i++) {
      Serial.print(allButtons[i], DEC);
    }
    Serial.println();
  }
  
  // a brief delay, so this runs "only" 200 times per second
  delay(5);
}

I don't know what a scope error is, but I don't understand why all these things would not be declared when all I did was change the integer to the array containing all 16 switches in weird order, I don't see why that would break anything. Then again I don't really know what half those words mean either.
 
Add in at the top
Code:
const int numButtons = 16;

and make sure you have selected a joystick usb type from the dropdown menu in the arduino ide
 
Okay so I added the constant and now the program compiles without errors, but nonetheless only 8 of my switches seem to be doing anything, in the serial monitor only my bottom row of buttons and the joystick register as anything, my start button, select button, and top row of buttons simply don't do anything. On top of that, if I open joy.cpl to check button inputs and the joystick hat switch in windows, the window will open, but instead of there being a bunch of numbered red circles and a POV hat, the window is completely empty.
 
I'm not familiar with the joystick library, so all i can suggest at this stage is check your wiring matches your software ... I recently had a bit of a cow by expecting serial data out of a pin that I had configured as a digital input, and another pin I was expecting input on was not even wired up!!

A couple of things occur to me in the code .... do any of the 'analog read' pins overlap with the digital pins you are selecting .... also

Code:
if (digitalRead(i)) {
should probably be

Code:
if (digitalRead(buttons[i])) {
 
Last edited:
Changed the digitalread to have buttons, realized that I had two extra switches in the buttons constant, although I don't think that changes anything, still not working. I'm not sure if analog read pins are overlapping, but my arcade stick has no analog components so I can probably remove that entire fragment of code.
 
Are you saying you have an oldschool arcade stick, like a 4 way or 8 way stick for MAME or something? Otherwise you will need that code! It is for a proportional joystick, I think. Even if you have an oldschool stick, I would suggest you may need the code to get the joystick working!

voltage 3.3V as off and voltage 0 as on still would work with anaolog read I would think ... Isn't there a page on joysticks on the pjrc home site?? i bet somoeone has used the joystick you have with the joystick library ... I haven't, so I'm not much use really ..
 
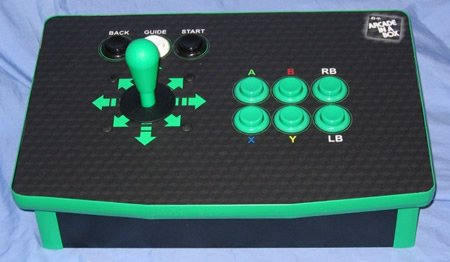
It looks like this with one extra button total. I have searched for arduino code I could adapt for what I'm doing, but I wired my PCB in an unconventional way hence why I made this thread, that and the fact that I want to learn to program a little bit makes me want to adapt the example rather than somebody else's code. How do you trick the code into thinking the digital switch is analog?

xbox10.jpg
 
Hmm Lebowski

I thought I had a solution, but I was wrong, so edited this answer to remove nonsense .... will look at your code again ....
 
Last edited:
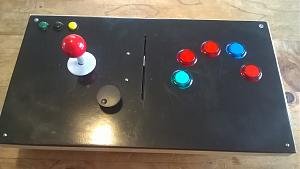
what is the part number etc of the joystick ...looks very mame-like... I made one myself!! For defender (the joystick is 4 way digital)

controller.jpg

I can give you code for my controller if you like ...what it does though is spit out key strokes to control mame (so press button 5 and you get the letter A over USB, and MAME interpretes that as 'fire') ... in other words it does not appear as a USB joystick type, but as a keyboard!!

What are you trying to control?
 
Last edited:
Happ competition joystick and pushbuttons. I have 3 arcade sticks, with all 3 major companies, so a Sanwa japanese stick, a Seimitsu Japanese stick, and this Happ American style stick. Keyboard strokes are really preferable for MAME, I've tried getting some of my other arcade sticks with proper PCBs work on MAME and it can be a total nightmare sometimes, however my main goal is to get to natively interface with PC fighting games like Ultra Street Fighter IV and the like, so making it interface as a keyboard actually makes things more complicated rather than less, although it tends to be more reliable.

I just made the code change you suggested as well as removed the entire block of analog joystick code, and now all the switches register on the serial monitor, but I don't know where to go from here. Every thing registers but how do I go from the code recognizing these switches to getting the thing to actually work in software? Still nothing shows up in joy.cpl.
 
Hmm which code suggestion?? Not the one I removed?? I think I was wrong about that one .... maybe change it back .... I guess it was removing the analog stuff that did the trick ... Have you plugged your joystick into a windows box and seen if it shows up? Is that the purpose of joystick.cpl?
 
Those joysticks are just digital, right? so its just like the dpad on a game controller.... should be a way to do it ... I'm a bit mystified why you can't see the joystick in windows though ....
 
It shows up in windows, but when I go to the properties and game settings, where you would normally see a hat POV and a bunch of red circles representing buttons, there is simply nothing, a big empty page. I just tried opening street fighter to see what would happen, the joystick didn't work as a joystick (not surprising) and a few buttons did work, but all that really happened was this weird up - up - up - down down down - up up up automatic movement of the joystick which was strange. The menu would be moving constantly even when I wasn't pressing anything.

Here is my current code:
Code:
const int numButtons = 16;
// Changes numButtons to be the specific pins that are wired rather than being incremental 0-16
const uint8_t buttons[numButtons] = { 0, 1, 2, 3, 16, 17, 18, 19, 20, 21 /* ... */ };

void setup() {
  // you can print to the serial monitor while the joystick is active!
  Serial.begin(9600);
  // configure the joystick to manual send mode.  This gives precise
  // control over when the computer receives updates, but it does
  // require you to manually call Joystick.send_now().
  Joystick.useManualSend(true);
  for (int i=0; i<numButtons; i++) {
    pinMode(buttons[i], INPUT_PULLUP);
  }
  Serial.println("Begin Complete Joystick Test");
}

byte allButtons[numButtons];
byte prevButtons[numButtons];
int angle=0;

void loop() {

  
  // read digital pins and use them for the buttons
  for (int i=0; i<numButtons; i++) {
    if (digitalRead(buttons[i])) {
      // when a pin reads high, the button is not pressed
      // the pullup resistor creates the "on" signal
      allButtons[i] = 0;
    } else {
      // when a pin reads low, the button is connecting to ground.
      allButtons[i] = 1;
    }
    Joystick.button(buttons[i] + 1, allButtons[i]);
  }

  // make the hat switch automatically move in a circle
  angle = angle + 1;
  if (angle >= 360) angle = 0;
  Joystick.hat(angle);
  
  // Because setup configured the Joystick manual send,
  // the computer does not see any of the changes yet.
  // This send_now() transmits everything all at once.
  Joystick.send_now();
  
  // check to see if any button changed since last time
  boolean anyChange = false;
  for (int i=0; i<numButtons; i++) {
    if (allButtons[i] != prevButtons[i]) anyChange = true;
    prevButtons[i] = allButtons[i];
  }
  
  // if any button changed, print them to the serial monitor
  if (anyChange) {
    Serial.print("Buttons: ");
    for (int i=0; i<numButtons; i++) {
      Serial.print(allButtons[i], DEC);
    }
    Serial.println();
  }
  
  // a brief delay, so this runs 200 times per second
  delay(5);
}

I removed the 4 digital switches that make up the joystick from the numButtons constant, and the code for an analog joystick was removed as well, I need to figure out how to get the joystick to function like a d-pad instead of an analog stick.
 
Last edited:
I can think of a way to do the 'analog to dpad' thing, but who knows if it will work? ..... You can read the digital switches and then insert the data into the axis functions .... I'll post some code later, if the idea pans out ....

I would change

Code:
Joystick.button(buttons[i] + 1, allButtons[i]);

back to

Code:
Joystick.button(i + 1, allButtons[i]);

That was a bad idea from me, I think...

At least youve got something happening on windows, so there is hope yet ...
 
Is that even necessary? For example, a standard gamepad would have 10-12 buttons, 2 analog sticks, and a D-pad, surely there must be a way to just do the buttons and the d-pad while completely ignoring anything analog, right?
 
Youd think so.

But it just might be a matter of what to transmit ... Youd think that you could just use 4/8 buttons for a dpad, but I guess it depends on the implementation.

Certainly worth looking into ... but it is probably worth a crack at tricking the analog axis into delivering dpad digital data...

there must be something on it somewhere ...
 
just a thought ... maybe the strange jitter you are getting is the pov switch 'revolving'
 
I had a similar issue a few years ago. Instead of hard coding the buttons individually. I went with an array that allows you to put the joystick buttons in any order. All you have to do is put the pin number in the order you want the joystick button to be. In my code below you can see I wanted Pin 31 to be joystick button 14. Hence 31 is the 14'th value in that array.


Code:
// Teensy becomes a USB joystick
//Number of joystick buttons attached
const int numButtons = 22;  

//Array containing the pin numbers of where the buttons are attached to your board.
// The order they are arranged will corresponde to the button's joystick button.
// IE 0 is joystick button 1, 1 is joystick button 2 and so on.
int joystickButton [] = {
  0, 1, 2, 3, 4, 5, 6, 7, 8, 9, 10, 11, 12, 31, 16, 17, 18, 19, 20, 21, 22, 23 };


void setup() {

  // you can print to the serial monitor while the joystick is active!
  Serial.begin(9600);
  // configure the joystick to manual send mode.  This gives precise
  // control over when the computer receives updates, but it does
  // require you to manually call Joystick.send_now().
Joystick.useManualSend(true);
  for (int i=0; i<numButtons; i++) {
    pinMode(joystickButton[i], INPUT_PULLUP);
  }
  Serial.println("Begin Complete Joystick Test");
}

byte allButtons[numButtons];
byte prevButtons[numButtons];
int angle=0;

void loop() {

  // read  analog inputs and use them for the joystick axis
  analogReadResolution(16);
  Joystick.X(analogRead(A0));
  Joystick.Y(analogRead(A1));
  
  // read digital pins and use them for the buttons
  for (int i=0; i<numButtons; i++) {
    if (digitalRead(joystickButton[i])) {
      // when a pin reads high, the button is not pressed
      // the pullup resistor creates the "on" signal
      allButtons[i] = 0;
    } else {
      // when a pin reads low, the button is connecting to ground.
      allButtons[i] = 1;
    }
   {
// Look up the pin's array location and assign it as joystick button
int wantedval = joystickButton[i];
int wantedpos;
for (int i=0; i<numButtons; i++) {
   if (wantedval = joystickButton[i]) {
     wantedpos = i;
  
   }
}
    
   Joystick.button(i + 1, allButtons[i]);
   }
  }
 
 // Because setup configured the Joystick manual send,
  // the computer does not see any of the changes yet.
  // This send_now() transmits everything all at once.
  Joystick.send_now();
  
  // check to see if any button changed since last time
  boolean anyChange = false;
  for (int i=0; i<numButtons; i++) {
    if (allButtons[i] != prevButtons[i]) anyChange = true;
    prevButtons[i] = allButtons[i];
  }
  
  // if any button changed, print them to the serial monitor
  if (anyChange) {
    Serial.print("Buttons: ");
    for (int i=0; i<numButtons; i++) {
      Serial.print(allButtons[i], DEC);
    }
    Serial.println();
  }
  
  // a brief delay, so this runs "only" 200 times per second
  delay(5);
}
 
Status
Not open for further replies.
Back
Top