alexthevdwp
New member
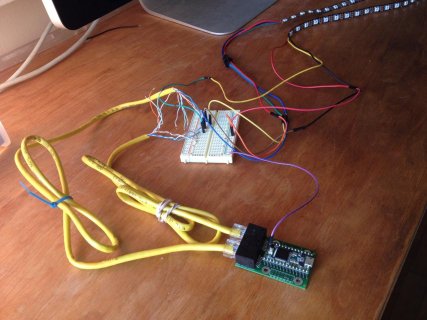
So I connected my Teensy3.2 to OctoWS2811 and have 2 ethernet cables plugged in the sockets going to 4 strips of Ws2812b (2 on each cable)
The Rainbow example in the Octo library works but now I would like to program the 4 led strips individually on each ethernet cable and paste parameters and code blocks from for instance: Phillip Burgess Neopixels library or FastLED3.1 to play around.
What are the best ways to do that? I'm just super inspired by these lights and have a tone of ideas that I would like to try out, thanks for your help!
Here's an example of what I would like to do: I would like to run a program like the rainbow chaser sketch on 1 of the 2 strips (of 54 leds each) connected to Ethernet cable #1 and a chasing white strobe on the on 1 of the 2 strips connected to Ethernet cable #2. Can something like this run simultaneously on this set up or does the Octo board only flows for a single program on all led strips?
I'm obviously new to coding LEDs so if you could give me a direction or resources on how to tweet code blocks and parameter for this Teensy3.2 to OctoWS2811 to Neopixels WS2812b set up that would really help.
Below is the code for the Rainbow chaser from the OctoWs2811 drop down example library:
For starters where would I define 1 of the 4 LED strips connected to 2 ethernet cable?
Thanks for your help and time!
/* OctoWS2811 Rainbow.ino - Rainbow Shifting Test
http://www.pjrc.com/teensy/td_libs_OctoWS2811.html
Copyright (c) 2013 Paul Stoffregen, PJRC.COM, LLC
Permission is hereby granted, free of charge, to any person obtaining a copy
of this software and associated documentation files (the "Software"), to deal
in the Software without restriction, including without limitation the rights
to use, copy, modify, merge, publish, distribute, sublicense, and/or sell
copies of the Software, and to permit persons to whom the Software is
furnished to do so, subject to the following conditions:
The above copyright notice and this permission notice shall be included in
all copies or substantial portions of the Software.
Required Connections
--------------------
pin 2: LED Strip #1 OctoWS2811 drives 8 LED Strips.
pin 14: LED strip #2 All 8 are the same length.
pin 7: LED strip #3
pin 8: LED strip #4 A 100 ohm resistor should used
pin 6: LED strip #5 between each Teensy pin and the
pin 20: LED strip #6 wire to the LED strip, to minimize
pin 21: LED strip #7 high frequency ringining & noise.
pin 5: LED strip #8
pin 15 & 16 - Connect together, but do not use
pin 4 - Do not use
pin 3 - Do not use as PWM. Normal use is ok.
pin 1 - Output indicating CPU usage, monitor with an oscilloscope,
logic analyzer or even an LED (brighter = CPU busier)
*/
#include <OctoWS2811.h>
const int ledsPerStrip = 54;
DMAMEM int displayMemory[ledsPerStrip*6];
int drawingMemory[ledsPerStrip*6];
const int config = WS2811_GRB | WS2811_800kHz;
OctoWS2811 leds(ledsPerStrip, displayMemory, drawingMemory, config);
int rainbowColors[180];
void setup() {
pinMode(1, OUTPUT);
digitalWrite(1, HIGH);
for (int i=0; i<180; i++) {
int hue = i * 2;
int saturation = 100;
int lightness = 50;
// pre-compute the 180 rainbow colors
rainbowColors = makeColor(hue, saturation, lightness);
}
digitalWrite(1, LOW);
leds.begin();
}
void loop() {
rainbow(10, 2500);
}
// phaseShift is the shift between each row. phaseShift=0
// causes all rows to show the same colors moving together.
// phaseShift=180 causes each row to be the opposite colors
// as the previous.
//
// cycleTime is the number of milliseconds to shift through
// the entire 360 degrees of the color wheel:
// Red -> Orange -> Yellow -> Green -> Blue -> Violet -> Red
//
void rainbow(int phaseShift, int cycleTime)
{
int color, x, y, offset, wait;
wait = cycleTime * 1000 / ledsPerStrip;
for (color=0; color < 180; color++) {
digitalWrite(1, HIGH);
for (x=0; x < ledsPerStrip; x++) {
for (y=0; y < 8; y++) {
int index = (color + x + y*phaseShift/2) % 180;
leds.setPixel(x + y*ledsPerStrip, rainbowColors[index]);
}
}
leds.show();
digitalWrite(1, LOW);
delayMicroseconds(wait);
}
}