Teensy 3.X soft start in software

Status
Not open for further replies.

George1

Active member
Hi,

I am developing an instrument based on the Teensy 3.1 and it is going to be powered by a battery so I would like to implement the soft start feature something very similar to what was explained on https://www.pjrc.com/teensy/prescaler.html but I see that for Teensy 3.1 we are encouraged to use the Snooze library. I looked at the Snooze library and it has very nice features which I tested and I plan to implement in my design (seep on time when battery power is low) but I don’t see anything that allows for slow cpu frequency on the startup. I would like to run the Teensy at 24MHz or 48MHz when battery voltage is good but also have an option to start at lower frequency (2Mhz) on the startup to reduce current demand.

Please let me know if you have any suggestions or if it is even necessary to do something like this.

Thanks,
George
 
Hi defgraster,

Thanks a lot for the reply. I know that in Arduino 1.6.5 IDE you can pick one running frequency between 2MHz and 96MHz on Teensy 3.1 but I don's see how you can select two frequency values one for startup and other for default.
Please explain if I you can in more detail for how that can be accomplished.

Thanks
 
You'll need to edit the startup code, in mk20dx128.c. This isn't simple, so there's no quick and easy instructions I can give you.

The modes above 16 MHz turn on the PLL and use it to run the chip. At 16 MHz and below, the PLL is off and the clock divider runs directly from the crystal.

You can probably copy and paste and modify that code to switch between modes. But again, this isn't simple. You're going to have to read the MGC chapter of the reference manual for the complex details of how to switch between the many different running modes.

The special VLPR mode also imposes a lot of restrictions, beyond just the 2 MHz speed limit. It's all documented in that reference manual.

If you make any progress on this, I hope you'll share your code or at least some insight about what you learn.
 
The latest Snooze on github has this example of changing the cpu frequency that might work? If not, you can take a look at how to change cpu speeds here.
 
Hi duff,

I was actually looking more closely into the Snooze library and I found some relevant examples. I will also take a look at the example mcg.c code for more detail. All in all Snooze library is great and job very well done on that. Thanks a lot for all your hard work and for savings us hours of time of figuring it out on our own.
I have two devices that communicate via Serial port and I also write to an SD card so I will have to run few tests to make sure it all works well when changing frequency and going in and out of sleep.

I will post any relevant code that runs well.

Thanks
 
Greetings.

I'm checking duff's links, and they both got me really confused. For what I see, it sets to 2MHz as min speed. my main problem is the fact I need the USB port because I'm working with Serial Monitor. I'd like to reduce speed to 24MHz. Can anyone please give me a sumary about how to do it? I dont have experience on that and I would avoid F_CPU changes but unfortunately I need that for graduating u_u


Edited: The second link seems it's just functions. I supose they're from snooze. What means PEE, BLPI, BLPE and PBE? I'm not used with those terms (and I'm not english native so is harder for me to understand acronyms)

Thanks in advance
 
Last edited:
Greetings.

I'm checking duff's links, and they both got me really confused. For what I see, it sets to 2MHz as min speed. my main problem is the fact I need the USB port because I'm working with Serial Monitor. I'd like to reduce speed to 24MHz. Can anyone please give me a sumary about how to do it? I dont have experience on that and I would avoid F_CPU changes but unfortunately I need that for graduating u_u


Edited: The second link seems it's just functions. I supose they're from snooze. What means PEE, BLPI, BLPE and PBE? I'm not used with those terms (and I'm not english native so is harder for me to understand acronyms)

Thanks in advance

@Ghosty, i think you have to write your own code. Please read Pauls comment above.
 
I'd like to but I need to understand how to do that first.

I just need basic guindances or maybe a place where I could find more information (with some details). Of course after understanding how that works I'll do my own stuff
 
...unfortunately I need that for graduating u_u
haha, how much is worth to you? j.k.

my main problem is the fact I need the USB port because I'm working with Serial Monitor. I'd like to reduce speed to 24MHz. Can anyone please give me a sumary about how to do it?
What are trying to do? Why do you need the cpu clock to be at certain frequency? How do you plan on using it? Changing that like you want is not easy, pretty much everything you use will depend on what speed you compile it at. Everything has to be reconfigured even the usb so its not just change the cpu speed and everything works as you expect you have a lot of work to make it work right.
 
Hi duff.

Gonna try to explain it the best I can (dont have a perfect english, ya know...)

What I'm trying to do is a planner with energy saving. I have few tasks (I'm working with 3 for testing purpoises) that must run according to their priorities (I'm working with static schedulers, means RM (rate monotonic) and DM (deadline monotonic). Those works fine in my project. But since my theme is about "power saving" I'll need to add an option that allows, well. power saving.

My idea is I start all tasks with max frequency (72 or 96 MHz) and after few conditions (let's say, 10 loops) system will change the frequency to another value (could be 24), and then goes back to normal (72-96Mhz). I need serial port because I got a timer and show count on screen (sides, there's an user interface where tasks parameters can be changed and scheduler chosen). I tried to use the snooze library and times change, but serial is unabled (gives error), because prolly is set at 2MHz. Also tested the mcg example to understand how it works but can't see it working properly (because processes should go slower, in fact clockspeed never changes).

I'm reading the manual, but.... that's chinese for me xD (got no experience with teensy, in fact this is my first... and I'm forced to do that).


What are trying to do? Why do you need the cpu clock to be at certain frequency? How do you plan on using it? Changing that like you want is not easy, pretty much everything you use will depend on what speed you compile it at. Everything has to be reconfigured even the usb so its not just change the cpu speed and everything works as you expect you have a lot of work to make it work right.

It's ok. I would do that "extra job to do". I just need to know... HOW? ^^;


PD: you're not Hillary Duff, right? (j.k.)
 
Last edited:
Also tested the mcg example to understand how it works but can't see it working properly (because processes should go slower, in fact clockspeed never changes).

Look, it's ok to be a novice, it's ok to ask questions, and it's even ok to ask for help with doing your student project. Really, that's fine. But it's not ok to ignore the "Forum Rule", which is shown at the top of every page.

When you try something and say it didn't work, you must post the complete source code. That's how this forum works! Good form involves trying to simplify and minimize your program, which also improves the odds someone will investigate why it doesn't work. But some problems are complicated and don't reproduce without a large program. We all understand that. Just do your best.

If it's an unmodified copy of a library, a link to the specific library is ok. But if you've changed even 1 line, you *must* post the code which reproduces your problem! Partial code fragments are a violation of the rule. Your message must have all the code needed for anyone reading to recreate the problem. The idea is to enable anyone who reads your message to recreate the problem by running the code you post.

Use the "
Code:
" tags to surround your code when posted directly in a message.  Or for larger files, click "Go Advanced" and the full editor lets you attach files.
 
Last edited:
Paul I'm talking about this library: https://github.com/duff2013/Snooze/blob/master/utility/mcg.c

Not modified. Only tried to understand how it worked.

And also this example: https://github.com/duff2013/Snooze/blob/master/examples/reduced_cpu_block/reduced_cpu_block.ino not modified neither.

Didnt post link because I though you would understand I'm talking about duff's links u_u


Seems like in the end I'll have to "learn chinese" (it's just a say in case you don't get it) to understand the procesor's manual and try to build my own library. There's tons to study u_u
 
Last edited:
Seems like in the end I'll have to "learn chinese"

Yes, you are going to have to read and understand the reference manual. That's how it always is when you want to use the hardware in ways not yet supported by any of the existing code or libraries.

Fortunately for you, there already is quite a good amount of code in Duff's library and also in mk20dx128.c which changes modes and configuring the speeds. So at least you won't be starting from only the reference manual without any working code (as I did 4 years ago when I made Teensy 3.0).
 
OK I been studying and I got "half" of what I need.

I made this little testing code:

Code:
#include <Snooze.h>
bool flag = false;

void setup() {
  // put your setup code here, to run once:
  pinMode(9, OUTPUT);
  Serial.begin(9600);
}

void loop() {
  // put your main code here, to run repeatedly:
  if(!flag){
  blinking();
  Serial.println(F_CPU);
  delay(1000);
  SIM_CLKDIV1 = SIM_CLKDIV1_OUTDIV1( 1 ) | SIM_CLKDIV1_OUTDIV2( 2 ) | SIM_CLKDIV1_OUTDIV4( 3 );
  blinking();
  Serial.println(F_CP
  delay(1000);
  /*SIM_CLKDIV1 = SIM_CLKDIV1_OUTDIV1( 0 ) | SIM_CLKDIV1_OUTDIV2( 0 ) | SIM_CLKDIV1_OUTDIV4( 0 );
  blinking();*/
  flag = true;
  }
}

void blinking(){
  for(int i=0; i<10; i++){
  digitalWrite(9, HIGH);
  delay(100);
  digitalWrite(9, LOW);
  delay(100);
  }
}

With it I just run a blinking function, first at 96MHz (my max speed) and then dividing CPU speed in 2 just to try at 48 MHz (others parameters where just random, not sure if can only change speed and leave others like that or maybe should divide all of them in same factor). I run the blinking function again at that new speed, and it works (at least led goes slower). Now I need to switch back to 96MHz, that's why I tried to use this (of course without comments):

Code:
  /*SIM_CLKDIV1 = SIM_CLKDIV1_OUTDIV1( 0 ) | SIM_CLKDIV1_OUTDIV2( 0 ) | SIM_CLKDIV1_OUTDIV4( 0 );
  blinking();*/

The result is the device "reboots" (could heard the USB plug/unplug sound) and restarts code. Is there another way to go from a lower to higher speed? (maybe a multiplier?, or a floating dividing factor like 0.5?)

Thanks in advance


Edited: Added the "Serial.println" lines to check if CPU changes the speed, and in both cases it shows it's 96MHz, but the second blink is slower (like in less frequency). That's weird... Of course I had to do something wrong or need to apply something else, but no idea what to do :/
 
Last edited:
F_CPU will not change! Its compile time constant, this is what i meant by most peripherals and functionality are tied to this and dynamically changing speeds will mostly break or alter their use. For example look at the code for delayMicroseconds:
Code:
[FONT=Menlo][COLOR=#bb2ca2]static[/COLOR] [COLOR=#bb2ca2]inline[/COLOR] [COLOR=#bb2ca2]void[/COLOR] delayMicroseconds([COLOR=#703daa]uint32_t[/COLOR]) [COLOR=#bb2ca2]__attribute__[/COLOR]((always_inline, unused));[/FONT]
[FONT=Menlo][COLOR=#bb2ca2]static[/COLOR] [COLOR=#bb2ca2]inline[/COLOR] [COLOR=#bb2ca2]void[/COLOR] delayMicroseconds([COLOR=#703daa]uint32_t[/COLOR] usec)[/FONT]
[FONT=Menlo]{[/FONT]
[COLOR=#78492A][FONT=Menlo]#if F_CPU == [COLOR=#272ad8]168000000[/COLOR][/FONT][/COLOR]
[FONT=Menlo]    uint32_t n = usec * [COLOR=#272ad8]56[/COLOR];[/FONT]
[COLOR=#78492A][FONT=Menlo]#elif F_CPU == [COLOR=#272ad8]144000000[/COLOR][/FONT][/COLOR]
[FONT=Menlo]    uint32_t n = usec * [COLOR=#272ad8]48[/COLOR];[/FONT]
[COLOR=#78492A][FONT=Menlo]#elif F_CPU == [COLOR=#272ad8]120000000[/COLOR][/FONT][/COLOR]
[FONT=Menlo]    uint32_t n = usec * [COLOR=#272ad8]40[/COLOR];[/FONT]
[COLOR=#78492A][FONT=Menlo]#elif F_CPU == [COLOR=#272ad8]96000000[/COLOR][/FONT][/COLOR]
[FONT=Menlo]    uint32_t n = usec << [COLOR=#272ad8]5[/COLOR];[/FONT]
[COLOR=#78492A][FONT=Menlo]#elif F_CPU == [COLOR=#272ad8]72000000[/COLOR][/FONT][/COLOR]
[FONT=Menlo]    uint32_t n = usec * [COLOR=#272ad8]24[/COLOR];[/FONT]
[COLOR=#78492A][FONT=Menlo]#elif F_CPU == [COLOR=#272ad8]48000000[/COLOR][/FONT][/COLOR]
[FONT=Menlo]    uint32_t n = usec << [COLOR=#272ad8]4[/COLOR];[/FONT]
[COLOR=#78492A][FONT=Menlo]#elif F_CPU == [COLOR=#272ad8]24000000[/COLOR][/FONT][/COLOR]
[FONT=Menlo]    uint32_t n = usec << [COLOR=#272ad8]3[/COLOR];[/FONT]
[COLOR=#78492A][FONT=Menlo]#elif F_CPU == [COLOR=#272ad8]16000000[/COLOR][/FONT][/COLOR]
[FONT=Menlo]    uint32_t n = usec << [COLOR=#272ad8]2[/COLOR];[/FONT]
[COLOR=#78492A][FONT=Menlo]#elif F_CPU == [COLOR=#272ad8]8000000[/COLOR][/FONT][/COLOR]
[FONT=Menlo]    uint32_t n = usec << [COLOR=#272ad8]1[/COLOR];[/FONT]
[COLOR=#78492A][FONT=Menlo]#elif F_CPU == [COLOR=#272ad8]4000000[/COLOR][/FONT][/COLOR]
[FONT=Menlo]    uint32_t n = usec;[/FONT]
[COLOR=#78492A][FONT=Menlo]#elif F_CPU == [COLOR=#272ad8]2000000[/COLOR][/FONT][/COLOR]
[FONT=Menlo]    uint32_t n = usec >> [COLOR=#272ad8]1[/COLOR];[/FONT]
[COLOR=#78492A][FONT=Menlo]#endif[/FONT][/COLOR]
[COLOR=#008400][FONT=Menlo]// changed because a delay of 1 micro Sec @ 2MHz will be 0[/FONT][/COLOR]
[FONT=Menlo]    [COLOR=#bb2ca2]if[/COLOR] (n == [COLOR=#272ad8]0[/COLOR]) [COLOR=#bb2ca2]return[/COLOR];[/FONT]
[COLOR=#BB2CA2][FONT=Menlo]__asm__volatile[COLOR=#000000]([/COLOR][/FONT][/COLOR]
[COLOR=#D12F1B][FONT=Menlo]"L_%=_delayMicroseconds:""\n\t"[/FONT][/COLOR]
[COLOR=#78492A][FONT=Menlo]#if F_CPU < [COLOR=#272ad8]24000000[/COLOR][/FONT][/COLOR]
[COLOR=#D12F1B][FONT=Menlo]"nop""\n\t"[/FONT][/COLOR]
[COLOR=#78492A][FONT=Menlo]#endif[/FONT][/COLOR]
[COLOR=#78492A][FONT=Menlo]#ifdef KINETISL[/FONT][/COLOR]
[COLOR=#D12F1B][FONT=Menlo]"sub    %0, #1""\n\t"[/FONT][/COLOR]
[COLOR=#78492A][FONT=Menlo]#else[/FONT][/COLOR]
[COLOR=#D12F1B][FONT=Menlo]"subs   %0, #1""\n\t"[/FONT][/COLOR]
[COLOR=#78492A][FONT=Menlo]#endif[/FONT][/COLOR]
[COLOR=#D12F1B][FONT=Menlo]"bne    L_%=_delayMicroseconds""\n"[/FONT][/COLOR]
[FONT=Menlo]        : [COLOR=#d12f1b]"+r"[/COLOR] (n) :[/FONT]
[FONT=Menlo]    );[/FONT]
[FONT=Menlo]}[/FONT]
As you can see it directly related to the F_CPU compile time constant, so if you start out at 96 MHz and change the core speed to 24 MHz, F_CPU will still be 96 MHz! You have to write new function for delayMicroseconds to reflect the change.

This is a basic example of the pitfalls of this kind of stuff that barely is scratching the surface.
 
Just sleep for the majority of the time and only wake when you need to do something.
You'll find the gains to be much greater as the idle currents are still relatively high while the core clocks are active
 
*sighs*

Let me try to explain better (seriously can you learn spanish? would be easier for me :V)

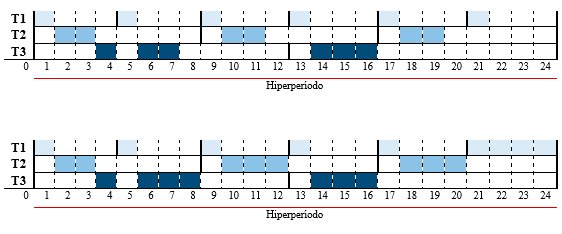
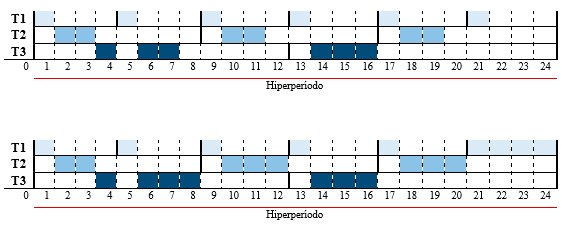
In my project I have a planner that execute few tasks (for example, 3), those tasks have certain computing time (I'm working with 1, 2 and 3 seconds, respectively), and also a period time (a max time they have for execute, considering priorities and interruptions, in this case they have 4, 8 and 12 sec). Look at the following image:

tasks_by_ghosthead_nebula-d9r7vcx.jpg

The one upside is the time "thing" (sorry dont know the english word for it) of the tasks executions in normal conditions, at max speed. The one downside is what I need (same RM but with energy saving). As you can see, in certain "ticks" the computing time of the tasks (in blue) needs to be extended, that's why in certain moments I need to decrease CPU speed, and no just to a fixed value (like 2MHz) but in a value that depends of an alpha factor (that might be calculated), and since I got multiple tasks I need to get back to max speed (and hiperperiod is ciclic, will reppeat during the algorithm lifetime).

And duff, I suposed F_CPU was going to be the same, that's why I tried the:

Code:
SIM_CLKDIV1 = SIM_CLKDIV1_OUTDIV1( 0 ) | SIM_CLKDIV1_OUTDIV2( 0 ) | SIM_CLKDIV1_OUTDIV4( 0 );
  blinking()

Because I though it would do changes based in the F_CPU value. But in the end it just worked in weird way, even dissabling/enabling the USB.


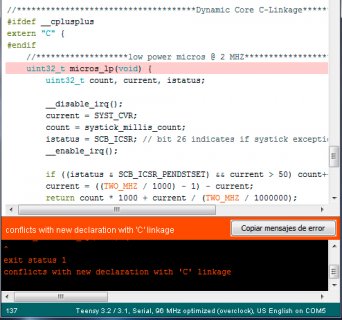
From this example: https://github.com/duff2013/Snooze/blob/master/examples/reduced_cpu_block/reduced_cpu_block.ino the micros_lp() and delay_lp() are pretty interesting and could be helpfull. Unfortunately the example doesnt run in my PC because it gets errors:

conflict1_by_ghosthead_nebula-d9r7xkv.jpg

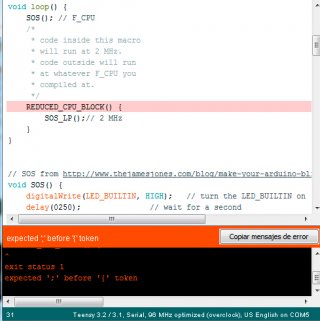
I changed the extern "C" lines for extern "C++" and got another error:

conflict2_by_ghosthead_nebula-d9r7xl4.jpg

And if I put the ";" now says the function "is not declared in this scope".

Can you see now why this noobie lady_in_distress is having a pretty huge headhache? :(
 
REDUCED_CPU_BLOCK {} not REDUCED_CPU_BLOCK() {}

You should do your program like so:
Code:
Setup timer for 1 second
Execute T1
Is there sufficient time to sleep? If so sleep and let the timer wake up the device. If not wait for the timer to end

Setup timer for 2 seconds
Execute T2
Is there sufficient time to sleep? If so sleep and let the timer wake up the device. If not wait for the timer to end

Setup timer for 3 seconds
Execute T3
Is there sufficient time to sleep? If so sleep and let the timer wake up the device. If not wait for the timer to end
Loop to start
 
*sighs*

Let me try to explain better (seriously can you learn spanish? would be easier for me :V)
Sorry.

From this example: https://github.com/duff2013/Snooze/blob/master/examples/reduced_cpu_block/reduced_cpu_block.ino the micros_lp() and delay_lp() are pretty interesting and could be helpfull. Unfortunately the example doesnt run in my PC because it gets errors:

View attachment 6357

I changed the extern "C" lines for extern "C++" and got another error:

View attachment 6358

And if I put the ";" now says the function "is not declared in this scope".

Can you see now why this noobie lady_in_distress is having a pretty huge headhache? :(
I though I fixed that with my last update guess not, try this:
Code:
/***************************************
 * REDUCED_CPU_BLOCK allows you to run
 * code at 2 MHz (VLPR). See micro_lp and
 * delay_lp to see how to convert core
 * functionality at F_CPU to work at 2 MHz.
 ****************************************/
#include <Snooze.h>
//*************************************Dynamic Core C-Linkage**************************************
#ifdef __cplusplus
extern "C" {
#endif
    //*******************low power micros @ 2 MHZ*************************
    uint32_t micros_lp(void) {
        uint32_t count, current, istatus;
        
        __disable_irq();
        current = SYST_CVR;
        count = systick_millis_count;
        istatus = SCB_ICSR; // bit 26 indicates if systick exception pending
        __enable_irq();
        
        if ((istatus & SCB_ICSR_PENDSTSET) && current > 50) count++;
        current = ((TWO_MHZ / 1000) - 1) - current;
        return count * 1000 + current / (TWO_MHZ / 1000000);
    }
    
    //*******************low power delay_lp @ 2 MHZ************************
    void delay_lp(uint32_t ms) {
        uint32_t start = micros_lp();
        
        if (ms > 0) {
            while (1) {
                if ((micros_lp() - start) >= 1000) {
                    ms--;
                    if (ms == 0) return;
                    start += 1000;
                }
                yield();
            }
        }
    }
#ifdef __cplusplus
}
#endif


void setup() {
    pinMode(LED_BUILTIN, OUTPUT);
}


void loop() {
    SOS(); // F_CPU
    /*
     * code inside this macro
     * will run at 2 MHz.
     * code outside will run
     * at whatever F_CPU you
     * compiled at.
     */
    REDUCED_CPU_BLOCK() {
        SOS_LP();// 2 MHz
    }
}


// SOS from http://www.thejamesjones.com/blog/make-your-arduino-blink-sos
void SOS() {
    digitalWrite(LED_BUILTIN, HIGH);   // turn the LED_BUILTIN on (HIGH is the voltage level)
    delay(0250);               // wait for a second
    digitalWrite(LED_BUILTIN, LOW);    // turn the LED_BUILTIN off by making the voltage LOW
    delay(0250);               // wait for a second
    
    digitalWrite(LED_BUILTIN, HIGH);   // turn the LED_BUILTIN on (HIGH is the voltage level)
    delay(0250);               // wait for a second
    digitalWrite(LED_BUILTIN, LOW);    // turn the LED_BUILTIN off by making the voltage LOW
    delay(0250);               // wait for a second
    
    digitalWrite(LED_BUILTIN, HIGH);   // turn the LED_BUILTIN on (HIGH is the voltage level)
    delay(0250);               // wait for a second
    digitalWrite(LED_BUILTIN, LOW);    // turn the LED_BUILTIN off by making the voltage LOW
    delay(0600);               // wait for a second
    
    digitalWrite(LED_BUILTIN, HIGH);   // turn the LED_BUILTIN on (HIGH is the voltage level)
    delay(1000);               // wait for a second
    digitalWrite(LED_BUILTIN, LOW);    // turn the LED_BUILTIN off by making the voltage LOW
    delay(0250);               // wait for a second
    
    digitalWrite(LED_BUILTIN, HIGH);   // turn the LED_BUILTIN on (HIGH is the voltage level)
    delay(1000);               // wait for a second
    digitalWrite(LED_BUILTIN, LOW);    // turn the LED_BUILTIN off by making the voltage LOW
    delay(0250);               // wait for a second
    
    digitalWrite(LED_BUILTIN, HIGH);   // turn the LED_BUILTIN on (HIGH is the voltage level)
    delay(1000);               // wait for a second
    digitalWrite(LED_BUILTIN, LOW);    // turn the LED_BUILTIN off by making the voltage LOW
    delay(0250);               // wait for a second
    
    digitalWrite(LED_BUILTIN, HIGH);   // turn the LED_BUILTIN on (HIGH is the voltage level)
    delay(0250);               // wait for a second
    digitalWrite(LED_BUILTIN, LOW);    // turn the LED_BUILTIN off by making the voltage LOW
    delay(0250);               // wait for a second
    
    digitalWrite(LED_BUILTIN, HIGH);   // turn the LED_BUILTIN on (HIGH is the voltage level)
    delay(0250);               // wait for a second
    digitalWrite(LED_BUILTIN, LOW);    // turn the LED_BUILTIN off by making the voltage LOW
    delay(0250);               // wait for a second
    
    digitalWrite(LED_BUILTIN, HIGH);   // turn the LED_BUILTIN on (HIGH is the voltage level)
    delay(0250);               // wait for a second
    digitalWrite(LED_BUILTIN, LOW);    // turn the LED_BUILTIN off by making the voltage LOW
    delay(1000);               // wait for a second
}


void SOS_LP() {
    digitalWrite(LED_BUILTIN, HIGH);   // turn the LED_BUILTIN on (HIGH is the voltage level)
    delay_lp(0250);               // wait for a second
    digitalWrite(LED_BUILTIN, LOW);    // turn the LED_BUILTIN off by making the voltage LOW
    delay_lp(0250);               // wait for a second
    
    digitalWrite(LED_BUILTIN, HIGH);   // turn the LED_BUILTIN on (HIGH is the voltage level)
    delay_lp(0250);               // wait for a second
    digitalWrite(LED_BUILTIN, LOW);    // turn the LED_BUILTIN off by making the voltage LOW
    delay_lp(0250);               // wait for a second
    
    digitalWrite(LED_BUILTIN, HIGH);   // turn the LED_BUILTIN on (HIGH is the voltage level)
    delay_lp(0250);               // wait for a second
    digitalWrite(LED_BUILTIN, LOW);    // turn the LED_BUILTIN off by making the voltage LOW
    delay_lp(0600);               // wait for a second
    
    digitalWrite(LED_BUILTIN, HIGH);   // turn the LED_BUILTIN on (HIGH is the voltage level)
    delay_lp(1000);               // wait for a second
    digitalWrite(LED_BUILTIN, LOW);    // turn the LED_BUILTIN off by making the voltage LOW
    delay_lp(0250);               // wait for a second
    
    digitalWrite(LED_BUILTIN, HIGH);   // turn the LED_BUILTIN on (HIGH is the voltage level)
    delay_lp(1000);               // wait for a second
    digitalWrite(LED_BUILTIN, LOW);    // turn the LED_BUILTIN off by making the voltage LOW
    delay_lp(0250);               // wait for a second
    
    digitalWrite(LED_BUILTIN, HIGH);   // turn the LED_BUILTIN on (HIGH is the voltage level)
    delay_lp(1000);               // wait for a second
    digitalWrite(LED_BUILTIN, LOW);    // turn the LED_BUILTIN off by making the voltage LOW
    delay_lp(0250);               // wait for a second
    
    digitalWrite(LED_BUILTIN, HIGH);   // turn the LED_BUILTIN on (HIGH is the voltage level)
    delay_lp(0250);               // wait for a second
    digitalWrite(LED_BUILTIN, LOW);    // turn the LED_BUILTIN off by making the voltage LOW
    delay_lp(1000);               // wait for a second
}

In my project I have a planner that execute few tasks (for example, 3), those tasks have certain computing time (I'm working with 1, 2 and 3 seconds, respectively), and also a period time (a max time they have for execute, considering priorities and interruptions, in this case they have 4, 8 and 12 sec). Look at the following image:

View attachment 6356

The one upside is the time "thing" (sorry dont know the english word for it) of the tasks executions in normal conditions, at max speed. The one downside is what I need (same RM but with energy saving). As you can see, in certain "ticks" the computing time of the tasks (in blue) needs to be extended, that's why in certain moments I need to decrease CPU speed, and no just to a fixed value (like 2MHz) but in a value that depends of an alpha factor (that might be calculated), and since I got multiple tasks I need to get back to max speed (and hiperperiod is ciclic, will reppeat during the algorithm lifetime).
Can you post some code? Why can't you just sleep instead for how many "ticks" you need? Without any code no one can really help, sorry but that the way it is. Can you give us something we can wrap our brains around as far as what you are trying to accomplish?

And duff, I suposed F_CPU was going to be the same, that's why I tried the:

Code:
SIM_CLKDIV1 = SIM_CLKDIV1_OUTDIV1( 0 ) | SIM_CLKDIV1_OUTDIV2( 0 ) | SIM_CLKDIV1_OUTDIV4( 0 );
  blinking()

Because I though it would do changes based in the F_CPU value. But in the end it just worked in weird way, even dissabling/enabling the USB.
As soon as you change SIM_CLKDIV values F_CPU does not change (its a constant) but everything that is coded to use F_CPU will need to be changed for the new cpu speed, thats why I gave you that delayMicroseconds example. Again without any code I or anyone else really knows what you are trying to do!
 
Xeno I'm not used to sleep. In fact also tried to learn to use id and felt worse...

About code... can give you some (since is quite long) but later... feel kinda sick. Can try duff's changes but again... later...

Thanks for your answer guys. Kisses <3
 
It's me again.


duff your code still gives problem with the REDUCED_CPU_BLOCK() line. The "expected ;" and the "is not declared in this scope"


About my code, I'll put some of it:

Code:
#include <TimerThree.h>

// Tasks
class tarea {
  private:
    int Cik, Dik, Pik, Fi;
    long Ki;
    float alpha;
    bool listo;
    

  public:
    bool setReady(int x);
    bool isReady();
    int getCik();
    int getPik();
    int getDik();
    float getAlpha();
    int getFi();
    void funcion(int x);
    void constructor(int a, int b, int c, float d, int e);
    void borrar();
};

// Planner
class planificador {
  private:
    int maxT;
    void escalador();

  public:
    void constructor(int x);
    void priorizar(int p);
    void ejecutar();
    void resetear();
} plan;

// Other classes yadda yadda yadda you dont need that info

// Global values

const int tope = 3; // max tasks amount (for now 3)
const int L9 = 9;
const int L12 = 12;
const int L13 = 13;
  
tarea Ti[tope];     // tasks list
int param[tope];    // planning parameters
int estado[tope];   // estate of the tasks: 1 executing, 0 not executing
int activo = -1;    // current active task. -1 if noone
int pl = 1;         // planers (1-5, for testing purpoise using 1, latter gonna add an interface where user can select it)

// Related with the timer
volatile long tic = -1;
long actual, ant;
bool on = false;


// Now starts the fun part

void setup() {
  
  // Serial monitor setup
  Serial.begin(9600);
  while(!Serial);
  delay(1000);
  Serial.println("Conexion establecida. Ingrese 1 para iniciar");
  ant = millis();
  
  defPIN(L9);
  defPIN(L12);
  defPIN(L13);

  Timer3.initialize();
  Timer3.setPeriod(1000000);
  Timer3.attachInterrupt(tempo);

  // All fields in 1 (since all tasks must be active first)
  for(int i = 0; i < tope; i++)
    estado[i] = 1;
}


/*********************** MAIN CODE ************************/

void loop() {

  // Load data interface, only occurrs once
  if(Serial.read() == '1'){  
    Ti[0].constructor(2, 3, 8, 1.0, 2);
    Ti[1].constructor(3, 7, 12, 1.0, 3);
    Ti[2].constructor(1, 1, 4, 1.0, 1);
    plan.constructor(3);
    plan.priorizar(2);
    Serial.println("Proceso iniciado. Presione 0 para terminar");
    tic = 0;
    on = true;
  }

  // Executing (after starting process)
  if(tic > -1 && on)
    plan.ejecutar();

  // A little instruction to stop process (could take that off lter, thats for testing purpoises)
  if(Serial.read() == '0'){
    Timer3.stop();
    on = false;
    Serial.print("Proceso finalizado");
  }
}

// Duh....
void defPIN(int pin){
  pinMode(pin, OUTPUT);
}


// Timer

void tempo(){
  if(tic != -1){
    actual = millis();
    if(actual - ant >= 1000){
      Serial.println(tic);

      for(int j = 0; j < tope; j++){
        Ti[j].setReady(j);
      }

      callBack();

      tic++;
      ant = actual;
      actual = millis();
    }
  }
}

// Subroutine to check which task has more priorities

void callBack(){
  for(int i = 0; i < activo; i++)
    if(estado[i] == 1){
      int aux = activo;
      Ti[i].funcion(i);
      activo = aux; // going back to last active process before interruption
      tic += Ti[i].getCik() - 1; // Ajuste en los pulsos
      break; // Al tratar la tarea prioritaria se sale del ciclo
    }
}

About the individual classes:

Code:
/****** PLANNER ******/

void planificador::escalador() {
  // Here comes the code where I change the frequency, this is the method that is giving me nightmares
}


// Other methods

void planificador::priorizar(int p) {
  for(int i = 0; i< maxT; i++){
    switch(p) {
      case 1: param[i] = Ti[i].getPik(); break; 
      case 2: param[i] = Ti[i].getDik(); break;
      case 3: /* Planificador Redu */ break;
      case 4: /* Planificador LPRMFAE */ break;
      case 5: /* Planificador EDF */ break;
    }
    /* As you see, it's incomplete, because I need the change freq. thingy, but gonna be based in the first 2
        prolly gonna activate a flag showing there's an energy management or something like that */
  }
  delay(500); // Just a little delay. Can take it off
  
  // Bubble method to rearrange array according to priorities
  for(int x = 0; x < maxT-1; x++)
    for(int y = 0; y < maxT-1; y++)
      if(param[y] > param[y+1]){
        int paux = param[y];
        tarea aux = Ti[y];
        param[y] = param[y+1];
        Ti[y] = Ti[y+1];
        param[y+1] = paux;
        Ti[y+1] = aux;
      }
}

void planificador::constructor(int x) {
  maxT = x;
}

void planificador::ejecutar() {
  for(int i = 0; i<tope; i++){
    if(Ti[i].isReady()){
      activo = i;
      Ti[i].funcion(i);
    }
  }
}

void planificador::resetear() {
  for(int i = 0; i<maxT; i++)
    Ti[i].borrar();
}

Code:
/***** TASKS *****/

void tarea::constructor(int a, int b, int c, float d, int e){
  if(a>=0 && b>=0 && c>=0 && d>=0.0 && e>=0){
    Cik = a;    // Computing time
    Dik = b;    // Deadline
    Pik = c;    // Period
    Ki = 0;     // Last activation time (in this case tics)
    alpha = d;  // The alpha factor will change according of the freaquency I'll need. At mast frequency is 1
    Fi = e;     // Select any function
    listo = true;
  }
  else{
    borrar();
  }
}

void tarea::borrar(){
  Cik = 0;
  Dik = 0;
  Pik = 0;
  Ki = 0;
  alpha = 1.0;
  Fi = 0;
  listo = false;
}

void tarea::funcion(int x){
  if(listo) {
    listo = false;
    switch(Fi){
      case 1: blinkeo(13,50); break;
      case 2: Fade(9); break;
      case 3: MorseSOS(12); break;
      /* more functions with aditional cases */
      default: Serial.println("Sin elegir"); break;
    }
    estado[x] = 0;
    activo = -1;
  }
}

// Check tasks status

bool tarea::setReady(int x){
  if((tic == 0) || (tic - Ki >= Pik)){
    listo = true;
    Ki = tic;
    estado[x] = 1;
  }
  return listo;
}

bool tarea::isReady(){
  return listo;
}

// Accesing inner attributes

int tarea::getCik(){
  return Cik;
}

int tarea::getPik(){
  return Pik;
}

int tarea::getDik(){
  return Dik;
}

float tarea::getAlpha(){
  return alpha;
}

int tarea::getFi(){
  return Fi;
}

And the individual fucntions are just a blinking, a fading and a SOS signal. Gonna share code anyways:

Code:
/*** All functions are designed to exectude in a fixed computing time ***/

// Blink - 1 seccond
void blinkeo(int led, int dly){
  for(int i=0; i<10; i++){
    digitalWrite(led, HIGH);
    delay(dly);
    digitalWrite(led, LOW);
    delay(dly);
  }
}

// Fade - 2 seccond
void Fade(int Aled){
  int brightness = 0, cant = 5;
  for(int i= 0; i<102; i++){
    brightness = brightness + cant;
    analogWrite(Aled, brightness);
    if(brightness == 0 || brightness == 255){
      cant = -cant;
    }
    delay(19);
  }
  delay(62); // Adjusting time
}

// SOS - 3 secconds
void MorseSOS(int led){
    puntos(led);
    delay(200);
    rayas(led);
    delay(200);
    puntos(led);
    delay(500);
}

void puntos(int l){
  for(int i=0; i<3; i++){
    digitalWrite(l, HIGH);
    delay(80);
    digitalWrite(l, LOW);
    delay(80);
  }
}

void rayas(int l){
  for(int i=0; i<3; i++){
    digitalWrite(l, HIGH);
    delay(300);
    digitalWrite(l, LOW);
    delay(80);
  }
}


I know what you're going to tell me: How come I'm executing long sentences in the interruption? that's the best I could do, and it works for my purpoises. Maybe later gonna use sleep and such... or maybe not. Why the hell am I using classes instead of structs? I'm an OOL freak so... xD (again, later this can be adapted for structs, but gonna leave that job for another student).

My idea is to add an instruction that checks the alpha factor, and according to its value change the CPU speed. I could manage to decrease it (as you could see in a previous post), but no idea how to get it back. I'm thinking there should be a reboot of CLOCKDIV1 or something... a "REDUCED_CPU_BLOCK" could be also usefull, but... doesnt work yet xDDDD


So there you go guys.
 
Last edited:
Still haven't explained what this project is!? Just blinking leds? How does someone use this? Is it battery powered, explain the actual piece of equipment too (Hardware + Software).

So it seems like you're trying to make some type scheduler using Timer3? That timer uses the system BUS CLOCK so that is what you have to be concerned with. The problem is that the F_TIMER in the TimerThree.h is not editable so it will stay the same when you change bus speeds so the timer period will change. Now you might be able to figure out a new timer period by looking at this and reverse engineer that formula for the new bus speed. What I am saying is that the interrupt you attach to Timer3 will not fire at the same interval once you change speeds. That might not matter since you use "millis" to fire those functions at your stated intervals but there is another problem because "millis" uses F_CPU. There you have to write new "millis" function for whatever speed you're going to.

This will be a huge endeavor, I hope can see that it's not just changing the speed of teensy but everything needs to be adjusted. I think you should just sleep the teensy instead of trying to make all your code play nice with changing the speeds to save power. Also I don't see why you can't just compile it for say 4-16MHz. From what I see your not doing anything to crazy where you would need full performance or maybe i missed it?
 
OMG how else should I explain it? *sighs*

OK let's do a list:

1) I have some tasks. Tasks can be any function, any algorythm, anything, like a blink or calculating square roots. That doesn't matter.
2) I put the teensy in a protoboard, conected via USB and execute those functions.
3) I dont execute them randomly, they do that in certain order. And the order is made by a planner. For a better understanding. I'll say RM (shorter period = more priority).
4) In theory, during the execution time when some conditions meet, the planner should interrupt the current process to execute one with more priority. But since I have no idea how to do that (believe me, I been looking for tons of info and didnt find anything usefull) I decided to use Timer3.
5) OK system works, doing the right interruptions. Now check the graphic:
tasks_by_ghosthead_nebula-d9r7vcx.jpg
The first one if the execution of the tasks (in blue). Af you can see, between periods there are sometimes a "slack time" where no tasks are executed.
6) To get seccond image (the "slack time" is used) I need to change CPU speed, making tasks execute in a longer time. That's where comes the "alpha" factor: Initially, system should work at max speed (alpha = 1), then when it finds these "slack times" alpha should change (for example, 0.5 that will make system work as, let's say, 16Mhz -of course I need to do calculations).

So.... my problems are:

A) Need to do an inner interruption if dont want to use Timer3. No idea how to do that.
B) Need to change CPU speed according to the alpha factor. Either I change speed dinamically or if I use sleep maybe alpha would set the amount of sleep time. How to do that? In languages like C# I just use a sleep() method. Here seems to be more complicated (or should I use the deepsleep from snooze? I'm confused)
C) If I sleep system, prolly gonna need a watchdog. Being reading about it and feel like in the abyss =/
D) Dont have much time. Professors are asking me to finish this ASAP. Tried to find the faster way to solve this. After finishing this nightmare would fix stuff with more calm u_u
 
Last edited:
Status
Not open for further replies.
Back
Top