Teensy as a MIDI controller - lots of connections

Status
Not open for further replies.
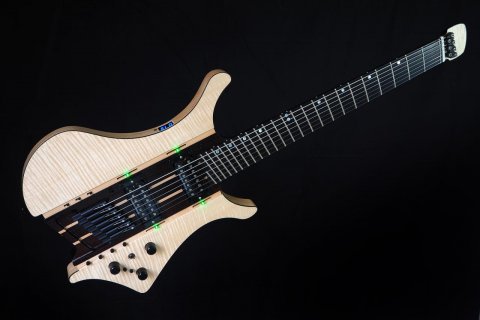
I have spent a long time building a MIDI controller that is built into my electric guitar to control digital effects on iOS and PC/Mac. I have used a MidiCPU made by Highly Liquid (www.midicpu.com) as the 'brain' which works almost as well as I had hoped. I *think* that the MidiCPU is reaching the end of it production and is currently sold out, so I'm looking to find another processor to replace it with that will offer more potential for development and has a more secure future, and the Teensy seems the obvious choice.

Being a total noob to anything Arduino, can anyone please advise if I will be able to achieve what I need with the Teensy? It is important that the dimensions of all circuitry are a small as possible. With the MidiCPU I made a custom PCB shield to mount it on to make all the connections with Harwin M20 connectors on the wires plugging into to male headers on the shield, which was great and I envisage doing the same thing again with the new processor. It also carried all the resistors for the various LEDs.

Here's a list of everything I need to connect:

4x 10k slide potentiometers, to output MIDI CC messages
4x LEDs which are integrated into the slide pots
1x latching slide switch, to turn the pot LEDs on or off

1x rotary encoder - to increment and decrement a register, used to send a Program Change MIDI message to change presets
1x momentary switch, to actually send the Program Change message once selected with the encoder

1x 3-digit 7 segment LED display, to display chosen preset number selected with the encoder (1-128) - this uses up 11 pins on the MidiCPU
1x latching slide switch, to change the display to show(0-127) instead of (1-128) if required

1x momentary switch, to send a global refresh MIDI message
4x momentary switches, used like 'stomp' pedals to turn effects on and off - the sketch needs to make these work as latching

1x LED indicating processor activity (this isn't absolutely necessary)

1x MIDI out jack
1x 9V battery to power the device, I assume I'd need a regulator..?
1x latching slide switch, to turn the device on and off

I would also LOVE to build in Bluetooth wireless MIDI. I currently use a Quicco Sound Mi.1 (quicco.co.jp) plugged into the MID output, but I REALLY want to get the same connectivity built in...

So will all this be possible with the Teensy, and how which pins would I need to connect everything up to? In particular are there enough pins available..? How do I connect the 7 segment display using fewer connections but without increasing the footprint... how does the encoder connect?

And where could I get help with programming it? I have no experience with Arduino code and don't know where to start... I learnt the MidiCPU code so have some understand that may be relevant, but any help or suggestions would be very gratefully received.

Thanks!
 

Attachments

  • 2016-02.jpg
    2016-02.jpg
    83.4 KB · Views: 511
Being new to this myself I'm not going to be able to give you as much insight as many, but just going through your list it all seems within the capability of the Teensy. I'm thinking in terms of the 3.2 because that's the one I've really started with and based my current project around but I wouldn't be surprised if other versions will handle it too. I'd recommend starting research a piece at a time and finding out how you would use just that one piece with the Teensy. The pin count vs what you've listed seems fine unless I'm grossly misjudging something.

Although I've seen a lot of MIDI controller projects on the various DIY-oriented microcontrollers and the fact that they can kind of be as simple as you want based on all the resources available, something custom and tailored to your needs will take more work on your part rather than grabbing something pre-made and tweaking values here and there. However, I'm in this for the learning experience too and to end up with something I could not go out and buy - so if you're like me it'll be a good experience.

As for where to start, I think it'll just take a lot of legwork to learn how you'd use each component by looking at examples of various libraries provided both on pjrc.com and various user-created libraries available out there. Also, since there are a lot of MIDI-centric projects like this in general I think you'll find a lot of reading material around as well for how people accomplished certain portions of their MIDI projects. Once you've done that research and familiarized yourself with how the example programs and user-created projects are structured it will probably make sense how you'd want to structure your project. But, in my brief time here it seems there are lots of knowledgeable and friendly people here ready to help if you get stumped along the way!

By the way, as a fellow guitarist that guitar is VERY cool. Did you build it? If so, kudos because it looks very nicely done! I've built a few electrics myself but I haven't ventured into the ergo/headless yet (but I think I'd like to).
 
That's a long shopping list but I believe it's all possible with teensy.

I don't know if it's still the only choice for arduino but it was the first (to support usbmidi directly).
 
Thanks guys.

By the way, as a fellow guitarist that guitar is VERY cool. Did you build it? If so, kudos because it looks very nicely done! I've built a few electrics myself but I haven't ventured into the ergo/headless yet (but I think I'd like to).

Yes I did build the guitar, and thanks for your kind comments. There's more info here if you're interested...

In building this prototype with the midiCPU I fully understand the amount of work it takes to develop the circuit and code..!! The thought of doing it all again with another language is a bit full on but I do have the concept worked out this time and the circuit should be easy enough to adapt.

I've ordered a teensy to begin breadboarding and coding each bit at a time as you suggest. The elements involving the encoder + 7 segment display + send PC message switch, both in terms of wiring to the teensy and coding, are going to be most challenging to me I think, so any helpful pointers would be much appreciated.

Cheers
 
Thanks guys.


Yes I did build the guitar, and thanks for your kind comments. There's more info here if you're interested...

In building this prototype with the midiCPU I fully understand the amount of work it takes to develop the circuit and code..!! The thought of doing it all again with another language is a bit full on but I do have the concept worked out this time and the circuit should be easy enough to adapt.

I've ordered a teensy to begin breadboarding and coding each bit at a time as you suggest. The elements involving the encoder + 7 segment display + send PC message switch, both in terms of wiring to the teensy and coding, are going to be most challenging to me I think, so any helpful pointers would be much appreciated.

Cheers

Very nice, and cool to meet a fellow SSO member here. I actually try to stay off the Luthiery section when I'm not able to build a guitar because it always makes me want to build so I missed your post over there.

I have to think that if you've done this all once in another environment that after you familiarize yourself with this one that it shouldn't take as long as you might think. It seems like although you have a lot of things to interface with, they are all very simple. Even the MIDI, considering you already understand what you need of it and there is a very good MIDI library for the Teensy.

As for pointers for your starting components, I haven't worked with an encoder or 7 segment display yet, but I'd start here:

https://www.pjrc.com/teensy/td_libs_Encoder.html

https://www.pjrc.com/teensy/td_libs_LedControl.html

I apologize if you've already seen these, but if not hopefully they'll help. If you have your breadboard available you can set up just what you need to run each device at once and then use the examples to blend a few concepts together to do something a little closer to what you're wanting in the end.

Also keep in mind when looking for resources that the Teensy is made to be used like an Arduino because there is a vast user base and knowledge base already for Arduino. So if you're looking for learning or reference material you can always include that in your search. They have their differences but the reference material will probably help much more than hurt.
 
I assume so. The segment display looks like it just directly controls the segments. The rotary encoder page you linked looks to be the same one that Paul links to on the bottom of his encoder library page. You can always install them and see if the example compiles for Teensy using the "verify" button on the arduino ide while you've selected a teensy as your board.
 
Thanks sandalhat, really appreciate your input. My teensy has arrived and I'm just soldering up the headers, and have my hands on an LED driver chip, diodes for external power etc. Just installing Arduino and teensyduino now...

will no doubt be back for more advice as she progresses...!
 
Wow @snapperjonno what an amazing piece of kit ... 7 string midi enabled steinberg .... I'm guessing you know who Paul Masvidal is ... if not you should definitely check out Cynic... I think Paul (heavily) uses an axe fx rig ... lots of textures going on, and he is a steinberg endorsee, I think. Tech pink floyd progressive yadayada meets alt metal.

Your project is similar to one I'm working on (but no guitar hardware for me!!) so with a bit of work you will get there with a teensy no worries... I think the SEVSEG library will work on the teensy (from a *really* quick skim), but if not, it would be an easy 'port', I think. There are some groovy little oled alternatives that are easy to work with (thats what I use for feedback) ....

LIPO batteries seem to be a common way to power teensys, and there are breakout boards if you need the underside pins (I can't quite work out exactly how many pins you are going to need). Good luck!!
 
Hey Adrian thank you for all your comments. Great to hear from a kiwi here too, I spent 8 years living in Arrowtown until relatively recently and miss it like hell...

Yes I've come across Paul Masvidal and cynic via Strandberg (rather than Steinberg) and BiasFX etc, but thanks for the reminder I'll refresh my knowledge. I'm just at the point of getting the concept and instruments out there for feedback and that's a great tip.

I was up till 4am last night getting familiar with the teensy code and had the seven segment displaying correctly with the SEVSEG library so a reasonable if slow start. I tried the Ledcontrol option too with the driver chip but it didn't work, I'm guessing because the teensy only supplies 3.3v and the driver expects 5v and it looks like I'd need a logical level converter and I feel that would be too much real estate on the final shield I anticipate building, so I may need to utilise the underside pins when I get to that point... But that's OK I think. In the meantime the SEVSEG is working so I know I have a fall back. Am I right about the 5v thing though?

The lipo battery would be great but they require charging of course and the idea of running out of juice and not being able to power up at the critical moment wouldn't be good, so I'm more tempted by standard batteries. The guitar has to operate on a single cable or std instrument cable + wireless, so power in is also another thing to accommodate, unless there are other suggestions out there..? Would i be right in thinking that 3 AA batteries would also last longer than a 9V stepped down, also because they have a higher mA?

Biggest thanks for the tip on oleds though, I didn't even know they existed and a quick Google search has got me excited as they look way better than the seven segment. Do you have any experience with these and the teensy or can you point in any useful directions to get experimenting with them for this project?

If you'd be interested in helping me code all this I'd be extremely grateful, please pm me if so. That goes for anyone out there!

Kia Ora
 
Strandberg! I didn't even rialise I'd written steinberg .... Wow Arrowtown is just soo beautiful ...

I have had experience with oleds and the teensy ... lots of people use them. They cost about 5 bucks and play nice. I used them for feedback from my $%$#% rotary encoder ... 1 click of the detent was not reliably a 1 step change in the midi channel, so I hooked up an oled to tell me what channel the damn rotary encoder had given me.

i'm happy to help with code. I have code for switches that incorporates debouncing as part of the read using a filter! I have encoder code, and midi code, and slider code with hysterisis built in! I have code for the cheapo OLEDs as well, using a lightweight non-wire driver (and adafruit graphics) .... You can PM me, or whatever ... I'll provide what help I can in the time I have.

I'm hoping to put all my code out there soon.... just have to finish a couple of tests.... its done up as a library! so you might be able to use it 'off the shelf, just about, for some switches and a rotary and a slider (it supports 13 buttons, 1 rotary, and one fader, all outputting midi messaging) ... adding more 'peripherals' in would not be hard (nor changing the messaging), in fact maybe just doing multiple objects could get you there, when i think about it, although there would have to be a bit of mucking around with pin assignments.

you can see most of the code here.

But, like I said, I haven't finished testing and documenting it quite yet (still futzing around with a 2 x 2 midi interface. I need a few more days to tidy stuff up.

Working out the pin assignments for your project is probably the best place you can start at this point.... A bit of planning around that will make things easier in the long run as I have found out myself.

Oh, and you can pinch 5V from the USB power line to power 5v stuff .... I tried it with a chip that requires 5V supply for its logic and it worked fine.... others may have a different take on that... google is your friend.
 
Last edited:
Can't resist a gutshot of my controller .... complete chaos, but IT LIVES. A connector board from FrankB and a usb port courtesy of macaba. A week of soldering practice! Using proper connectors and a real pcb just weren't an option.:cool:

WP_20160610_19_26_44_Pro.jpg
 
Status
Not open for further replies.
Back
Top