Three cheers for Daniel Gilbert's Teensy 3.2 Breakout board!

Status
Not open for further replies.

Brooks

Well-known member
It's not often that I feel compelled to announce my admiration for a product, but I must tell you that Daniel Gilbert's Teensy 3.2 breakout board is just outstanding.

It's a board that the Teensy 3.2 permanently mounts to, increasing the footprint of the Teensy to 2.4" x 0.9". Considering that the Teensy is, well, teensy, the small size increase is not a big deal.

What IS a big deal is that the pads on the bottom of the Teensy are now brought out to the edge of the breakout board. Now all the pins of the Teensy are readily accessible. I wanted those pins! Now I can have them.

www.tall-dog.com. $12. Worth every cent!

If it's just the bottom-pads: Three Boards for $3.45 (shipping incl.) ... https://oshpark.com/shared_projects/0T6ZdhhG
 
I wasn't aware those were out there! well, you learn something new every day.

I need to prototype a parent board with more uarts and a few other odds & ends, and like the one I found better, but I'll keep Oshpark's board in mind
 
I use frankb's connector boards .... they are great. You just have to remind yourself of the pin numbering every once in a while. And such good value.

edit

I also use macaba's oshpark usb connector, for usb-b. I can not recommend that highly enough.
 
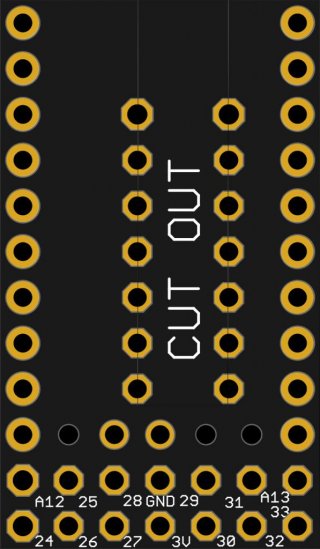
I do wish the board printed which pin went with the underneath pad.

From an organization standpoint, Frank's board is great in that it only adds 0.2" to the length of the Teensy, while Daniel's board is on the order of 1" bigger. However, if you tend to use a breadboard over a protoboard, Daniel's board is better, because all of the pins are brought out to normal breadboard slots.

Daniel's board also brings out the reset pad (and now has support for the different location of the reset pad between 3.1 and 3.2).

The two mounting holes on Daniel's board can be helpful in some situations.

I haven't tackled either yet, but FrankB's board looks easier to solder than Daniel's. And if you are really solder challenged, having an option where Daniel will solder a Teensy 3.2 for you can be helpful.

Different strokes for different folks. It is nice to have alternatives.

Note, the next generation of Teensy will have a longer board, and break out most of the underneath pins (though a few of the underneath pins got changed, and the back row of pins is in a different location). There is a possibility, that even more pins might be broken out underneath the K64/K66 based Teensys.
 
Last edited:
LOL yes it can be a challenge knowing which pin goes with what underneath pad .... I was trying to be diplomatic ... but YES put the damn numbers on the breakouts, Frank B.

Given that for hobbyists like myself more pins is like the number one thing as projects get more and more out of hand, having more pins broken out 'natively' is going to be a boon.

edit: I have no experience of Daniel's board, but I can say that soldering Frank B's boards is easy.
 
Last edited:
I got a couple of those from TallDog - still have not soldered one up. I did solder up a OSH Park ~ Teensy 3.1 breakout board last week to emulate the beta board I got with a T_3.1 and a RTC crystal and reset button. There is also this one Teensy 3.2 Breakout Board R3.

I have used at least two of Frank's Connector boards - I'm not sure if he realizes the Silkscreen layer is Free :)

I like the look of the TallDog board - but the direct solder to the under pads is more straightforward and works well with solderpaste.
 
You're going to laugh! The first thing I did after I took a good look at Daniel's board kit was to order a table-mounted magnifying glass/light combination from Amazon. I would have needed it anyway - all these Teensy things are just teensy!

After a few hours later, after some thought, I ordered a completed Teensy + Breakout assembly. My excuse to myself is that I needed another Teensy anyway. It had nothing at all to do with my ability to foresee horrible solder burns all over my fingers...
 
They are tiny ... I got a $15 set of these from Amazon - what table magnifier did you get?

I also got this solder paste that can allow 2nd hand free for holding with less burning proximity - especially useful on SMD's and mounting the castellated type boards. Just noticed I meaning of Low Temp - 278F - I should turn my iron down when using it.
 
I ordered this. I'll park it on top of the PC alongside my desk. I needed a lot more light anyway. My desk is currently set up with only low levels of available light, to make using the monitors easier. Not so conducive to soldering teensy parts!
 
Make sure you keep that solder paste in the fridge. I'd be interested to know what the lead free stuff is like though

I second the desk magnifier/light, they save having to use a microscope for 0.5mm pitch stuff
 
They are tiny ... I got a $15 set of these from Amazon - what table magnifier did you get?

I also got this solder paste that can allow 2nd hand free for holding with less burning proximity - especially useful on SMD's and mounting the castellated type boards. Just noticed I meaning of Low Temp - 278F - I should turn my iron down when using it.
For the fun of it I ordered one of these from Amazon to see if it helps. Currently I am simply using a magnifier lamp, that is sort of like the one I linked to from Amazon, which is probably 15 years old.

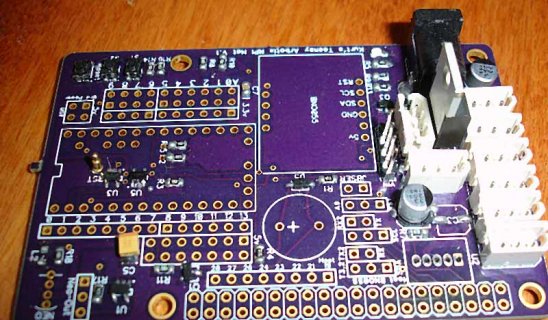
I probably should get something a little better, especially when I am trying to solder up a board, with smaller parts, like:
Teensy-RPI-Hat.jpg

Sorry off topic, but this one is partially assembled, but before I added the more expensive parts (I had the DC/DC converter semi installed), I tried applying power and it was obvious I had some shorts, probably in U3 or U5 or U1... Soon will try assembling the 2nd one... keep thinking maybe I need to try solder mask and ...
 
I love the color of that board!

I'm having too much trouble with my "Kid in the candy store" syndrome, but looking at your board reminded me of my end-game. I've realized that 18 servos add up to a worst-case 16A current draw - more than I want to put across the traces of a board. I'm going to put a "power board" down in the battery-level of the hexapod to handle power switching, signal buffering, etc, and move the power wires themselves into a hand-assembled harness on that level. Servo current will never hit a board. Unless I change my mind. Again...

But I need to prioritize! Threading Services first!

And more off topic, what do you use for schematic capture and layout?
 
Should take to different thread: The boards are done by OSHPark... Likewise you can get the OSHPark T3.2 for $17 same color, Likewise with The T3.5 beta...

Board has DC/DC converter, all of the VIN is on right hand side with as large of traces as possible. Also ability to turn power off to servos (Large transistor)....

Back to topic at hand, keep meaning to try the boards mentioned in this thread. But so far I have either rolled my own or I do have 1 of the Sparkfun boards.
 
U5 looks a little dodgy yeah. You have a lot of solder going on there so I'll assume you're using solder paste. You'll find it very hard to apply the right amount without a stencil

What I find useful if I am using solder paste like that is to do exactly what you've done but go over all the joints with solder wick and remove the excess

I'd strongly recommend a set of tweezers and a fine curved soldering tip though
 
:) where ?
The Board is too small to print the damn numbers :)

But of course, i could make a larger board..


OHNO NOT A BIGGER BOARD!!!

can't you get teensier numbers .... there has to be a way. We've put a man on the moon and we can't put little numbers on a teensy board:D:D:D:D:
 
Oh, it wasn't me who "put a man on the moon" :)

I tried it. The numbers would be 0.6mm high (i have no idea if that even can be printed) and look like this:
connectorboard3.jpg

I'm not sure if i want to make a test-order...
I need a microscope to read them :)
 
Last edited:
U5 looks a little dodgy yeah. You have a lot of solder going on there so I'll assume you're using solder paste. You'll find it very hard to apply the right amount without a stencil

What I find useful if I am using solder paste like that is to do exactly what you've done but go over all the joints with solder wick and remove the excess

I'd strongly recommend a set of tweezers and a fine curved soldering tip though
Sorry off topic... But actually I soldered with a fine (but straight point) and hopefully a lot of of flux... Probably an issue with older eyes and 10 thumbs and trying to see and do everything using a magnifying lamp...

Now back on topic.
Frank B said:
I tried it. The numbers would be 0.6mm high (i have now idea if that even can be printed) and look like this:
Yep I struggle on my boards as well. Sometimes I have luck if I rotate them 90 degrees, but here I don't think it would help much.

Also sometime it would be great to see what you do in your design to allow the cutout. Obviously it appears OSHPark is happy with it, have you tried others like Seeedstudio?

Kurt
 
@Frank B I'm ordering 3 more with or without the printing. They are great .....if you don't like the printing then thats ok with me... its your board, and am very grateful that you have shared it .... perhaps my sense of humor is a bit over the top... I use an led-lit desk magnifier with a loupe insert .... great for all sorts of small things, from teensy boards to my daughter's jewellery ...But now that you mention it, I've always wanted a microscope ever since I was a kid....
 
I did a test-order at digistump (4 Boards 2.80$) . I'm curious how it looks. I increased the size to 0.027, 15% - and as a test, the traces are 5 MIL.Ccurious if Digistump can handle this (and the cut-out trough the holes)
Unfortunately, Digistump is very slow with shipping to Germany. May take more than a month until I hold them in my hands..


If you want to risk $2.80: https://pcbs.io/share/46718

But - please - I DON'T KNOW IF THESE BOARDS ARE OK -
Ok ? :) Be warned :) They might NOT work. Might be my fault....Please test them, before using them...

Edit: Teensy 3.1/3.2 users in Europe: I have some boards here..so..if you need some.. feel free to write a PM. That's faster than ordering @ OSH or Digistump.And, no, I do not make any profit with it.
Edit: Boards, that are known to work: https://oshpark.com/shared_projects/0T6Zdhhi
 
Last edited:
Frank - I have one of the Digistump boards before you put labels on and the pinout matches the labels added here with my continuity meter. If the PCB routing is the same as the prior version they should be good? I have a set of these in my cart - once I place the order I should have them in ~2 weeks.
 
Status
Not open for further replies.
Back
Top