Audio Shield & Onboard Mic Troubleshooting (Urgent Project - Portland Art Museum)

Status
Not open for further replies.

cymaspace

Well-known member
We are having a heck of a time trying to get the Teensy Audio Shield to work with the onboard Mic that we ordered through the store: https://www.pjrc.com/store/teensy3_audio.html & https://www.pjrc.com/store/microphone.html

We have followed the directions and images and put together two separate units with Teensy 3.2, Audio Shield & Mic but both units show no change when using the Teensy examples for both peak amplitude and RMS peak

https://raw.githubusercontent.com/P...akAndRMSMeterStereo/PeakAndRMSMeterStereo.ino

We are in a bit of a pinch since we are installing an exhibit at Portland Art Museum this week and if we cannot get the Teensy Audio / Mic working, we'll have to resort to using our older approach with an MSGEQ7 IC and a bit of a hack with a voice recorder to provide line level audio in.

Has anyone here been successful with this set-up before that can help us with some troubleshooting within the next 24 hours? Any key pointers we need to look out for to troubleshoot this correctly? Thanks in advance!
 
This may help. I've attached code, that I tested to get RMS and Peak response (modified your code, but here are a few point:
- AUDIO_INPUT_MIC is the right value to use. I plugged it directly into the call to audioShield.inputSelect(AUDIO_INPUT_MIC);
- The Mic is a mono input (to the best of my knowledge). I just use channel 0 (left)
- I retyped your LeftPeak and leftRMS to floats. I think the math was dealing with the operations with integers and peak_L.read() would deliver a float between 0-1, and interpreted in the math as a 0 or 1. Not your intent.

my quickly-hacked code:
Code:
/* Adaptation of Stereo peak meter example, including RMS.
assumes Audio adapter but just uses terminal so no more parts required.

This example code is in the public domain
*/

#include <Audio.h>
#include <Wire.h>
#include <SPI.h>
#include <SD.h>
#include <SerialFlash.h>

//const int myInput = AUDIO_INPUT_LINEIN;
// const int myInput = AUDIO_INPUT_MIC;

AudioInputI2S        audioInput;         // audio shield: mic or line-in
AudioAnalyzePeak     peak_L;
//AudioAnalyzePeak     peak_R;
AudioAnalyzeRMS      rms_L;
//AudioAnalyzeRMS      rms_R;
AudioOutputI2S       audioOutput;        // audio shield: headphones & line-out

AudioConnection c1(audioInput, 0, peak_L, 0);
//AudioConnection c2(audioInput, 1, peak_R, 0);
AudioConnection c3(audioInput, 0, rms_L, 0);
//AudioConnection c4(audioInput, 1, rms_R, 0);
AudioConnection c5(audioInput, 0, audioOutput, 0);
//AudioConnection c6(audioInput, 1, audioOutput, 1);

AudioControlSGTL5000 audioShield;


void setup() {
  AudioMemory(5);
  audioShield.enable();
  audioShield.inputSelect(AUDIO_INPUT_MIC);
  audioShield.volume(0.5);
  audioShield.micGain(40);  // I added this to the code - I typically use this value
  
  Serial.begin(9600);
}

// for best effect make your terminal/monitor a minimum of 62 chars wide and as high as you can.

elapsedMillis fps;
uint8_t cnt=0;

void loop() {
  if(fps > 24) {
    if (peak_L.available() && rms_L.available() ) {
      fps=0;
//      uint8_t 
      float leftPeak = peak_L.read() * 30.0;
//      uint8_t rightPeak = peak_R.read() * 30.0;
//      uint8_t 
      float leftRMS = rms_L.read() * 30.0;
//      uint8_t rightRMS = rms_R.read() * 30.0;

      for (cnt=0; cnt < 30-leftPeak; cnt++) {
        Serial.print(" ");
      }
      while (cnt++ < 29 && cnt < 30-leftRMS) {
        Serial.print("<");
      }
      while (cnt++ < 30) {
        Serial.print("=");
      }
      
//      Serial.print("||");
//      
//      for(cnt=0; cnt < rightRMS; cnt++) {
//        Serial.print("=");
//      }
//      for(; cnt < rightPeak; cnt++) {
//        Serial.print(">");
//      }
//      while(cnt++ < 30) {
//        Serial.print(" ");
//      }
      Serial.print(AudioProcessorUsage());
      Serial.print("/");
      Serial.print(AudioProcessorUsageMax());
      
      Serial.print("\t");
      Serial.print(leftPeak);
      Serial.print("\t");
      Serial.println(leftRMS);

      
    }
  }
}

Try this to assure your MIC is working... and the RMS and peak are delivery what you expect

Nice textual graphing, by the way!
 
Last edited:
About a month back I got 2 and soldered one of those PJRC mics - as fitted in the included base - to my audio shield and it worked for me. I used that board on the T_3.6 it came with.
 
Thanks Davidelvig,
Will try your revised code, if we still are not getting any readings from both units, what else might the issue point to? (what are the chances of two dud units?). I placed the mic in the washer and ensured the flat-side was against the edge of the Audio shield just like the pictures so I am pretty sure the polarity is correct.
 
Try this test sketch Under Examples / Audio? :: C:\arduino_16_11\hardware\teensy\avr\libraries\Audio\examples\Tutorial\Part_2_04_Microphone_Check
 
If that code does note produce rms and peak results on your setup, take a picture of your setup showing how the teensy, audio board and mic are assembled. Post it here.
 
If you're trying to use the mic, this definitely needs to be changed:

Code:
const int myInput = AUDIO_INPUT_LINEIN;
// const int myInput = AUDIO_INPUT_MIC;

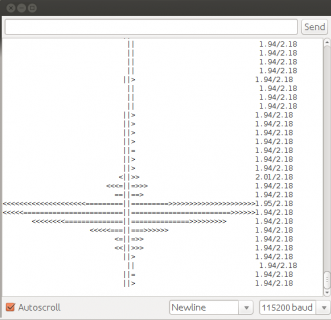
I ran your code just now (with this changed to select the mic) on a Teensy 3.2 with audio shield that has the mic. It works. Here's a screenshot of the response when I click my fingers a couple inches above the mic.

sc.png
 
Status
Not open for further replies.
Back
Top