Teensy 3.5/3.6 Breakouts Available Now + Discount for PJRC Forum Members

Status
Not open for further replies.

loglow

Well-known member
Hello!

Two of my new Teensy 3.5/3.6 breakout kits are now available on Tindie.

Features common to both kits:
  • Use many additional Teensy pins in a breadboard-friendly configuration.
  • Easily configure VIN-VUSB and/or USB host power settings with switches or jumpers (both are included).
  • Make your Teensy breakout socket-able with the optional Socket Kit (available in a few days).
  • Works great with the Micro SD Breakout ($8) for even more GPIO pins.
  • Includes all components and headers needed for assembly.
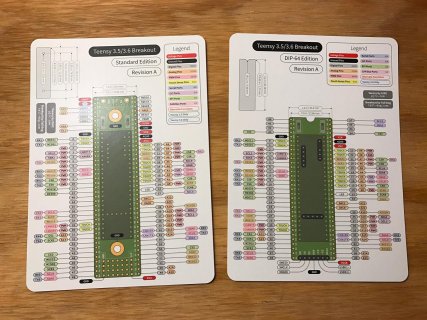
  • Includes a full-color printed pinout card.
  • Bare PCBs are available and cost $5 less than the kits.
  • Fully-assembled boards (including Teensy) are also available.
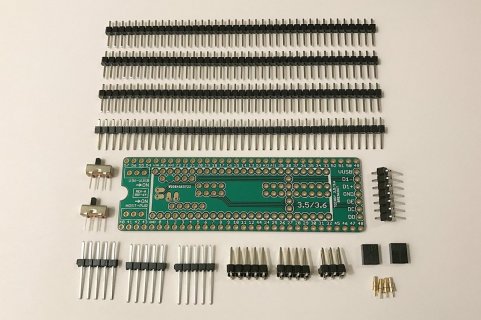
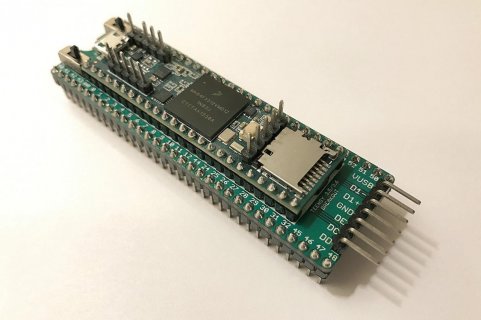
DIP-64 Edition ($14)

2016-11-28T04-55-32.017Z-IMG_4666.JPG.2560x2560_q85.jpg2016-11-28T08-12-48.280Z-IMG_4675.JPG.2560x2560_q85.jpg

  • Fits in a standard DIP-64 socket.
  • Breaks out all the Teensy's bottom pads.
  • Comes with extra-long pin headers for interior through-hole connections.
  • Edge connection pins for USB data and debug (SWD) signals.
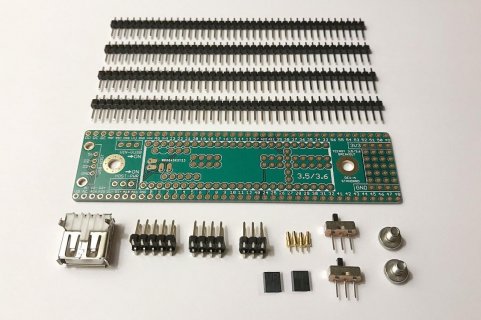
Standard Edition ($15)

2016-12-13T05-19-14.887Z-IMG_4790.JPG.2560x2560_q85.jpg2016-12-13T05-19-14.887Z-IMG_4792.JPG.2560x2560_q85.jpg

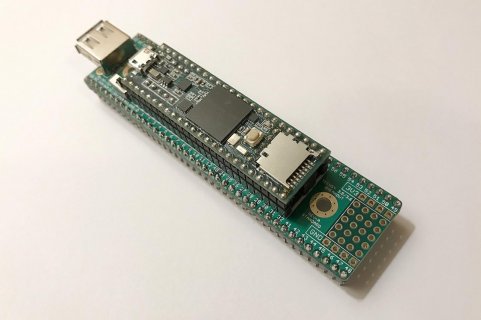
  • Breaks out every pin/signal into two rows.
  • Mounting holes for permanent installation (screws included).
  • Location to install a USB-A host jack (part included).
  • Proto area with 20 pins and power/ground rails.
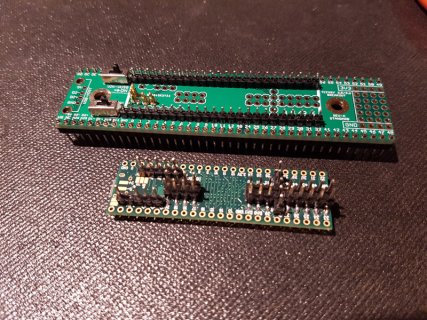
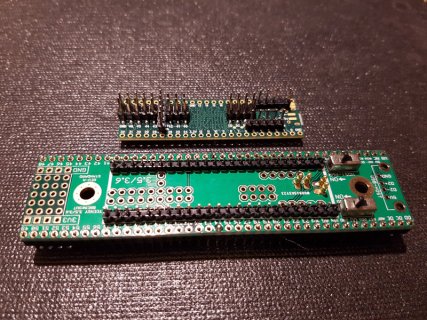
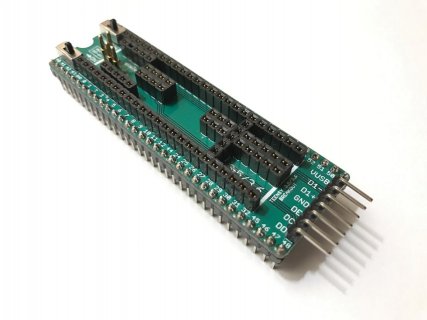
Note: There's limited clearance to the Teensy's onboard Micro USB jack when the full-size USB-A jack is installed on the Standard Edition breakout board. Therefore, if you're planning to use this kit with the Teensy 3.6 and install the USB-A jack, I highly recommend that you also use the Socket Kit, which will be available within the next few days. Doing so will increase the height of the jack and provide the necessary clearance for standard Micro USB cables. Alternatively, you could wire up your own low-profile USB cable or use the broken-out USB data lines to interface with the Teensy, but those options are considerably more involved. The picture above (left) shows the Standard Edition breakout assembled using the Socket Kit, however the other picture (right) shows only the regular kit's components.

Forum Discount

PJRC forum members (and visitors) can get a 25% discount on all orders. Use the coupon code PJRCFORUM25 at checkout.

Other new products, features, and updates are planned for the very near future. Sign up for my non-spammy mailing list if you'd like.

Finally, thank you so much for all the feedback, and please don't hesitate to contact me with any questions!
 
Last edited:
now, if he made a breakout with level shifters that would make teensy 3.6 5v tolerant on all pins, that be a winner :)
 
Love your work, Talldog! LOVE it. Also, thanks to Paul for not putting any of the FTM pins on the underside this time.
 
How do you accurately position the surface mount dual row headers for soldering by hand on these and the 3.2 versions? Isn't one of them not on a 0.1" grid or was that just true for one of the through hole 4 or 5 pin single row headers?
 
I just received my standard breakouts after being shipped all the way to 'down under' land. I haven't assembled yet, but I'm already impressed with the quality of the PCB and the paperwork/card. The attention to detail is excellent. nice work ... !
 
I'm assembling now ...

Looking at the first image on tindie store of the assembled fully breakout, it looks like the teensy is spaced well off the breakout, perhaps due to header pins going into header sockets? But wouldn't this stop the 4 x pogo pins contacting the underside of the teensy?

It would help to have some photos of partially assembled units .... a bit like these of my progress:

teensy breakout 2.jpgteensy breakout 1.jpg
 
How do you accurately position the surface mount dual row headers for soldering by hand on these and the 3.2 versions? Isn't one of them not on a 0.1" grid or was that just true for one of the through hole 4 or 5 pin single row headers?

Ok, I am finnally assembling my 3.2 kit and will answer my own question with how I aligned them. I stuck the two side header in the Teensy and set the dual row surface mount heater on the Teensy. The two side 14 pin headers don't need soldered in to do the alignment. I then plugged a couple female headers I had 90 degrees to and across all 3 headers. I positioned the female header so the left the end pairs of pins on the surface mount header accessible. I tacked soldered diagonal corner pins. I checked if it would plug in and it was a great fit.

Overall the 3.2 kit is great, can't wait to finish it but my break is over. I need the ring lamp magnifier to solder anymore and don't have one at home.
 
Last edited:
On a side note.

There are two phases of USPS shipping

1) Shipping Information Received
...wait for an eternity with no updates
2) Delivered/left in/at mailbox.

I would have paid whatever the cost was to NOT use the USPS. If possible, for future boards like this, please consider offering alternative shipping methods at a higher cost.
 
Then again, USPS is the best when it comes to international shipping, so keep it as main option for that at least.
 
Then again, USPS is the best when it comes to international shipping, so keep it as main option for that at least.

I have found that DHL or FedEx are more reliable. I order stuff from China/Australia/Russia and have had far greater success with them than with USPS. While it may be inexpensive, it is a terrible experience for some of us. I have had multiple packages mangled/lost/stolen by USPS.
 
to be fair the brokerage fees are smaller if none at all when using USPS to CANADA, especially for items under 100$.
fedex, dhl, will be expensive with brokerage fees to CANADA, often with fees upwards of 40 and up for a 100$ import

usps is better for canadians...
 
to be fair the brokerage fees are smaller if none at all when using USPS to CANADA, especially for items under 100$.
fedex, dhl, will be expensive with brokerage fees to CANADA, often with fees upwards of 40 and up for a 100$ import

usps is better for canadians...

exactly the same for Australians ... USPS much cheaper getting stuff into the country.
 
Quick question.

On the DIP64 version, I can't find were reset_b is broken out to.

Is it broken out? Is there a schematic?
 
I received two kits today. The printed reference cards were unexpected but will come in handy.

Great to hear! In case anyone else is curious what EBRAddict is talking about, the kits all come with these 5" x 7" printed pinout cards, which are also available in PDF form if you click the "Datasheet" link on right side of the Tindie product pages.

IMG_0400.jpg
 
How do you accurately position the surface mount dual row headers for soldering by hand on these and the 3.2 versions?

All of the surface-mount headers are on the same 0.1" grid. To be honest, I just spread some flux on, align them by eye, tack them in place, and solder them on. You have to be careful, but they don't need to be super-ultra-crazy precise since there's a little bit of tolerance with the holes. I've never not been able to get the boards to eventually mate with each other, though sometimes it requires a little extra force or going back and bending a few pins here and there.

Isn't one of them not on a 0.1" grid or was that just true for one of the through hole 4 or 5 pin single row headers?

One of the Teensy's internal 5-pin through-hole headers (for the USB host port on the 3.6 or A25/A26 on the 3.5) is not on the same 0.1" grid. I think that's what you were thinking of.
 
Looking at the first image on tindie store of the assembled fully breakout, it looks like the teensy is spaced well off the breakout, perhaps due to header pins going into header sockets? But wouldn't this stop the 4 x pogo pins contacting the underside of the teensy?

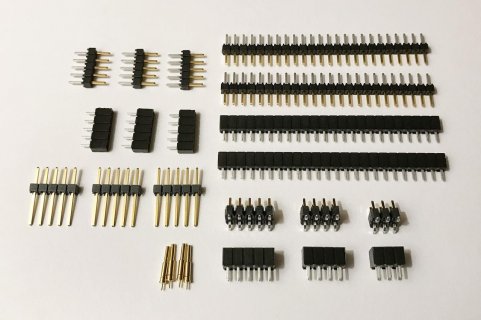
You're right about this. The photos on the project page are taken of a "socketed" assembly, which is currently only available as an assembled option, but will very soon be available as a separate Socket Kit for self-assembly. I'm working out the final details of this now. It will be a little bit more expensive, because all the headers are non-standard, and therefore need to be ordered from a non-generic manufacturer, and it also comes with four longer pogo pins. The socketed assembly also allows for the full size USB host jack to be used without getting in the way of the Teensy's onboard Micro USB jack (in addition to allowing you to swap Teensy boards in and out).

Here's a sneak preview of all the Socket Kit parts and an assembled socketed breakout board:

IMG_4823.jpgIMG_4825x.jpg
 
Last edited:
I would have paid whatever the cost was to NOT use the USPS. If possible, for future boards like this, please consider offering alternative shipping methods at a higher cost.

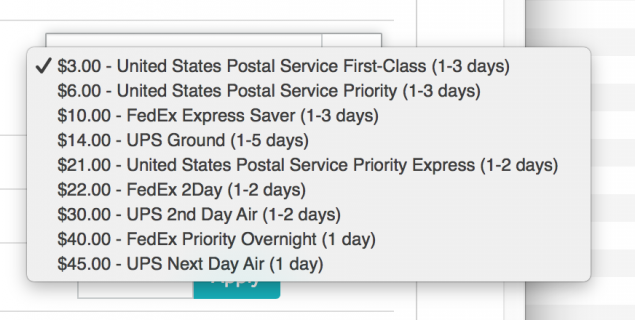
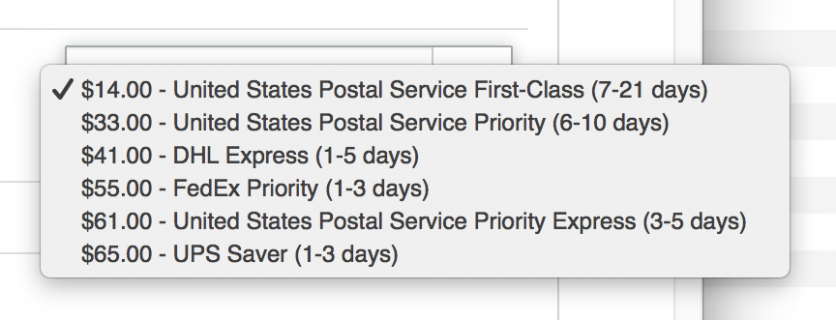
I think you might've missed the shipping options on Tindie.

I currently offer flat-rate shipping via USPS, UPS, and FedEx within the United States, and all of those plus DHL internationally:

ship_usa.pngship_world.png
 
On the DIP64 version, I can't find were reset_b is broken out to.

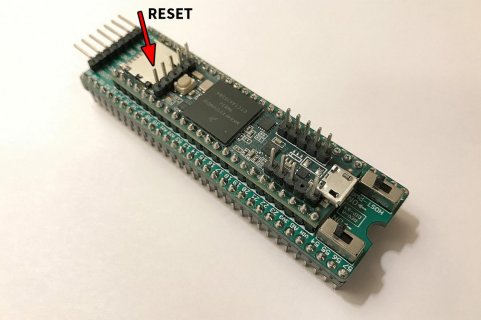
On the DIP-64 breakout the RESET signal is not broken out, but extra-long headers are provided so the internal through-hole pins can be connected easily to jumper wires or DuPont headers or the like. The Standard edition, which is larger, does breakout the RESET signal.

Here's where the RESET signal lives:

reset_pin.jpg
 
Status
Not open for further replies.
Back
Top