Rocker midi controller

Status
Not open for further replies.

Explodey

Member
Hi folks, I am new to the forum and new to Teensy. I came across this forum because I've been looking for a way to make a midi controller version of this "Time traveling guitar" rocker device that I've been working on for the past couple years. Here's a video of an early version of it (which ended up getting quite a bit of attention, and got me a pretty sweet job!)


So I've been looking around for info on building homemade midi controllers, but all I can find are these tutorials that have way more information than I need. I am building what is essentially a midi controller with only two buttons, and I just need to know how to do the wiring. Could someone help me with that, and perhaps let me know if Teensy is a good fit for my project? Thanks!
 
Very cool

So two CCs or one with two values (0/127)

What does it do in between when neither switch is closed?

Should be very easy to set you up with a simple sketch that will do whatever you need so just define the hardware (are there two states or three?) as well as what MIDI you what from it.
 
Oh and Teensy is the best choice for this.... the wiring is ground to one side of the switch and the other to any digital pin.

Super easy. You can copy the transmit example sketch for the usbMIDI page verbatim or remove the code that's clearly for the third button.

https://www.pjrc.com/teensy/td_midi.html
 
Great, thanks for getting back to me. To answer your question, there are three states -- left side down, right side down, and neither side down. It snaps back to the third state when you're not touching either side. It basically works like two N.O.-type pushbuttons. The rocker design just makes it more ergonomic for super-fast rhythmic tapping. I want to use it for the same purpose as in my video above -- pressing down the left side un-mutes channel 1, and pressing down the right side un-mutes channel 2.

My original plan was to get a cheap midi keyboard, crack it open, and figure out which pins to connect for two of the keys. So for example, I could find the pins for C1 and C2, then run cables from those pins to my rocker, and then just map C1 and C2 to the appropriate controls in Ableton Live. But modding consumer electronics can be tricky, and I thought there might be a better way. And that's why I'm here!

One more thing -- I was about to go ahead and buy the Teensy, but there seems to be more than one kind. Which should I get? (assuming I'll only be using it for this one purpose)

Thanks again!
 
Teensy LC is plenty for just sending MIDI messages.

The larger models with the audio shield could (probably) do the audio delay all in one self-contained unit, without a PC.
 
Teensy LC is plenty for just sending MIDI messages.

The larger models with the audio shield could (probably) do the audio delay all in one self-contained unit, without a PC.
I think the delay length might be an issue.

@Explodey: what sort of delay length do you need?
 
what sort of delay length do you need?

I've been experimenting with different delay lengths, and I've gone as high as 16 beats, which at 116 BPM would be a little over 8 seconds.

I think I'll go with the LC, since I'll be needing my MacBook for other aspects of my performance anyway, but it's great to know that I could do all of this in one self-contained unit! I'll definitely keep that in mind in the future.
 
My original plan was to get a cheap midi keyboard, crack it open, and figure out which pins to connect for two of the keys.

That's one option, and one that I have used myself. It requires very little thinking, but you are limited to sending note on / off messages. Another "no think" method is to use a Brain Jr. From Livid. They make several different MIDI controllers that sell for $$$$ but have a whole section of reasonably priced DIY stuff on their web site. The Brain JR is relatively cheap, and you can program the MIDI message sent by each switch. It does use a non standard (not 0.1 inch) pin spacing which makes connectors hard to find. Less limited that hacking up a keyboard, but nowhere near the power of a Teensy, even the LC.

For basic MIDI the LC is great, and the learning curve is not too bad, but if you ever want to do audio processing (like your delay) you will need a more powerful unit like the Teensy 3.2. Decent quality audio delay would probably require the audio adapter, and your 8 seconds of time may require adding a memory chip to the audio adapter.

I found your tape scratching device to be pure genius. I played with Echoplexes in the 1970's and even built some similar devices, but all had fixed heads with moving tape. I'm surprised that it took so long for someone to fix the tape and move the head.
 
Thanks for all the info @tubelab.com! I checked out the Brain Jr and it looks interesting. So what makes it easier to set up than the Teensy? Is it because there's no coding required?

Delighted to hear you enjoyed my scrubboard. My original idea was to try and replicate Laurie Anderson's "violin tape bow," but the idea kept evolving and then one day it hit me -- why not move the playhead instead of the tape? That's when it all came together. I actually wanted to make a super-deluxe motorized version of my scrubboard, but the interesting thing was that people seemed more interested in my DIY version. I still get emails from people all the time asking if I can build them one. So I recently signed up at a maker space with 3-D printers and stuff, and I'm going to do a kickstarter to build and sell like 20 or 30 of them.

Anyway, thanks again to everyone for all the info. It sounds like the Teensy LC would be cheaper and more versatile, but the Brain Jr would be a snap to set up. Is that about right?
 
...It sounds like the Teensy LC would be cheaper and more versatile, but the Brain Jr would be a snap to set up. Is that about right?...
I'm not sure what's involved in configuring the hardware for the MIDI brain (some sort of config file sets behaviour and CC/note values sent from specific pins on the brain I suspect) but what you are looking for is so simple in Teensy that I'm sure you will have no problem getting working code that does what you need given how close it is to the example Paul gives on the usbMIDI page.

In fact, if you need a CC message with 0 when off and 127 when on for each of two switches then Paul's code example would look very much like this:
Code:
#include <Bounce.h>  // Bounce library makes button change detection easy

const int channel = 0; 
const int CC1 = 14 ; // the CC message sent with button 1
const int CC2 = 15 ; // the CC message sent with button 2

Bounce button1 = Bounce(1, 5);  // 5 = 5 ms debounce time
Bounce button2 = Bounce(2, 5);  // which is appropriate for good quality mechanical pushbuttons

void setup() {
  pinMode(1, INPUT_PULLUP);
  pinMode(2, INPUT_PULLUP);
}

void loop() {
  button1.update();
  button2.update();
  
// CC messages when each button is pressed
  if (button1.fallingEdge()) {
  usbMIDI.sendControlChange(CC1, 127, channel);
  }
  if (button2.fallingEdge()) {
  usbMIDI.sendControlChange(CC2, 127, channel);
  }
  
// CC messages when each button is released
  if (button1.risingEdge()) {
  usbMIDI.sendControlChange(CC1, 0, channel);
  }
  if (button2.risingEdge()) {
  usbMIDI.sendControlChange(CC2, 0, channel);
  }


  // MIDI Controllers should discard incoming MIDI messages.
  while (usbMIDI.read()) {
  }
}
Edit note: has been compiled and tested on T3.0 pins 1 and 2 (maybe should be 0 and 1?)
 
Last edited:
Great, thanks again @oddson. This is a total newbie question, and I'm sure this will all make more sense once I start setting it up, but is the Teensy executing the code, or is my computer executing it? I'm just wondering if I'll always have to have something running in the background in order to use Teensy as a midi controller in Ableton Live.
 
No... that's the code that (should) run the controller.
Using USB MIDI

When you select "MIDI" from the Tools->USB Type menu, the Teensy becomes a USB MIDI (Musical Instrument Digital Interface) device, capable of sending and receiving MIDI messages.
no special drivers required.
 
So what makes it easier to set up than the Teensy? Is it because there's no coding required?

The Brain and the Brain Jr are PIC chip based devices that are already programmed for one specific function, MIDI controllers. They have a Windows based GUI application that sets up the function of each pin, and what MIDI code gets sent when it is activated. Digital inputs and outputs are available as are analog inputs.

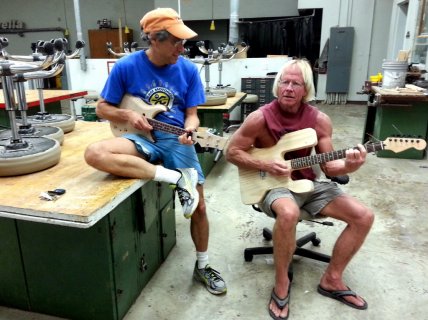
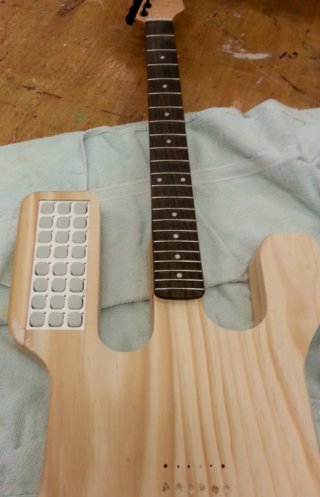
I bought my Brain, Brain Jr, and several boards with the conductive elastomer buttons on them like miniature versions of those on a Push or Launchpad over two years ago. The GUI programmer was freely downloadable from their web site so you could play with it to see whether it looked useful to you before spending any money. I put a 24 button controller in a guitar that I was building in a local evening woodshop class. The Brain Jr was the path of least resistance at a time when I had money for playing around. The guitar is still unfinished in a box here somewhere, because my 41 year engineering career ended abruptly shortly after these pictures were taken. I briefly looked at the Livid web site last night and couldn't find half of whai was there when I got the stuff I used in the guitar. I didn't discover the Teensy until earlier this year. Definitely the way to go for a lot of projects, MIDI, music synthesis (check out the audio library) and general projects. I built a machine gun simulator for a friend that's into military stuff. It's really a WAV player in disguise. I swapped out the machine gun SD card for a piano sound once when he wasn't looking. Got some good laughs from the crowd. WoodshopMusic_a.jpgGuitarInProgress_a.jpg
 
One more question: Lately I've been working on a performance where I switch back and forth between two different rockers -- the second one applying the same treatment to the audio from a live singer who's been working with me. So it just occurred to me that it would be a lot simpler to just connect both rockers to 4 pins on one Teensy, instead of buying a second Teensy, which is what I was originally thinking. I'm assuming I can start with one rocker, and then later, if I want, I can update the code and add a second rocker, right?

By the way, great stuff @tubelab.com, thanks for sharing!
 
Sure... just add a few lines to extend to four buttons.... the 2ND controller could even be remote with a TRS or other 3 conductor cable.
 
Out of curiosity... what's the difference between when neither switch is closed and when the 'present' switch is closed?

Is there additional distortion over the normal non-delayed audio vs. the neutral position?
 
It doesn't pass any audio unless one of the sides of the rocker is held down. That was actually the main purpose of my rocker device -- I never liked the standard killswitches that guitarists sometimes wire into the tone knob, so I came up with a more versatile killswitch. I wanted to be able to do super-fast "crab cuts" like turntableists do, but on the guitar, and the rocker design is perfect for that.
 
I am happy to report that I was able to build exactly what I wanted without too much trouble! Ironically the hard part is turning out to be just setting up the midi stuff in Ableton Live. The problem is I can't get Live to recognize the note-off events. The left side of the rocker is supposed to un-mute the delayed channel, and the right side is supposed to un-mute the live channel. So I mapped the two sides (which are C3 and C#3) to the track activators for the two channels. I can press down a side of the rocker and the corresponding channel will become active, but when I release... nothing happens. The channel stays active. I have to press down again to get the channel to become inactive. I can't find any way to assign note-on to "active," and note-off to "inactive."

I finally managed to come up with a convoluted workaround that sort of works. My midi device now triggers a software instrument, and I am routing that instrument's audio output to the sidechain in a gating plug-in, which gates the audio from my guitar. It works except for when I do superfast "crab cuts" -- then I usually end up losing a note.

I'm sure there must be a better way to do this. Are there any midi experts here with any suggestions? Or perhaps you could suggest some other forums/online communities that might be able to provide some insight. Thanks!
 
Explodey- I'm not an Ableton guy at all, but if you are having trouble with your note off messages you should be aware that there are two kinds: The official note off message and the sneaky "same note on message with velocity of zero" variant. Might as well try them both in case one works. If that doesn't work you could map the switches to CC channels and use them to control volumes, scooting around the whole note on / off issue.

I like your side-chain work-around, though!
 
Last edited:
Thanks for your reply @drjohn. I actually came up with a solution since my last message, but that's good info for future reference.

Turns out that the gate plug-in I'm using (Unfiltered's G8) does allow you to route a midi signal directly into it, which I knew, but I had it in the wrong mode so it wasn't working properly. Once I set it to the right mode it worked perfectly, without any convoluted side-chain routing!

I'm going to put together a new video of the latest version of my rocker device. I'll send you guys a link once it's ready. Thanks again!
 
Hello again everyone. I just posted a video last night demonstrating the homemade midi controller that you all helped me make! I thought you might like to check it out:


The video of my original non-midi version (that I posted earlier) went viral and got several pretty high profile media placements, and I'm hoping this one new will get some viral love as well, so please share! By the way, I give a shout out to the Teensy a couple minutes in.
 
Status
Not open for further replies.
Back
Top