Teensy 3.5 Autonomous Robot

Status
Not open for further replies.

mjs513

Senior Member+
Hi All

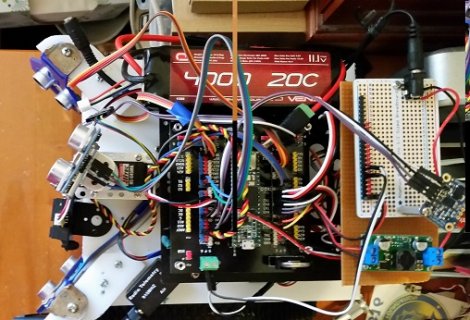
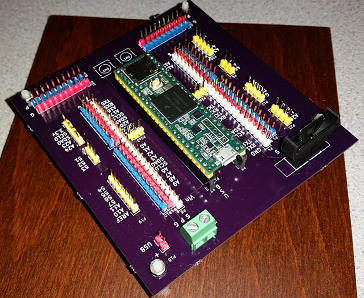
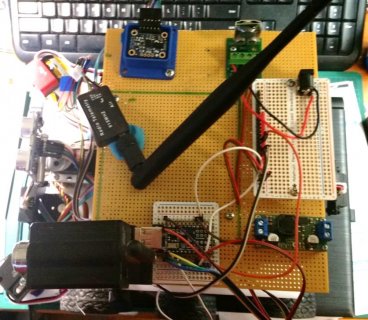
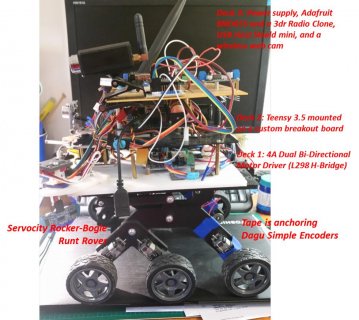
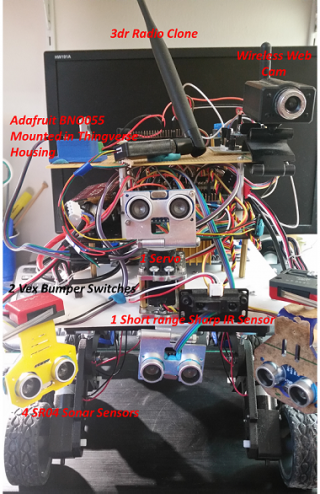
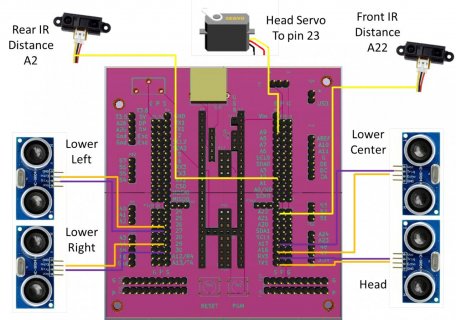
Thought I would share a autonomous robot project I am working on using a Teensy 3.5. Used to run on a Mega but I wanted a little more processing power for future expansions. The robot uses a Teensy 3.5, of course, 4 SR-05 Ultrasonic sensors, 2 IR distance sensors, a servo for what I call the head sensor so I can run a bubble rebound/vfh kind of algorithm, a CanaKit 4 amp motor driver, a Adafruit BNO055 breakout board and uses a 915Mhz radio for telemetry. It uses a 11.1 volt LiPo for power that I connect direct to the motor driver and through a step up/step down 5v regulator from Pololu. I am using a custom breakout board that I am working on as well. Right now it has two modes of operation, autonomous and manual control.

Still working on timing and tweaking the avoidance algorithm I put together. Also working on getting the lower pins aligned so I can use the pins on the bottom of the board.

Addons: Looking at using a PS4 as a remote - using a usb host shield (I have a separate post on this one) as well as using I guess the talkie library that I just came across in a another post to add voice. Not sure how to go with the talkie for the 3.5 so if anyone has any suggestions let me know.

Here are some photos.
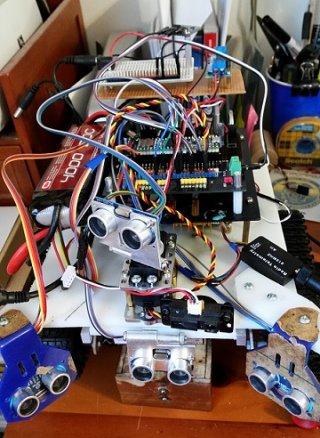
20161227_114821.jpg 20161227_114903.jpg
 
Addons: Looking at using a PS4 as a remote - using a usb host shield (I have a separate post on this one) as well as using I guess the talkie library that I just came across in a another post to add voice. Not sure how to go with the talkie for the 3.5 so if anyone has any suggestions let me know.
Looking at the Talkie code, it has support for the Teensy 3.5 (& 3.6). What you would need to do is add an amplifier between DAT0 (A21 on the Teensy 3.5) and a speaker. I've primarily used the prop shield to provide amplification for the Teensys, but it might be a little complex fitting the prop shield into your environment. You might want to start with a simple amplifier and speaker and see if that is loud enough:

What the Talkie library contains is a set of commented out declarations for different words spoken. You would un-comment out the words that you want to use, and then pass the array to the function that writes to the DAT (digital to analog) which in turn is fed to the amplifier and then the speaker. The declarations are commented out because the Arduino microprocessors have very little flash memory, and encoding every word that isn't used wastes a lot of space.

However, as I look at the sources, it appears to be blocking until the sound is finished, which is probably not what you want in a robot. You could refactor the program, or go in another direction.

Given the Teensy 3.5 has a micro-SD card slot, rather than encode all of the sounds in the program, you could just put .WAV (or MP3/RAW/etc.) on the micro-SD card, and have a WAV/RAW/MP3 player play the sounds. On the 3.5/3.6, you have two DAT's so you could play stereo instead of mono. I haven't played with sound on the 3.5, but I think there are examples floating around how to connect the pieces.
 
Based on your comments I was thinking it might be easier to use a EasyVR module. Would have to do a little more research on whether I will have a blocking issue but I think I could get around that one by using a second Teensy 3.1 or 3.2 attached to the EasyVR module. I would then just send a command on what I want said and then keep going. Don't know if the EasyVR library would work with the Teensy but I can give it a try. I have one laying around some where just have to dig it up. Will probably still need the speak and probably an amplifier as well. Thanks for the reference from adafruit.

Still a lot to do but so far I am loving the 3.5. Also looking at eventually converting over to using an artificial neural network. This project should take me through most of the new year. :)
 
I didn't know what EasyVR was, and when I did a google search, I saw it was voice recognition. So, it sounds like you speak to it, and it converts the text into characters/words that your microprocessor can process, but perhaps it also has output capability.

If you are doing a second 3.2 for voice output, you have some basic choices:
  • Using the basic low cost prop shield for mono output: http://www.pjrc.com/store/prop_shield_lowcost.html -- this basically provides the amplifier, but it also includes 8 megabytes of SPI flash memory to hold the sounds (instead of a micro-SD card), and support for voltage level conversion for APA102 (dotstart) or WS2812B (neopixel) leds. You would need a speaker;
  • Since you are doing a robot, perhaps using the full prop shield (http://www.pjrc.com/store/prop_shield.html) would work as it includes various motion sensors and let the 2nd Teensy do motion sensing input and voice output, while the 1st controls the robots movement;
  • Using the audio shield (http://www.pjrc.com/store/teensy3_audio.html. This gives you a lot more processing options. My sense is you would use this if your main purpose was to do audio processing, and not just say specific words, or play a sound. This has stereo output to either headphones, or to external amplifiers driving speakers.
  • Using one of the various devices that you can give it a command to play a particular song. Adafruit has its audio-fx line: https://www.adafruit.com/products/2220. Note, they used to have a variant that had built-in amplifiers, but it kept burning out, and they have retired it, so you could either use the headphone jack with powered speakers, or provide an amplifier for the speakers. I played around with this for a bit (and burned out my first board that had the built-in amplifiers), but I lost interest in it when the prop shield came out.
  • There are cheaper devices out in ebay, amazon, etc. such as the DFPlayer: https://www.dfrobot.com/index.php?route=product/product&product_id=1121. I bought one of these, and used it as a standalone device. But you could hook it to one of the serial lines to control it. from the Teensy.

If you go with something with a headphone output, you can get the little mini-speakers made for cell phones. One name that they go under is "bomb speaker" because it is globe shaped, and it reminds people of the cartoon bombs with a black globe and a lit fuse (the 3.5mm wire connecting to the headphone jack is the fuse). For example:
 
Michael you are a wealth of information. I have the full up prop shield and tested the imu with 3.5 and it works great better than with 3,2. :) Thanks for the links from adafruit and ebay Think I will pick up the bomb speaker.

Never played around with the audio capabilities before so I would be starting from scratch, I just picked up a audio board from the shop as well as a couple more 3.5's to play around with. Yes I have a couple of 3.6's as well. Audio was one of the things on my long list of projects.

As for text-to- speech I realized I also have a emic 2 text to speech module. Again not sure if the lib will work but not adverse to trying it. You may want to check it out.

In the end think I would be using a combination of what you are recommending as well as the emic 2. Think the speech recognition would come later ... Think I will need a bigger robot. :). Think my priority list is going to be tweaking the motor settings for use on a hard wood floor, then getting the underside of the 3.5 to make good contact with the pins (going to use half height sockets and trim the connectors to length so they are more flush with the underside of the board, the getting the PS4 controller to work once I get the usb host module big sigh. Then move on to speech. Of course this could change - usually does.
 
Just remember, you have to connect A21 to the prop shield due to the change of location of what are the back row pins in the 3.2.

For a one off design, just soldering a wire will do.

If you wanted an adapter plate so you could mount the shields with stacking headers, Frank B designed one that connects the back row pins and also allows you to connect A10, A11, AREF, etc. if you mount a prop shield which does not have holes for the shield: https://pcbs.io/share/8gXO3. The original version of the board had the wrong connection for the 3.6 USB pins (or 3.5 extra analog pins), but I don't know if this version fixes that.

Note, the audio board and the prop shield can't be used together (due to having to use the alternate pins due to I2S usage) without a lot of re-wiring.
 
If I can ask another question. If I want to migrate to the 3.6 would I need level shifters for the sensors. Don't think I need it for the radio?

EDIT: just took a look at the adapter board will be ordering one soon.
 
keep it away from 5volt devices unless you wanna burn out it's pins. I've got the 3.5's because i wanted less hastle converting my mega2560 project where everything on i2c and spi busses were 5 volts. I've got 12 I2C and 11 SPI devices running on the 3.5 (so far) :)

i also soldered header rows, all underneath to expose the pads, so basically 4 raised pin rows on the back side, gives me access to uart 6 and spi2 bus as well.
 
Thanks tonton81 that's what I figured with the 3.6 (nice to have confirmation). Thanks for the advice on the underside pins. I hate soldering so this should be an adventure - probably as a last resort.
 
i started with the inner pads, then the outer pins, make sure the solder joints are good, the header rows make them nice and strong, and add a bit of hot glue for support inbetween the rows, it's currently in an automotive application in -20 temp daily driven project
 
Just by way of an update on the Emic2 text to speech module. I gave a quick test on the Teensy 3.5 and it worked fine. I did have to modify the Emic2 library to use one of the hardware serial ports since it is currently set up for Software Serial only. If anyone is interested I will post it to GitHub.
 
Please do post the modified code. It might be quite a while, but eventually someone who wants it is likely to find this thread by searching.
 
Will do Paul.

All - attached please find the modified library for Emic2. It has been converted to use Serial3. To select a different Serial edit the define in the emic2.cpp file. Currently I have not modified it yet to work with the SD card on the teensy 3.5. Still have to learn how to use the SD card on the teensy :). I will post the update when I have it updated.

View attachment EMIC2.zip
 
EMIC2 Library Update for Teensy and Hardware Serial

Hi All

I completed modifications to the EMIC2 library. Thanks to an old post on the Arduino forum by PaulS I was able to pass the Serial port number that I want to use to the library. I also incorporated the SDFat-beta library into the code and tested it on the Teensy 3.2 and 3.5. There appear to be some issues with an external reader on the 3.2 but on the 3.5 it works like a charm. I am going to post the issue with the 3.2 in the SDFat library thread. Hope this helps someone else.

Mike
 

Attachments

  • EMIC2-Teensy.zip
    69.7 KB · Views: 168
Looking at the Talkie code, it has support for the Teensy 3.5 (& 3.6). What you would need to do is add an amplifier between DAT0 (A21 on the Teensy 3.5) and a speaker. I've primarily used the prop shield to provide amplification for the Teensys, but it might be a little complex fitting the prop shield into your environment. You might want to start with a simple amplifier and speaker and see if that is loud enough:

However, as I look at the sources, it appears to be blocking until the sound is finished, which is probably not what you want in a robot. You could refactor the program, or go in another direction.

I modified the Talkie Library to have a NON-blocking interface! There are QUE commands to send over data for enunciation and it is send and forget - though you can monitor queue progress and state as well. And it works on T_3.5/3.6 using the correct DAC pin.

Talkie is fun - but has a limited vocabulary - unless somebody can rebuild an encoder system that died with XP and even that doesn't seem to be on the web when I searched.

As far as using the Prop Shield - to use the audio amp - only takes a couple of power and data lines to use the Amp- you should be able to see from the Prop Shield page - IIRC:: it would need GND, 3V3 and 5V power and set 3V3 on the AMP pin to enable the amp of whatever comes into the DAC input pin to have that amplified and sent out the speaker connects. If not using the MPU - get the PROP_LC and you still have access to the onboard FLASH if you wire that up.
 
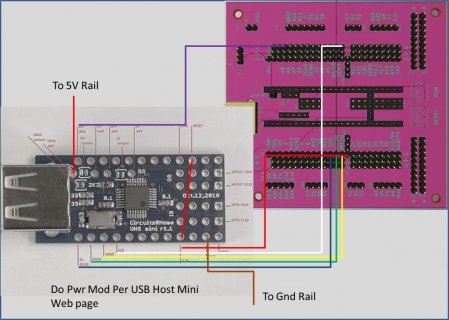
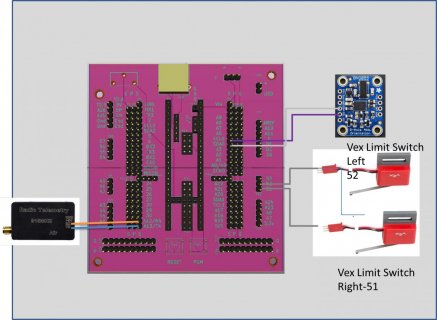
Haven't provided an update on this project for quite some time so here goes. I got a USB Host Shield mini and using a PS4 controller I am now able to control the rover with the controller. I modified the code from a previous project using rc to control the rover and am working out one last bug (using differential drive): I can go forward, reverse, and pivot to the left and right in place. I also attached two bumper switches to cover those cases where the rover tends to catch on a corner when its doesn't see a thin edge like the edge of chair.

The only problem I seem to be having is with reading the BNO055 I2C while using the PS4 controller. Don't know if there is some catch with using I2C with SPI? Always something. Have to figure this one out.

When I get the bugs worked out I will post the pictures, video and code.
 
Ok. I managed to get everything working the way I want it too now for some cleanup of the code. Anyway, as promised here are some pictures of the final config of the rover. I did change the base of the rover to a servocity rocker bogie rover. I added a picture of my custom breakout board. I will post a video as soon as I get a chance. Before the Teensy 3.5 the Mega 2560 was my go to board for these projects but based on the experience to date with the Teensy 3.5 I think the 3.5 is going to be my new project board. Thanks Paul for all the extra pins :)

20161105_210210.pngPicture3.jpgPicture1.jpgPicture4.png
 
Quadrature Encoder Question

Right now I am using a single hall effect encoder on the two rear wheels. What I am curious about is whether about the possibility of adding another hall effect sensor next to the current one on each wheel to get a quadrature encoder. Here is the link to the Dagu simple encoder that I am currently using. Would this then work with the Encoder library?

Thanks for your help
Mike
 
As promised here is a link to a youtube video. Note the video is at 1.5x speed to shorten its length. As you can see from the video there are still a few problem areas for it to operate smoothly in a very cluttered environment like my apartment.

 
Last edited:
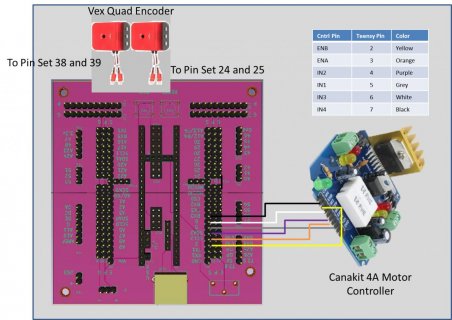
Gave up on the hall effect sensors and replaced them with the Vex Quad Wheel encoders. Thought I would post how I hooked everything up. Here are the core images.
Picture4.jpgPicture3.jpgPicture2.jpgPicture1.jpg
 
Status
Not open for further replies.
Back
Top