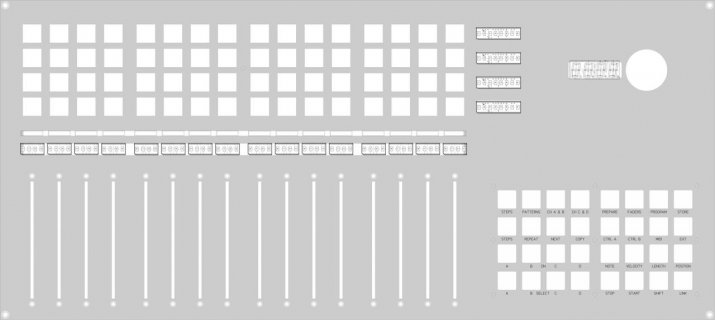
Teensy 3.6 controlled motorfader panel

Code:
i just wanna controll 8 midi motorized fader in protools 
i see in your code that the #define FOLLOW that is the incoming controling value and i wonder if:
#define FOLLOW 0x7F from the midi out can be work on the fader?

There's no such thing as 'just controlling faders'. What protocol will be used for the feedback? How do you switch banks? How do you prevent the fader working against you (Protools moves it but you want to move it to)? These are all things you'd have to solve in your code as nothing of this is contained in my two projects.
If you just want to have control over the channel volume you're much better of getting a (used) midi controller, it will be difficult to build something for less and it is not at all certain that the end result will be what you want it to be.

For now I have seceded to move the fader with midi with the Cody code with some of my changes. The fader not running smoothly but its move's up and down follow the software.
My next test is to send the midi RX data to the (receive event) in your code.
I'll uptade soon and upload my ino file if I'll make it working good.
 
Last edited:
Using a Teensy 3.6 to control 8 ALPS motorfaders:


L293B H-bridges are used to drive the motors. The fader wipers and touchtracks are connected directly to the Teensy. Each faders has it's own PID control using 12 bit PWM at 14648.437 Hz. The ResponsiveAnalogRead library is used for the analog inputs, notice how stable the values are. Separate timers are used for the analogRead and touchRead:
Code:
elapsedMicros sinceFaderRead;                         // timer for fader check
unsigned int  faderReadInterval=500;                  // interval in microseconds for checking fader position(update)
elapsedMicros sinceTouchRead;                         // timer for touch read
unsigned int  touchReadInterval=5000;                 // interval in microseconds for reading fader touch

A second Teensy is reading the values from the faders via I2C and shows the raw values on the LED displays using the LedDisplay library.

Fader panel bottom view:

View attachment 9884

The plan is to create a MIDI step & pattern sequencer with presets and this is an important first step. The code will of course be available when finished, in the meantime I'll be happy to provide snippets if somebody is interested.
A very big Thank You to everybody involved with the Teensy, Arduino and the great libraries that are available!

Kind regards,

Gerrit

My guess is this is supposed to be similar to a Roland MC-808 in the way it uses motorized faders to control and recall parameters such as volume and pan.
 
My guess is this is supposed to be similar to a Roland MC-808 in the way it uses motorized faders to control and recall parameters such as volume and pan.

No, not volume and pan but the parameters of the individual steps (notes). The test setup supports control of pitch, velocity, length, position and a controller for each individual step. The timing uses midi beat clock as a floating point value, note events in between to midi clocks are handled by timing. The note off event is also sent based on a timer. The length of a note can be varied between 5% and 100% of the step length. The position can be varied between -50% and +50%. Of course this all works while the sequencer is running. The four buttons with the LEDs select the different parameters for editing.

Here's a design sketch of what I have in mind:

Four-Channel-Sequencer.jpg

This use case requires that the faders are really fast, switching parameters or patterns for editing should be near instantaneous. The FOLLOW mode of the panel is used for what I call 'Link mode', moving one fader will cause all other faders to follow either relative or absolute.
Although the current prototype has just 8 steps, one channel and a single pattern it's already great fun to play with because you have real hands on control of expression (velocity, controller) and timing (length, position) while the sequencer is running. Great for some 'Tangerine Dreaming':)
 
Absolutely love these builds.

Do you have to use two teensy’s? Why not one for everything?

I am so curious about the enclosure. Well done!

I want to see vids of the Mackie control too!
 
Absolutely love these builds.

Do you have to use two teensy’s? Why not one for everything?

I am so curious about the enclosure. Well done!

I want to see vids of the Mackie control too!

Thank you :)

The faders use up all the pins on one Teensy (up, down, touch, analog, all times eight) and I don't know how to control the faders using port expanders and because I use PID control the (PID loop) timing has to be stable and having the Teensy doing something else didn't seem like a good idea. As this is intended for use with a sequencer the timing argument also works the other way around, the sequencer timing shouldn't be influenced by the fader control. Motor faders are mostly used in control surfaces and these don't do much computing compared to a sequencer. So far I didn't get any comments on the PID control itself or the way the faders are controlled so I don't know if this is the way to do it. The fader control still needs some tuning with respect to the fine movements but the speed is excellent. Speed is very important because the recall of settings should be very fast, the way the faders move on my old Logic Control would be too slow for quick recall of settings.

For the panels I used Schaeffer's Front Panel Desinger, not cheap but the results are great and you know exactly what it's going to cost beforehand. The enclosure I made myself using a table saw and other tools.

Still haven't gotten around to making a video of the midi controller, the reflective screens make it difficult to get a good picture and I'm also working on changing it to an OSC (Open Sound Control) controller. I'm in the process of moving form Logic X to Reaper as I'm not happy with the multi track midi recording in Logic and I don't use the Logic instruments and effects anyway. Reaper has extensive OSC control facilities which go beyond what's possible with the Mackie protocols (MCU or HUI).
 
wow very cool. Please keep us posted.

Still haven't gotten around to making a video of the midi controller, the reflective screens make it difficult to get a good picture and I'm also working on changing it to an OSC (Open Sound Control) controller. I'm in the process of moving form Logic X to Reaper as I'm not happy with the multi track midi recording in Logic and I don't use the Logic instruments and effects anyway. Reaper has extensive OSC control facilities which go beyond what's possible with the Mackie protocols (MCU or HUI).

Powerful. I love the direction this is going.
 
Sorry if this is off topic (and double if it was mentioned and I missed it) but can you give some detail on the 4-char displays? Are they just eight 5x7 led displays like Avago sells? How’d you mount them?
 
Sorry if this is off topic (and double if it was mentioned and I missed it) but can you give some detail on the 4-char displays? Are they just eight 5x7 led displays like Avago sells? How’d you mount them?

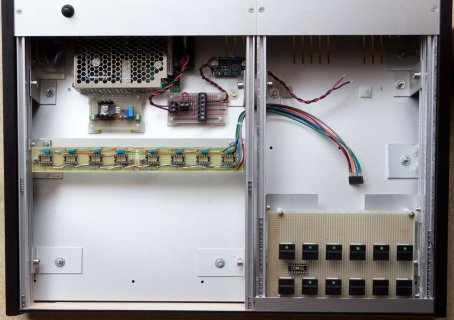
Yes, these are Avago (now Broadcom) HCMS-2965 4 digit LED displays. They're just mounted on some strip board:

SPS-8-interior.jpg

They're pretty expensive but the readability is excellent and there's no burn-in like with OLED. I also very much like the look with the transparent red acrylic cover. The LedDisplay library is easy to use but a bit slow for my purposes. Updating the eight displays takes 20ms with the library, I copied parts of the library into my sketch and changed the way the display is updated and now it takes 0.7ms to update all eight displays.
 
Very nice. I went the OLED route with my early experiments because I wanted VU meters and pan position without having to support and drive so many LEDs. If I go back to this I’ll make a board with its own atmega chip that just takes in I2C data and outputs SPI to the displays (like a little video card).

https://youtu.be/CIs-mdPnIRk
 
Next generation panel

While strip board is nice to develop and test stuff there comes a point when you just have to create proper circuit boards for your project so I took the time to learn how to use KiCad and designed boards for my sequencer project. I’m not an electrical engineer but I tried to design the board as best as I could keeping the high current motor stuff as far away as possible from the fader input. The thermal relief for the four ground pins of the L293B was removed as the copper ground plane is used as a heatsink, same for the high current connections. The copper layers are 35µm.

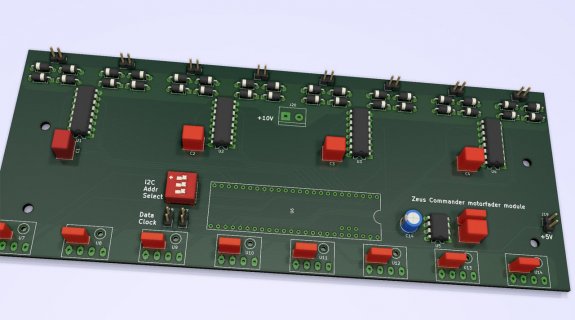
This is what the KiCad 3D render looks like:

motorfaderpanel-render.jpg

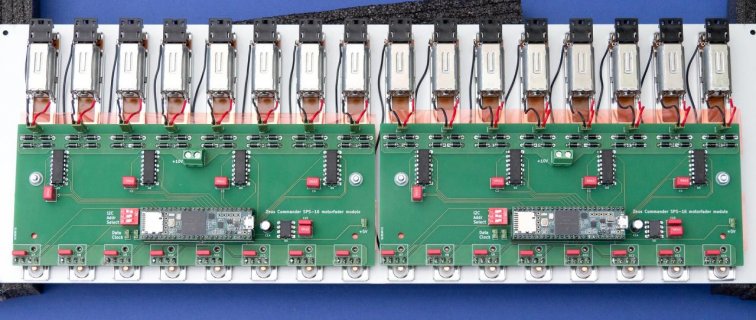
And here’s a picture of two boards for a total of 16 motor faders:

FaderPanel_rear_1.jpg


Here’s the KiCad project: View attachment Fader_Motor_KiCad.zip
The updated sketch for the panel: View attachment Zeus_FaderPanel_181227.zip

Any comments on the board design are welcome. There's at least one issue that needs fixing; the 100µf capacitor on the analog reference should be moved, the USB connector barely fits. Note that he pin numbers in the schematic do not match as I had to move around pin connections to fit everything on the PCB, the sketch contains the correct numbers.

The new setup has completely separate power supplies for the 5V logic and the 10V motor supply and the faders all have 10nF decoupling caps directly on the input, the result is that the response of the faders is most excellent. The link mode is working flawlessly now, completely stable values while 15 faders follow the one that’s moved. It's really nice to see how 15 faders move like a perfect Roman cohort as they follow the fader that's moved.
 
Hey Gerrit thanks for sharing! I've been working on a level shifter for a fader board I pulled from my Yamaha 01v. And I've been reading PID w/o a PHD, but your code is fast tracking me. Just wanna say thanks!
 
programming the fader position

On desks I see, when you touch the fader, the motor stops driving,

does this do that ?
 
On desks I see, when you touch the fader, the motor stops driving,

does this do that ?

Yes it does, this was one of the reasons to use touch sensitive faders.

Be aware that building a panel like this only makes sense for specific purposes, you won't be able to beat the price of commercial controllers or even digital mixers. As this panel is PWM controlled I wouldn't recommend it for retrofitting analog consoles without extensive testing.
 
Further documentation for MIDI controller

While strip board is nice to develop and test stuff there comes a point when you just have to create proper circuit boards for your project so I took the time to learn how to use KiCad and designed boards for my sequencer project. I’m not an electrical engineer but I tried to design the board as best as I could keeping the high current motor stuff as far away as possible from the fader input. The thermal relief for the four ground pins of the L293B was removed as the copper ground plane is used as a heatsink, same for the high current connections. The copper layers are 35µm.

This is what the KiCad 3D render looks like:

View attachment 15434

And here’s a picture of two boards for a total of 16 motor faders:

View attachment 15433


Here’s the KiCad project: View attachment 15432
The updated sketch for the panel: View attachment 15435

Any comments on the board design are welcome. There's at least one issue that needs fixing; the 100µf capacitor on the analog reference should be moved, the USB connector barely fits. Note that he pin numbers in the schematic do not match as I had to move around pin connections to fit everything on the PCB, the sketch contains the correct numbers.

The new setup has completely separate power supplies for the 5V logic and the 10V motor supply and the faders all have 10nF decoupling caps directly on the input, the result is that the response of the faders is most excellent. The link mode is working flawlessly now, completely stable values while 15 faders follow the one that’s moved. It's really nice to see how 15 faders move like a perfect Roman cohort as they follow the fader that's moved.

Hi Gerrit,

This is truly a wonderful project, which I would very much like to replicate. I have been scouring the internet for the last couple of days, trying to find information for DIY 16+ motorized faders MIDI controllers, and it looks likes yours is the most fleshed-out and—based on the videos you provided—also the one with the best performance.

Although the overall MIDI controller I would like to design differs from yours, the fader bank would be basically identical. Therefore, I kindly ask if you could provide the following details on your build:

  • The type and number of components;
  • The business which printed your circuit board;
  • Code for interfacing with your chosen DAW;
  • Relevant information regarding connecting other components (encoders, LED strips, etc.) to your master microcontroller; and
  • Any other details you deem important—especially after having used your fader panel for several months.
I know this is asking for a lot, but I think we would all be super appreciative of the time and effort you would put into thoroughly documenting your project. Of course, please don't feel obliged. I bet you already dedicated a lot of time to this project, and you may want to move on.

Anyway, thanks again for all your work and for already documenting many of the steps.

Best regards,

Florent
 
Last edited:
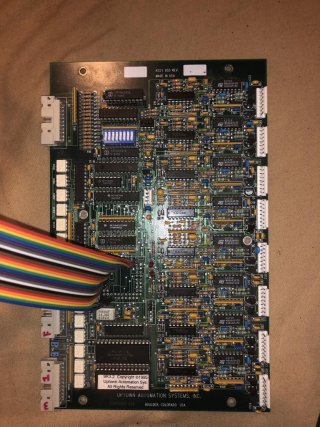
The only thing that could be better about Gerrit’s design is not using PWM to control the fader motors. To offer a solution to that I’m going to be working on drawing up a schematic from this board:
DEAF2420-2CC2-4359-B998-E234C6DBD3EE.jpg
This controls the fader position basically without even a microcontroller, the microcontroller is used to set the voltage on a DAC and based on that voltage the fader is moved until the wiper voltage matches without taking up processing time for PWM. On top of this it doesn’t require the use of any touch pins so no extra processing time is stuck on that either, it takes a little bit of circuitry to accomplish this but I’ve found it more stable than touchread ever was. This also means that the circuit requires no calibration for PID or touch threshold so it’s always accurate with no fader jitter from PWM.
 
The only thing that could be better about Gerrit’s design is not using PWM to control the fader motors. To offer a solution to that I’m going to be working on drawing up a schematic from this board:
View attachment 17851
This controls the fader position basically without even a microcontroller, the microcontroller is used to set the voltage on a DAC and based on that voltage the fader is moved until the wiper voltage matches without taking up processing time for PWM. On top of this it doesn’t require the use of any touch pins so no extra processing time is stuck on that either, it takes a little bit of circuitry to accomplish this but I’ve found it more stable than touchread ever was. This also means that the circuit requires no calibration for PID or touch threshold so it’s always accurate with no fader jitter from PWM.

The circuit is originally from an Uptown System 990 that came with our console built in the early 90's, it's pretty old technology, but nothing compares to the smoothness that was achieved with it. They used 8051 microcontrollers and an old DOS pc to control it, so you can imagine how much of a performance boost a Teensy 4.0 is considering it's faster than the pc cpu that used to run it. It's a great circuit, but I want to downsize it and increase the resolution of the motor control since the DAC is only 8 bits because the 8051 was 8 bit. So in the next coming days/1-2 weeks I'm going to be reverse engineering the schematic from this board so I can accomplish that and get rid of the unnecessary parts that I no longer need from the 8051.

First video is when I was testing it with no micro controller hooked up by using the set of dip switches on board to select the DAC voltage and the motors are being power by 12 volts here. You can hear how quiet the motor is here with a known good fader.
Second video I had it hooked up to a Teensy 4.0 and w5500 for Ethernet to test it with Pro Tools Diginet doing simple sawtooth automation and the motors are at the full 24 volts here. Here some of the motors sound really loud because the faders are in dire need of a tune up.

I didn't take any other videos when I had it all connected, but this at least gives you an idea of how it performs. This project is also why I'm working on USB Ethernet in my other thread because the w5500 doesn't give me the performance that I need it to for the Eucon protocol, but it was enough for the Diginet protocol to get the basic test performed with it.
 
Hi Gerrit,

This is truly a wonderful project, which I would very much like to replicate. I have been scouring the internet for the last couple of days, trying to find information for DIY 16+ motorized faders MIDI controllers, and it looks likes yours is the most fleshed-out and—based on the videos you provided—also the one with the best performance.

Although the overall MIDI controller I would like to design differs from yours, the fader bank would be basically identical. Therefore, I kindly ask if you could provide the following details on your build:

  • The type and number of components;
  • The business which printed your circuit board;
  • Code for interfacing with your chosen DAW;
  • Relevant information regarding connecting other components (encoders, LED strips, etc.) to your master microcontroller; and
  • Any other details you deem important—especially after having used your fader panel for several months.
I know this is asking for a lot, but I think we would all be super appreciative of the time and effort you would put into thoroughly documenting your project. Of course, please don't feel obliged. I bet you already dedicated a lot of time to this project, and you may want to move on.

Anyway, thanks again for all your work and for already documenting many of the steps.

Best regards,

Florent

The component details are in the schematics. KiCad is free software so you can download it to view the schematics and pcb layout. The PCB's were made by Eurocircuits. You can get pcb's from China for a lot less but I then you'd have to order a minimum of 5 pcs and I didn't want to burden the environment (and use resources) any more than necessary just to save a few Euros.
The fader panel is not intended for use as a controller but for a sequencer I designed and built: Zeus Commander SPS-16 MIDI Step & Pattern Sequencer. The focus is on fader speed, not smoothness, for fast preset recall and switching between parameters. The post on the sequencer also contains information on the components used.
My current DAW is Reaper and I built an OSC controller for it: PoE powered OSC controller for Reaper DAW
The sequencer is working very well although the fader response could use some tweaking. I've been thinking about a way to calibrate the faders but haven't come around to it and the need is not pressing for this use case.
There's more info on the switches in this thread: SN74HC165 shift register revisited.
 
Thank you both vjmusik and Gerrit for the information. After spending several more days researching, I decided that I simply don't have the required experience to build a motorized fader control surface with all the bells and whistles that I want. Plus, I keep hearing over and over again that I will actually be spending more money on a custom control surface than if I buy a commercial one. However, who knows, maybe I'll make a small controller in the future, just to gain more electrical engineering and programming experience.

Anyway, I wish you the best of luck with your projects!
 
There’s certainly some surfaces that can be bought cheaper than you can build one, some of the more specialized ones like a Euphonix controller can be built for cheaper since they are so overpriced to begin with. Half of your cost will be wrapped up in faders depending on the quality of the ones you get. Once I get the circuit worked out for the Uptown boards I’m hoping the cost per board won’t be too high, I know the msrp was really high back when it was sold, they charged somewhere in the range of $1000 per fader, but the people they were catering to definitely weren’t caring about the price.
 
Hi Gerrit,
Your project looks amazing! Thanks for sharing all your knowledge in this thread. It seems that you made the motorized faders running really smooth. I am using a Teensy LC currently to play around with some ALPS motorized faders using PID control to follow/send MIDI to/from my DAW. I got it working pretty well so far. I do have a question regarding getting the motorfaders running more quiet while buffering PWM signals. I first tried to use AnalogWriteFrequency to increase the PWM frequency to a (near) non audible frequency. While I tried 11718.75 Hz which is the most suitable for 12 bit resolution on a Teensy LC, I realized the motors were not getting enough torque. How did you tackle this problem?
Cheers,
Coen
 
It could be the H Bridges or your power supply isn’t suppling enough power to the motors.

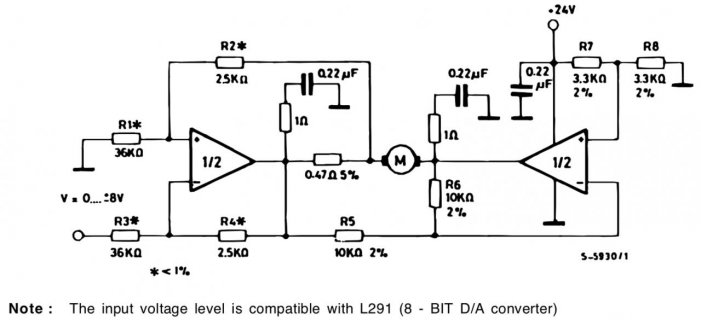
As far as for audible noise your only option is to increase the PWM frequency or ditch PWM entirely. Upon reverse engineering the Uptown 990 circuit I found out they used the schematic straight from the data sheet just with a couple different resistor values. They used an L2720 power op amp in a DIP package, but that is no longer being sold. The replacement is an L2720W SOIC package which doesn’t deliver the same amount of current per channel, but should still deliver enough for faders.

3020E5F8-995B-4852-99D2-AED47CDD00DD.jpg

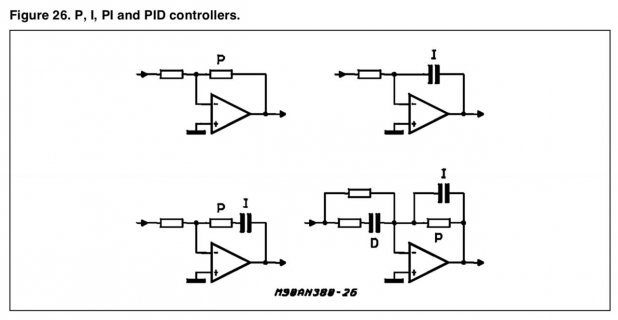
They also use an analog PID circuit so it has no effect on the processor, I’ve found this in an application note which matches the same circuit.

CD2698B3-7CF9-41DB-A57B-044E50EC4555.jpg

The last part of the circuit is effectively an instrumentation amplifier that handles setting the fader position for the processor which frees up cycles.

I finally ordered the parts so I’ll post a final schematic once I have all the values tuned to how I want it. My faders do not work with PWM since they have a variable torque requirement because of the position of the motors which just can’t be compensated for while using an H Bridge.
 
Hi, thanks for your quick reply! I love your alternative analog approach to tackle basically the same ideas. Definitely awesome to dig more into analog control possibilities. While I was using my multimeter to check your advice on the load demand in the circuit I noticed what the problem was. It programmed my code initially in that the near zero control output of the PID loop would lead into a minimum PWM of 1365 (12bit resolution scale) as for anything below that value, the motor would not be running enough to be interesting. It seems that i need to raise that minimum PWM if I am increasing the PWM frequency and than everything would work fine! This will however also result in a decrease in my PWM bandwidth, but will practically not make that huge of a difference. Gonna dig into finding the sweet spot for that value now!
 
Here are the settings I use with the Teensy 3.6:
Code:
  //initialize faders and analog reference 
  analogReference(EXTERNAL);
  analogWriteResolution(12);
  for (int i=0; i<8; i++){
    pinMode(faderMotorUpPin[i], OUTPUT);
    pinMode(faderMotorDownPin[i], OUTPUT);
    analogWriteFrequency(faderMotorUpPin[i],14648.437);  // 14648.437 ideal frequency for 180MHz 12bit PWM
    analogWriteFrequency(faderMotorDownPin[i],14648.437);  //14648.437 ideal frequency for 180MHz 12bit PWM
    faderTouched[i]=false;
    faderValueData[i]=0;
    faderTarget[i]=500;
    faderPidOn[i]=false;
  }    
       
  readFaders();
  // set PID tuning parameters
  for (int i=0;i<8;i++){
    pGain[i]=10;
    iGain[i]=1;
    dGain[i]=50.00;
    iMin[i]=-1500;
    iMax[i]=1500;
  }

When the days get shorter again I plan on revisiting the code as I learned a lot since I wrote this but for now it works just fine.
 
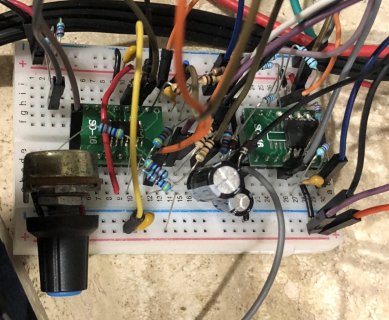
Alright I finally got one channel breadboarded and tuned the PID with what I had available on hand and it’s pretty good (quick and accurate). It’s quite a bit of components per channel, but I personally feel it’s smoother than PWM.

Here’s what the breadboard looks like:
1723EF92-8E5E-4944-A2C7-DCF9EACD7162.jpg

Quick video of it action, there is no motor noise just noise from the bushings being worn out in this fader:

It can still be a tiny bit faster, I only have a 20v power supply on my test bench, this is also without having the correct op amp since this one can't produce close to its rails so moving the fader up is ever so slightly slower than going down right now. To interface this analog circuitry with a Teensy you would have to use a DAC in place of the rotary pot which I plan on using 2 AD5592R DAC/ADCs per 8 channels for a theoretical 12 bit resolution. This uses very little pins so if you wanted to you can control a lot of faders and other peripherals with just one Teensy.

I'll make a schematic of this likely tomorrow, this breadboard doesn't currently have the circuits for the low pass filters and buffers connected that would be on this in a final product.
 
Back
Top