Button problems

Status
Not open for further replies.
That's how I see it given some two side by side are common and you just want one path the button closes. One of the two unused diagonal will carry 3.3V so it must be insulated - but depending on rotation it may be top or bottom - and also of course the other will carry GND which likewise isn't always harmless and needs proper respect.
 
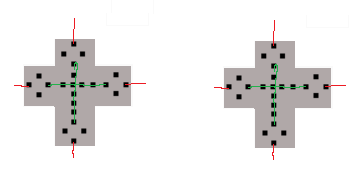
Ok the centers of the crosses are soldered, then i tied a ground wire from a ground on the buttons to a central ground. I know i put the wires in a weird direction. I wanted to make sure they cleared the washers i use with the screws to protect the perf.


You can see the empty pins compared to the soldered one.


Should all four pins of each switch be soldered to the board? Ive been leaving the ones not ground or signal loose.
 
Last edited:
Mechanically you are better having everything soldered down. If this works those joints will be getting a fair bit of force through them in play. Basic check to do while board is sitting like that is grab a multi meter and check resistance on each button. Should be open circuit, then press the board down and see it short. If anything stays open or doesn't close then now is the time to sort it out.
 
Takes some scanning to see what is there - versus what prior diagonal post suggested. I thought post #23 showed just two four pin switches rotated. Here I see two groups of four switches? But the unsoldered pins are adjacent? Hopefully you checked and rotated them properly as square 4 pin switches I've seen have a 50:50 chance of adjacent pins being the same unswitched potential, where two diagonal pins cannot. { edit :: a meter across each pair of unsoldered pins per switch must show not be connected unless the button is pressed }

I would see two sets of four looking like this in some fashion where green is ground and each red it a signal pin - based on what I saw from post #23 - though not sure switches seat rotated I thought you had achieved this (though seating them square but rotated 90° and wiring as indicated will get you diagonals the AFAIK would work):
djoke.png

Unused pins will be live as noted - so need to be touch safe or isolated - perhaps hot glue bumpers will do that - solder to lone pads first might make them more stable.
 
Last edited:
Sounds like you have the buttons mis-wired - with the ground routed through the other buttons?

I've never understood how to look at a button an KNOW which two are which - but four pin buttons have two common pairs that are connected on the button press. Check with a meter - continuity beep or resistance reading on an unconnected button - or if powered across a connected button watch for voltage. What you'll see is what the Teensy is seeing - the switches are not 1::1 switching to ground?
:D - I often resort to what you mentioned and would not do any project like this without using meter to test out.

But before this, when I am ordering new parts for this I would look at the documentation for the buttons. They should have some document telling you what the purpose of each of the buttons are... I think the last one I used that had 4 contacts, was setup where the diagonally opposite of each other were connected to each other. such that it did not matter which side was up and which side was down...

And again also need to check to see if buttons or normally open or normally closed.

So again IF your buttons are like I just described (easy to verify with meter), I would carefully install all of my buttons. and then setup ground. Making sure you are consistent on which of the two pins you use for ground. Example if you are using the (UR and LL as ground), you could simple connect one of the buttons UR to GND of Teensy and connect it's LR to the next buttons UR and the next buttons LL to the next next UR... And then connect up your signal wires to one of the other pins on the board (LR or UL)...

OR you could setup some sort of ground plane on your perfboard, and try to connect each of the buttons one at a time to your ground plane. I would also do simple test as I connect up each button to make sure it is working... I did something like this long time ago when doing a Remote control. But wiring was a little more interesting as I did not want to use an IO pin per button, so needed to setup as a matrix (NxM)... So did not directly connect any of the pins to ground.
 
Put in a call to my dealer with some pics and im waiting for a message back. I git curious about the 90* turn between the top and bottom so again i grabbed my old working dpad and looked at the angles of the switches and the direction of each switch doesnt seem to matter on it.

Heres a pic from the ebay store with the ratings......


Update:::

Just soldered the direction pad side one by one then using the serial monitor to check each button and so far so good.
 
Last edited:
The problem for me is finding what I need with in my country and at an affordable price so I don't have to wait 2-3weeks. Most of the time this works well enough. But most people are ready and willing to correct a mistake. But usually buy from the same people when ever I can. I have a guy that makes my custom guitar neck blanks for me and I wouldn't use any body else.

Ok back to the business at hand. I ended up adding wires to the buttons one by one checking for a signal every time. And I seem to have all ten buttons working. I just checked with all the buttons plugged in and so far so good. I did the start/select buttons the same way as the crosses, that is seperate and then running the ground to the main hub in the center on the pad as seen above.

Now I need to figure out how to include bounce as my buttons.
 
Good - not just me with trouble looking at a square button and have it be obvious in any way what two are common to each other. I hadn't seen diagonal ones - that would make sense - unless diagonal wiring was used as noted above.

Glad to see you are making progress DJoker. Kurt and I are both in the US and you being 'in another country' explains our not understanding your situation as presented all the time ...
 
No sorry I'm in the US I just say it that way as to not offend people. Lol And my typing sux!!

Really I'm just slow some times to catch on but once I do it's no problem.
 
Last edited:
OK Now that I know all the buttons work along with the t3.6 pins I can start integrating the bounce library into my controls. I started by removing the buttons files completely. I have several copies and they are all the same. Then dropped bounce in my gaming library and included settings.c where the button pins stuff is stored then included bounce into my grafx library and named it a class in my public print. I then added the pin info into the settings.c file then added the update functions to my grafx files.cpp in the updateAll() and begin() functions.

Not too sure what to do about the update times in the bounce() function should change to since the updateAll() function updates everything 20x a second. Will that create a conflict?

Also the example defragster gave for testing one button at a time on page 1 post #18. I see that both Bounce() and pinmode() use buttonpin and its actually named in const int buttonPin = 4.

just for clarification do I put the pin number in both bounce and pinmode? Or just one?

Ok I got it. Both. Looked at both the pi mode page and bounce() function itself. I'm telling pinmode which pins I want to use then in bounce() I'm telling it to read from pin #X

Still stuck on the update interval.
 
Last edited:
of course I'm stuck.

I cant figure out how to call the function so it includes the button I want to assign it.

here is the settings.c file with the button settings. Both my grafx files and bounce has #include settings.c so it should read the settings file for the pinmode and such.

Code:
#ifndef SETTINGS_C
#define	SETTINGS_C

#define NOROT 0
#define ROTCCW 1
#define ROT180 2
#define ROTCW 3

//SETTINGS YOU CAN EDIT

#define NUM_CHANNELS 1 //number of sound channels, between 0 and 4
#define DISPLAY_ROT NOROT //set to NOROT, ROTCCW, ROT180 or ROTCW. Can be used to play in portrait mode.
//#define ENABLE_GUI 1 //enable menu, keyboard, pop-up, volume adjust functions
#define ENABLE_BITMAPS 1 //will replace bitmaps with rectangles if disabled
//#define ENABLE_GRAYSCALE 1 //allows the use of the GRAY color
#define EXTENDED_NOTE_RANGE 1 //allows the use of notes above A 5... please avoid that they sound really bad

//not really useful
#define ENABLE_BATTERY 1 //disable battery monitoring
#define ENABLE_BACKLIGHT 1 //disable automatic back-light

//IT'S STRONGLY ADVISED TO LEAVE THE FOLLOWING SETTINGS ALONE

//defaults values of settings which can be adjusted on each Gamebuino using settings.hex
#define SCR_CONTRAST 60
#define START_MENU_TIMER 255 //40 = 40 frames (2sec) before start menu is skipped, 0 = no start menu, 255 = start menu until you press A

//addresses of settings stored in the program memory
#define SETTINGS_PAGE ((const char *)(0x7800-128))
#define SETTINGS_TOKEN 			0xC001
#define OFFSET_CURRENTGAME		2
#define OFFSET_USERNAME			11
#define USERNAME_LENGTH			10
#define OFFSET_CONTRAST			22
#define OFFSET_BACKLIGHT_MIN	23
#define OFFSET_BACKLIGHT_MAX	24
#define OFFSET_LIGHT_MIN		25
#define OFFSET_LIGHT_MAX		27
#define OFFSET_VOLUME_MAX		29
#define OFFSET_VOLUME_DEFAULT	30
#define OFFSET_START_MENU_TIMER	31
#define OFFSET_BATTERY_CRITIC	32
#define OFFSET_BATTERY_LOW		34
#define OFFSET_BATTERY_MED		36
#define OFFSET_BATTERY_FULL		38

//GUI
#define KEYBOARD_W 16
#define KEYBOARD_H 8

//screen
//#define SCR_cs    13
//#define SCR_wr    11
//#define SCR_rs    A2
//#define SCR_rest  A1
//#define SCR_pmw   A0

//sound
#define VOLUME_GLOBAL_MAX 1
#define VOLUME_CHANNEL_MAX 255/NUM_CHANNELS/VOLUME_GLOBAL_MAX/7/9 //7=instrument volume 9=note volume

//battery voltage monitor
#define BAT_PIN A6
#define NUM_LVL 4
#define BAT_LVL_CRITIC  3500
#define BAT_LVL_LOW		3550
#define BAT_LVL_MED		3700
#define BAT_LVL_FULL	3900

//SD card
//#define SD_CS 10

//screens back light
#define BACKLIGHT_PIN 5
//auto back-light levels
#define BACKLIGHT_MIN 0
#define BACKLIGHT_MAX 255

//ambient light sensor
#define AMBIENTLIGHT_PIN A7
//auto back-light levels
#define AMBIENTLIGHT_MIN 800 //800
#define AMBIENTLIGHT_MAX 980 //1000
#define AMBIENTLIGHT_SMOOTHING 16

//number of buttons
/*#define NUM_BTN         10
//buttons ID
#if DISPLAY_ROT == 0
	#define BTN_UP      1
	#define BTN_RIGHT   2
	#define BTN_DOWN    3
	#define BTN_LEFT    0
#elif DISPLAY_ROT == ROTCCW
	#define BTN_UP      2
	#define BTN_RIGHT   3
	#define BTN_DOWN    0
	#define BTN_LEFT    1
#elif DISPLAY_ROT == ROT180
	#define BTN_UP      3
	#define BTN_RIGHT   0
	#define BTN_DOWN    1
	#define BTN_LEFT    2
#elif DISPLAY_ROT == ROTCW
	#define BTN_UP      0
	#define BTN_RIGHT   1
	#define BTN_DOWN    2
	#define BTN_LEFT    3
#endif
#define BTN_A           4
#define BTN_B           5
#define BTN_X           6
#define BTN_Y           7
#define BTN_S           8
#define BTN_T           9

//buttons pins
#define BTN_UP_PIN      33  // up button
#define BTN_RIGHT_PIN   17  // right button
#define BTN_DOWN_PIN    38  // down button
#define BTN_LEFT_PIN    35  // left button
#define BTN_A_PIN       28  // A button
#define BTN_B_PIN       30  // B button right
#define BTN_X_PIN       26  // X button
#define BTN_Y_PIN       32  // Y button up
#define BTN_S_PIN       21  // start
#define BTN_T_PIN       4   // select
*/


  pinMode(33, INPUT_PULLUP);  //UP
  pinMode(17, INPUT_PULLUP);  //DOWN
  pinMode(38, INPUT_PULLUP);  //LEFT
  pinMode(35, INPUT_PULLUP);  //RIGHT
  pinMode(28, INPUT_PULLUP);  //A
  pinMode(20, INPUT_PULLUP);  //B
  pinMode(26, INPUT_PULLUP);  //X 
  pinMode(32, INPUT_PULLUP);  //Y
  pinmode(21, INPUT_PULLUP);  //START
  pinmode(4,  INPUT_PULLUP);  //SELECT

 
  Bounce button0 = Bounce(33, 10);  //UP
  Bounce button1 = Bounce(17, 10);  //DOWN
  Bounce button2 = Bounce(38, 10);  //LEFT
  Bounce button3 = Bounce(35, 10);  //RIGHT
  Bounce button4 = Bounce(28, 10);  //A
  Bounce button5 = Bounce(30, 10);  //B
  Bounce button6 = Bounce(26, 10);  //X
  Bounce button7 = Bounce(32, 10);  //Y
  Bounce button8 = Bounce(21, 10);  //Start
  Bounce button9 = Bounce(4,  10);  //Select


#endif /* SETTINGS_C */

and then I included the bounce library and its class like this in my main grafx file like so....

Code:
#ifndef _Grafx_H_
#define _Grafx_H_

#include "Arduino.h"
#include <limits.h>
#include "pins_arduino.h"
#include "wiring_private.h"
#include <stdio.h>
#include <stdlib.h>
#include "Print.h"
#include <SPI.h>
#include <avr/sleep.h>      
#include <avr/pgmspace.h>   


#include "Bounce.h"

#include <SPIN.h>

#include "settings.c"
#include "Sound.h"
//#include "Buttons.h"
#include "Battery.h"
#include "_includes/Grafx_cpuCommons.h"
#include "_includes/Grafx_settings.h"

//Load sumotoy universal descriptors (used in many other libraries)
#include "_includes/fontDescription.h"
#include "_includes/imageDescription.h"
#include "_includes/iconDescription.h"

#define ENABLE_ILI9341_FRAMEBUFFER

#define load_game (*((void(*)(const char* filename))(0x7ffc/2)))
#define write_flash_page (*((void(*)(const char * page, unsigned char * buffer))(0x7ffa/2)))

#define wrap(i, imax) ((imax+i)%(imax))

#include <SD.h> 


////////////////////////////////////////////////
//////////////////////duhjoker//////////////////
////////////////////////////////////////////////

#define BLACK       0x0000 
#define WHITE       0xFFFF 
#define GREY        0x8410
#define DARKGRAY    0xAD55 
#define LIGHTGREY   0xD69A
#define BLUE        0x001F 
#define DARKBLUE    0x0011 
#define GREEN       0x07E0
#define DARKGREEN   0x8DF1 
#define LIGHTBROWN  0xF52C
#define YELLOW      0xFFE0 
#define ORANGE      0xFD20 
#define PINK        0xFE19 
#define RED         0xF800 
#define PURPLE      0x8010 
#define BROWN       0xA145
#define BEIGE       0xF7BB
#define CYAN    	0x07FF
#define MAGENTA 	0xF81F

/////////////////////////////////////////////////
/////////////////////////////////////////////////
////------------FRAME BUFFER DEFINES---------////
/////////////////////////////////////////////////
/////////////////////////////////////////////////
#define Grafx_CASET   0x2A
#define Grafx_PASET   0x2B
#define Grafx_RAMWR   0x2C
#define Grafx_RAMRD   0x2E

 #define pgm_read_byte(addr) (*(const unsigned char *)(addr))

#ifndef pgm_read_byte
#define pgm_read_byte(addr) (*(const unsigned char *)(addr))
#endif
#ifndef pgm_read_word
#define pgm_read_word(addr) (*(const unsigned short *)(addr))
#endif
#ifndef pgm_read_dword
#define pgm_read_dword(addr) (*(const unsigned long *)(addr))
#endif

// Pointers are a peculiar case...typically 16-bit on AVR boards,
// 32 bits elsewhere.  Try to accommodate both...

#if !defined(__INT_MAX__) || (__INT_MAX__ > 0xFFFF)
#define pgm_read_pointer(addr) ((void *)pgm_read_dword(addr))
#else
#define pgm_read_pointer(addr) ((void *)pgm_read_word(addr))
#endif

#ifndef min
#define min(a,b) (((a) < (b)) ? (a) : (b))
#endif


#define swap(a, b) { int8_t t = a; a = b; b = t; }

/////////////////////////////////////////////////
/////////////////////////////////////////////////
/////////////////////////////////////////////////


#if defined(_Grafx_DEF_FONT_PATH)
	#include _Grafx_DEF_FONT_PATH
#else
	#include "_fonts/nullfont.c"
#endif

#if defined(ESP8266) && !defined(_ESP8266_STANDARDMODE)
	#include <eagle_soc.h>
#endif

#if defined(SPI_HAS_TRANSACTION)
	static SPISettings Grafx_SPI;      //duhjoker
#endif

#if !defined(swapVals)
	#if defined(ESP8266) 
		#define swapVals(a, b) { int16_t t = a; a = b; b = t; }
	#else
		#define swapVals(a, b) { typeof(a) t = a; a = b; b = t; }
	#endif
#endif


#define CENTER 				9998


enum Grafx_modes { 		NORMAL=0,	PARTIAL,	IDLE,	SLEEP,	INVERT,	DISP_ON,	DISP_OFF };//0,1,2,3,4,5,6
enum Grafx_iconMods { 	NONE=0,		TRANSPARENT,REPLACE,BOTH};//0,1,2,3
enum Grafx_centerMode { 	NORM=0,		SCREEN,		REL_X,	REL_Y,	REL_XY};//0,1,2,3,4

#ifdef __cplusplus
#define Grafx_SPICLOCK 30000000
#define Grafx_SPICLOCK_READ 2000000


class Grafx : public Print {

 public:

	 //Buttons buttons;
 	 Bounce buttons;
	 Sound sound;
	 Battery battery;

   ////////////////////////////////////////////////////////////////////////////////////////////////
   ////////////////////////////////////////////////////////////////////////////////////////////////
   ///-------------------------------constructors-----------------------------------------------///
   ////////////////////////////////////////////////////////////////////////////////////////////////
   ////////////////////////////////////////////////////////////////////////////////////////////////

	#if defined(__MK20DX128__) || defined(__MK20DX256__) || defined(__MK64FX512__) || defined(__MK66FX1M0__)
		Grafx(const uint8_t cspin,const uint8_t dcpin,const uint8_t rstpin=255,const uint8_t mosi=11,const uint8_t sclk=13);
	#elif defined(__MKL26Z64__)
		Grafx(const uint8_t cspin,const uint8_t dcpin,const uint8_t rstpin=255,const uint8_t mosi=11,const uint8_t sclk=13);
	#else
		Grafx(const uint8_t cspin,const uint8_t dcpin,const uint8_t rstpin=255);
	#endif

	//////////////////////////////////////////////////////////////////////////////////////////////
	//////////////////////////////////////////////////////////////////////////////////////////////
    ///---------------------------------initialisation-----------------------------------------///
    //////////////////////////////////////////////////////////////////////////////////////////////
	//////////////////////////////////////////////////////////////////////////////////////////////

    boolean     updateAll(); //DUHJOKER SHOULD UPDATE ALL 20 X A SECOND // GAMEBUINO

				//avoidSPIinit=true set everithing but not call SPI.init()(you should init SPI before!)
	void     	begin(bool avoidSPIinit=false);
	void		setArea(uint16_t x0, uint16_t y0, uint16_t x1, uint16_t y1);
	void		setPartialA

I made bounce buttons just to be easier in the class as seen above.

and heres where I'm having trouble on my sketch.......

Code:
void loop(void) {
//updates the GameRIot (the display, the sound, the buttons, everyyhing)
  //returns true when it's time to render a new frame (20 times/second)
   if(tft.updateAll()){
    if (tft.buttons.repeat(BTN_RIGHT,1));//{X--:}
    if (tft.buttons.repeat(BTN_LEFT,1));//{X++:}
    if (tft.buttons.repeat(BTN_DOWN,1));//{Y--:}
    if (tft.buttons.repeat(BTN_UP,1));//{Y--:}


//tft.drawTilemap(x, y, tilemap1, spritesheet1, BLACK);
//  tft.drawTilemap(x, y, tilemap2, spritesheet2, BROWN);
 //  tft.drawTilemap(x, y, tilemap3, spritesheet3, LIGHTBROWN);

    if (tft.buttons.repeat(BTN_UP,1)){
       tft.drawBitmap1(player_x, player_y,paul_rearblack,16,16,BLACK);
         tft.drawBitmap1(player_x, player_y,paul_rearblue,16,16,BLUE);
          tft.drawBitmap1(player_x, player_y,paul_rearbrown,16,16,BROWN);
          tft.drawBitmap1(player_x, player_y,paul_reargrey,16,16,GREY);
           tft.drawBitmap1(player_x, player_y,paul_rearpink,16,16,PINK);
            tft.drawBitmap1(player_x, player_y,paul_rearred,16,16,YELLOW);

            player_direction = 1;
             player_y = player_y - 1;}
            if(player_y <= 0){
              player_y = 0;}

I know to go

Code:
 if (tft.buttons.fallingEdge()){
     tft.drawBitmap1(player_x, player_y,paul_rearblack,16,16,BLACK);
       }
but how do I point it to button0
 
Indeed that sample was appropriate to show you the same number is needed in both places - that was where the prior posted sample was broken.

buttonPin is just a variable name - in the end you'll have a list of 10 of them - that would fit well into an array of a different name perhaps for both the pin #'s to init and perhaps the BOUNCE object pointers to allow running through them with a for loop.

Button update calls need to be done as often as you don't want to miss a press - if some are lower priority during game play you might skip them to reduce overhead and make sure the active ones are checked often enough - but that may be a later or unneeded optimization.

Look at a sample with ElapsedMillis usage - a great way to control how often or when things are done. It is a class that internalizes reference to millis() to make the math clear and easy. Starts at ZERO ( or wherever you set it or leave it ) - wait for it to be >= your limit time value ( 50ms would be 20 times/sec) then perform your desired action and set to zero ( or remove 50ms to keep it from sliding if it does )
 
I don't have time to follow what you've done pulling lib code into your source tree all at once?

Perhaps start with a simpler mod to a known working sample - to incorporate all buttons. Each instance of a button "Bounce button0 = Bounce(33, 10); //UP" generates a BOUNCE object. If you had those in an array they could be scanned and referred to that way by [index] rather than by name is what I'd try.
 
I think I got it. I used your post #18 example and added another button and tested it. It would be easier just to do it the way you posted. Then I can try to get it integrated later.

Thank you for your patience with me

Oh do the buttons repeat? Or stay sending signal when as long as the switch is pressed?
 
Last edited:
I'm happy!!!!!!! I did something and it worked the first time.

So what I did was made a demo sketch to test the buttons using the graphics part. Each button changes a bitmap square 32x32 centered on the screen different colors and hold the color upon release.

Code:
#include <SPI.h>
#include <Grafx.h>
#include <SD.h>
#include <Bounce.h>

#define __CS1   10
#define __DC  9
#define SD_CS 4
#define BUFFPIXEL 20

uint8_t errorCode = 0;

Grafx tft = Grafx(__CS1, __DC);

 int player_x = 160;
 int player_y = 110;
 int player_direction = 2;

 int x=-0,y=0;

const byte square[] PROGMEM = {32,32,
B11111111,B11111111,B11111111,B11111111,
B11111111,B11111111,B11111111,B11111111};

//////dpad + select buttons
const int buttonUp = 33; //up button
Bounce ButtonUp = Bounce(buttonUp, 10);  // 10 ms debounce
const int buttonDown = 38; //down_button
Bounce ButtonDown = Bounce(buttonDown, 10);  // 10 ms debounce
const int buttonLeft = 35; //left button
Bounce ButtonLeft = Bounce(buttonLeft, 10);  // 10 ms debounce
const int buttonRight = 17; //right button
Bounce ButtonRight = Bounce(buttonRight, 10);  // 10 ms debounce
const int buttonS = 21; //select button
Bounce ButtonS = Bounce(buttonS, 10);  // 10 ms debounce

//////action + start buttons
const int buttonX = 32; // X button up
Bounce ButtonX = Bounce(buttonX, 10);  // 10 ms debounce
const int buttonY = 26; // Y button left
Bounce ButtonY = Bounce(buttonY, 10);  // 10 ms debounce
const int buttonA = 30; // A button right
Bounce ButtonA = Bounce(buttonA, 10);  // 10 ms debounce
const int buttonB = 28; // B buttun down
Bounce ButtonB = Bounce(buttonB, 10);  // 10 ms debounce
const int buttonT = 4; // Start button
Bounce ButtonT = Bounce(buttonT, 10);  // 10 ms debounce


void setup() {
  Serial.begin(38400);
  long unsigned debug_start = millis();
  while (!Serial && ((millis() - debug_start) <= 5000));
  Serial.println("serial ok, testing lib...");
  tft.begin();
  tft.setFrameRate(62);
  tft.persistence = false;
   pinMode(buttonUp, INPUT_PULLUP);
   pinMode(buttonDown, INPUT_PULLUP);
   pinMode(buttonLeft, INPUT_PULLUP);
   pinMode(buttonRight, INPUT_PULLUP);
   pinMode(buttonS, INPUT_PULLUP);
   pinMode(buttonX, INPUT_PULLUP);
   pinMode(buttonY, INPUT_PULLUP);
   pinMode(buttonA, INPUT_PULLUP);
   pinMode(buttonB, INPUT_PULLUP);
   pinMode(buttonT, INPUT_PULLUP);
   
//Serial.print("Initializing SD card...");
//  if (!SD.begin(SD_CS)) {
//    Serial.println("failed!");
//  }

//  Serial.println("OK!")

//the following it's mainly for Teensy
  //it will help you to understand if you have choosed the
  //wrong combination of pins!
  errorCode = tft.getErrorCode();
  if (errorCode != 0) {
    Serial.print("Init error! ");
    if (bitRead(errorCode, 0)) Serial.print("MOSI or SCLK pin mismach!\n");
    if (bitRead(errorCode, 1)) Serial.print("CS or DC pin mismach!\n");
  }
  else {
    Serial.println("Inited");
  }
}

/////////////////////////////////////////////////////////////////
/////////////////////////////////////////////////////////////////
void loop(void) {
//updates the GameRIot (the display, the sound, the buttons, everyyhing)
  //returns true when it's time to render a new frame (20 times/second)
   if(tft.updateAll()){

     if (ButtonUp.update()) {
    if (ButtonUp.fallingEdge()){
       tft.drawBitmap1(player_x, player_y, square,32,32,RED);
       player_direction = 1;
    }
   }

/////////////////////////////////////////////////////////////
/////////////////////////////////////////////////////////////

     if (ButtonDown.update()) {
    if (ButtonDown.fallingEdge()){
       tft.drawBitmap1(player_x, player_y, square,32,32,GREEN);
       player_direction = 2;
    }
   }

/////////////////////////////////////////////////////////////
/////////////////////////////////////////////////////////////

     if (ButtonLeft.update()) {
    if (ButtonLeft.fallingEdge()){
       tft.drawBitmap1(player_x, player_y, square,32,32,BLUE);
       player_direction = 3;
    }
   }

   //////////////////////////////////////////////////////////
   //////////////////////////////////////////////////////////

     if (ButtonRight.update()) {
    if (ButtonRight.fallingEdge()){
       tft.drawBitmap1(player_x, player_y, square,32,32,YELLOW);
       player_direction = 4;
    }
   }

   ///////////////////////////////////////////////////////////
   ///////////////////////////////////////////////////////////

     if (ButtonS.update()) {
    if (ButtonS.fallingEdge()){
       tft.drawBitmap1(player_x, player_y, square,32,32,PURPLE);
       player_direction = 5;
    }
   }

   ////////////////////////////////////////////////////////////
   ////////////////////////////////////////////////////////////

     if (ButtonX.update()) {
    if (ButtonX.fallingEdge()){
       tft.drawBitmap1(player_x, player_y, square,32,32,PINK);
       player_direction = 6;
    }
   }

   ////////////////////////////////////////////////////////////
   ////////////////////////////////////////////////////////////

     if (ButtonY.update()) {
    if (ButtonY.fallingEdge()){
       tft.drawBitmap1(player_x, player_y, square,32,32,LIGHTBROWN);
       player_direction = 7;
    }
   }

   /////////////////////////////////////////////////////////////
   ////////////////////////////////////////////////////////////
     if (ButtonA.update()) {
    if (ButtonA.fallingEdge()){
       tft.drawBitmap1(player_x, player_y, square,32,32,LIGHTGREY);
       player_direction = 8;
    }
   }

   ////////////////////////////////////////////////////////////
   ////////////////////////////////////////////////////////////

        if (ButtonB.update()) {
    if (ButtonB.fallingEdge()){
       tft.drawBitmap1(player_x, player_y, square,32,32,CYAN);
       player_direction = 9;
    }
   }

   ////////////////////////////////////////////////////////////
   ////////////////////////////////////////////////////////////
   
        if (ButtonT.update()) {
    if (ButtonT.fallingEdge()){
       tft.drawBitmap1(player_x, player_y, square,32,32,MAGENTA);
       player_direction = 10;
    }
   }
   
   ////////////////////////////////////////////////////////////
   ////////////////////////////////////////////////////////////
   /////////////////  PLAYER DIRECTION ////////////////////////

    if (player_direction == 1){
   tft.drawBitmap1(player_x, player_y, square,32,32,RED);
   }

   ////////////////////////////////////////////////////////////
   ////////////////////////////////////////////////////////////

 else if (player_direction == 2){
   tft.drawBitmap1(player_x, player_y, square,32,32,GREEN);
   }
   
   ////////////////////////////////////////////////////////////
   ////////////////////////////////////////////////////////////

 else if (player_direction == 3){
   tft.drawBitmap1(player_x, player_y, square,32,32,BLUE);
   }

      ////////////////////////////////////////////////////////////
   ////////////////////////////////////////////////////////////

 else if (player_direction == 4){
   tft.drawBitmap1(player_x, player_y, square,32,32,YELLOW);
   }

     ////////////////////////////////////////////////////////////
   ////////////////////////////////////////////////////////////

 else if (player_direction == 5){
   tft.drawBitmap1(player_x, player_y, square,32,32,PURPLE);
   }

  ////////////////////////////////////////////////////////////
   ////////////////////////////////////////////////////////////

 else if (player_direction == 6){
   tft.drawBitmap1(player_x, player_y, square,32,32,PINK);
   }

  ////////////////////////////////////////////////////////////
   ////////////////////////////////////////////////////////////

 else if (player_direction == 7){
   tft.drawBitmap1(player_x, player_y, square,32,32,LIGHTBROWN);
   }

  ////////////////////////////////////////////////////////////
   ////////////////////////////////////////////////////////////

 else if (player_direction == 8){
   tft.drawBitmap1(player_x, player_y, square,32,32,LIGHTGREY);
   }

  ////////////////////////////////////////////////////////////
   ////////////////////////////////////////////////////////////

 else if (player_direction == 9){
   tft.drawBitmap1(player_x, player_y, square,32,32,CYAN);
   }

  ////////////////////////////////////////////////////////////
   ////////////////////////////////////////////////////////////

 else if (player_direction == 10){
   tft.drawBitmap1(player_x, player_y, square,32,32,MAGENTA);
   }

   }
}

thank you for your help in this!!!!!
 
Well I thought I was done!!!!!

I can get the Sprite to move now but I have to do a button press every time. I need some kind of repeat function so it keeps moving the character.
 
Well I thought I was done!!!!!

... I need some kind of repeat function so it keeps moving the character.

Yes, you do.

If a 'direction' is triggered - and it is to auto repeat until 'another press of something' - you need to code for that.
 
Ok I can't find the arduino playground for bounce. It has bounce 2. If I could understand the other functions better I could probably figure this out. I hope.

Do you know of such a page? Maybe written in lay terms?

I'm looking at some tutorials and other code.

Ok maybe I could do something like falling edge moves the player the if rising edge set player direction. So it's only moving when pressed. I think it might need a digital write high or some thing
 
Last edited:
With no suggestion it applies . . . take what I wrote above.

Do you have experience with using an elapsedMillis variable to track time? Do a blink with no delay using it. Perhaps watch a pair of buttons and have one increase the time and one decrease the time and TOGGLE the blink when the time expires - forum search qBlink - it does toggle and I expect I left one sample using elapsedMillis.

Introduce a third button that says stop the blinking perhaps for even more fun. When you see this button immediately set needed variable to stop blinking - that is ignore the elapsedMillis until you get a new button to do otherwise.

So now you can start with a 1 second blink - and add or remove say 100 ms depending on the button press. You can check the button press and record what you'll do each pass through the loop() - but only do it when the elapsedMillis expires - either increase or reduce the next wait by 100 ms - and then for a non repeating button clear the state of what you just did. For a repeating button press do not clear the button press indication at that point so youd do the same next time. At any point you get a NEW button press decide it that changes how you'll react the next time elapsedMillis expires and set the proper variables to check and do that when it does expire. Perhaps left/right on left four buttons are non-repeating and L/R on the right four buttons are auto repeating. Either UP button stops the blink with the LED on - and DOWN button stops and sets the LED off.

Okay perhaps I said that right ( I just made it up - if you make it work it should get you more familiar with the issues at hand ) and it was somehow fun . . . are you any closer? That should wholly fail to answer your question for you - and be more work than needed - but should let you see a great deal. In the end perhaps instead of LED blink you then move a sprite L/R based on button direction and multiple presses in the same direction move it faster - and a press the opposite way stops it or move it slowly to start the other way - but starting with blink will be a simpler start that I could debug perhaps.

The elapsedMillis is used to set your repeat rate while always running - how often you move the sprite or whatever. elapsedMillis are very handy and just a little overhead - and to start much clearer that inventing your own math watching the current millis() value as it is embedded in a class variable with a simple name and no 'visible' math.

But what you do when that timer expires is dependent on the last or overriding button that was hit.
 
Well I thought I was done!!!!!

I can get the Sprite to move now but I have to do a button press every time. I need some kind of repeat function so it keeps moving the character.
As with most things here you are better off, if you look at some of the code.

So for example if you look at the Bounce library (bounce.h), you will see a function rebounce()
The comments are:
Code:
	// Forces the pin to signal a change (through update()) in X milliseconds 
	// even if the state does not actually change
	// Example: press and hold a button and have it repeat every X milliseconds
So if you want a repeat function, that may be one way to do so... But again it may do what you want it may not...
That is if your code is checking both falling edge and rising edge it will probably give you cases you are not interested in.
 
your library code disables pullups to "save power". this could be why your buttons "don't work". configuring it in a sketch wont work if the library will just reset the pin state.

post #4, CPP:


Code:
void Buttons::update() {
    for (uint8_t thisButton = 0; thisButton < NUM_BTN; thisButton++) {
        pinMode(pins[thisButton], INPUT_PULLUP); //enable internal pull up resistors
        if (digitalRead(pins[thisButton]) == LOW) { //if button pressed
            states[thisButton]++; //increase button hold time
        } else {
            if (states[thisButton] == 0)//button idle
                continue;
            if (states[thisButton] == 0xFF)//if previously released
                states[thisButton] = 0; //set to idle
            else
                states[thisButton] = 0xFF; //button just released
        }
        pinMode(pins[thisButton], INPUT); //disable internal pull up resistors to save power
    }
	

}

ahh just checked again, your toggling the pullups, perhaps this is too fast that may be erratic
 
Last edited:
your library code disables pullups to "save power".
ahh just checked again, your toggling the pullups, perhaps this is too fast that may be erratic

And wondering does this really save any power? I can see if you are going to go into a sleep state that it might... But if you are constantly turning it on and off does it?
 
you should comment out the pullup toggling during your tests, you never know, sometimes is stuff that simple that can cause major headaches, but again, just until you fix your code.
 
Tonton the code works just fine and does what I want but I'm still learning how to use the bounce library. Normally in the original 5110 code, I would use

buttons.repeat()) {}

Pretty simple. It takes care of the button press and tells it to repeat til button is released. But the old library has a hard time understanding presses from the buttons connected with teensy3.x.

Thanks guys for the clues.

Last night before going going to bed and moved the update functions where they are all listed in a row instead of wrapping the function in update like the example in post 41. Worked like it did with the functions inside the update. I might be able to wrap the functions together like the above but I'm thinking the rebounce command will be inside the fallingEdge() function.

Lol!!! I literally typed rebounce() arduino into google and never got a hit for it. But I did get hits for debounce. Wtf?
 
Last edited:
Status
Not open for further replies.
Back
Top