Making flight sim controllers

Status
Not open for further replies.

marksydney

New member
I have metalworking skills and am into audio recording, I also like the xplane 11 flight sim and am considering making my own controllers because a) the cheaper ones aren't very good b)The good ones are very expensive and c) I would enjoy the process. Creating the physical bits is not a problem but I'm scoping how do-able it is for someone like me to put together the electronics and code to make it work. I've only just discovered this site and wondered if anyone would be kind enough to offer advice.

I want to make:
A flight yoke with several buttons of different types (toggle, latch and incremental)
Flight throttles with several buttons of different types (toggle, latch and incremental)
Rudder pedals with toe brakes

The rudder pedals look like the simplest to start with and I may attempt construction of these first.

Thanks in advance.

Mark
 
Welcome to the slippery slope that is DIY sim controls.

If you have the fab skills to put together the physical parts for the controls such that they survive use that's probably the hardest part. There are two parts to the controller electronics/code. The easy part is taking the Teensy joystick example and wiring up your various axis with push buttons for seasoning and then going flying. Key thing here is that it'll all be one way, you push a button all that happens is what a joystick push would have done (so toggles don't work well, since teensy can't tell what the game state is).

The next part is harder, and is where you load in the xplane teensy plugin and try to extract game state information and reflect that on your controller (warning lights, toggles etc). That's much more involved (and satisfying), but not actually required to just go flying.

If looking at this path suggested method is before buying anything
Install arduino and teensyduino
https://www.pjrc.com/teensy/td_download.html
go to tools->boardtype->teensy 3.2
and then
look in files->examples->basics for things like:
blink
digitalReadSerial
readanalogVoltage
and
file->examples->teensy->USBJoystick->basic

If all of that is stuff that makes sense try to make some changes for the USBjoystick example for how you might what your pedals with toe brakes to work(and change tools->usbtype to a joystick included type) and make sure it compiles.

From there you can make some decisions about how this all goes together and how ambitious you want to be. Another more boring option of course for an input only stick is to just buy a cheap controller and gut it for the main PCB and connect your new hardware to that.

If buying hardware, suggest getting at least two, preferably three of everything simply because it will give you more options and makes life easier if you have a spare unit to test things with, especially if you've just had to open a window to clear the smoke from a learning experince (load the same code to spare and whatever just did something exciting and compare).
 
Thankyou for your reply!

Welcome to the slippery slope that is DIY sim controls.

If you have the fab skills to put together the physical parts for the controls such that they survive use that's probably the hardest part. There are two parts to the controller electronics/code. The easy part is taking the Teensy joystick example and wiring up your various axis with push buttons for seasoning and then going flying. Key thing here is that it'll all be one way, you push a button all that happens is what a joystick push would have done (so toggles don't work well, since teensy can't tell what the game state is).

The next part is harder, and is where you load in the xplane teensy plugin and try to extract game state information and reflect that on your controller (warning lights, toggles etc). That's much more involved (and satisfying), but not actually required to just go flying.

If looking at this path suggested method is before buying anything
Install arduino and teensyduino
https://www.pjrc.com/teensy/td_download.html
go to tools->boardtype->teensy 3.2
and then
look in files->examples->basics for things like:
blink
digitalReadSerial
readanalogVoltage
and
file->examples->teensy->USBJoystick->basic

If all of that is stuff that makes sense try to make some changes for the USBjoystick example for how you might what your pedals with toe brakes to work(and change tools->usbtype to a joystick included type) and make sure it compiles.

From there you can make some decisions about how this all goes together and how ambitious you want to be. Another more boring option of course for an input only stick is to just buy a cheap controller and gut it for the main PCB and connect your new hardware to that.

If buying hardware, suggest getting at least two, preferably three of everything simply because it will give you more options and makes life easier if you have a spare unit to test things with, especially if you've just had to open a window to clear the smoke from a learning experince (load the same code to spare and whatever just did something exciting and compare).

I have the fab skills and have got some ideas re the way the physical unit will look, for me that's the easy part. Sections of your reply sent my head spinning but I consider that a good thing, I like to learn new stuff so I'm going to give it a go. I'll wait for a few more replies and then head off into the flight sim wilderness...
 
Doing a google search of the forum for x-plane will get a fair number of projects in various stages, including this one from today.
https://forum.pjrc.com/threads/46183-Teensy-3-2-as-Flight-Sim-Controls-Joystick
My experience has been with kerbal space program, not Xplane so not up on the nuts and bolts of getting data out of xplane but custom building a controller is certainly a project that works well with being done in small chunks. The really critical part from your mechanical design perspective is that you will be using potentiometers/variable resistors to read the angles
https://en.wikipedia.org/wiki/Potentiometer
You can get various oddly shaped ones for a price, but the standard design is the as shown on that page, three wires, on to gnd, one to 3.3V and the middle one off to your Arduino to read the angle. Which is all easy enough. Tricky part is that they have full range of 270 degrees, so you either need to get clever in your electronic design to usefully read a small fraction of the motion or work out a way use mechanical advantage to turn ~30 degrees of pedal motion as close to 270 degrees of pot rotation as possible. And have solid mechanical stops to not destroy the thing when you stomp on the pedal when that cloud turns out to have a mountain in it.
 
Thankyou,
I'm happy to take on the physical engineering challenges, the coding stuff is already giving me nose bleeds! I would hope to be able to buy gearing for the 30/270 degree problem. I have a lathe but and milling machine making the right gears is a big job, there's loads of pre made metal/nylon stuff out there that I hope to adapt. I want the finished product to look good, function well and not cost an arm and a leg like quality off the shelf products do.
 
If you have a 3D printer (or a 3d printing friend), adapting available plastic gears is certainly within your capabilities. Not everything has to be done on a lathe or mill, and 3D printing is very well suited for prototypes. Make one, see where it has shortcomings and then maybe decide which parts need to be redesigned and which should be really tough.
 
Hey, I'm assuming you've already seen this but just in case you haven't:
https://www.pjrc.com/teensy/td_flightsim.html
Do you have any use for a simple switch panel such as the saitek one? I think this would be even less complicated for a first project. I would also start out with a few basic experiments to get acquainted with the teensy/arduino basics. At the most basic level , you'll need the teensy , preferably with pins (and having 2 of them doesn't hurt just in case something happens to the first) , a breadboard,jumper cables or something similar, a few switches, potentiometers and LEDs. Having some resistors, capacitors, diodes and some of the most commonly used ICs on hand will be useful as well , but isn't critical for doing some basic experiments. So you could start out with a few switches and read their state with the serial monitor , one or several pots ,reading their value .
If you manage to get these working (and honestly, with a little reading, most anyone could) , it won't be that complicated to send these values to x-plane. A very simple, not very elegant, script for controlling the first engine's throttle could look like this - let's assume you have a potentiometer attached to pin A0:
Code:
FlightSimFloat throttle;

void setup() {
  throttle = XPlaneRef("sim/flightmodel/engine/ENGN_thro[0]");  // [0] is first element in array
  
}

void loop()
{
float targetthrottle = analogRead(A0) / 1023.0;   // here we read and convert the pots value from a 0-1023 range to the 0-1 float range required by x-plane
throttle = targetthrottle ; //here we set the flight sim float defined earlier that will get sent to x-plane
delay(10);
}
In a real project, you'd probably check if the pot's value has changed since the last check and would handle the delay thing a bit differently, but that's the basic gist of it. Here's a list of x-plane's data refs btw: http://www.xsquawkbox.net/xpsdk/docs/DataRefs.html
Hope that helps and best of luck!
 
Last edited:
If the programing part is looking like a steep learning curve there is nothing wrong with buying a cheap stick or gamepad and hacking your new hardware into it. Coding up a custom Teensy controller just for you is where the fun is at, but if you want to get a flyable version 0 up and working then that is always an option, and very straightforward to then swap the game controller PCB with a Teensy as a next step.
 
Cockpit.jpg

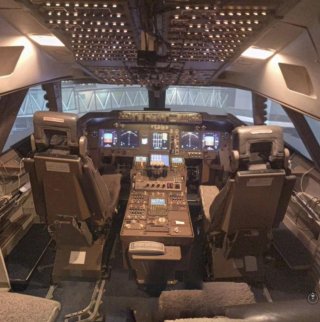
A friend and I built his 747 cockpit from real parts. I've built about 12 Teensy boards so far to interface various panels and motors to the simulation software (Aerowinx PSX). In a nutshell - Teensy is wonderful for flight sims (though we've completely avoided using USB and use Ethernet instead - USB is awful for setup and reliability on a large sim like this).

It sounds like you're building a USB controller; I've not used this Teensy functionality much but what I did try works really well so if you have any specific questions to ask, please ask away!
 
I'm at the very start of this project and I guess a good idea would be to buy some kind of starter kit and play around with the stuff. I really don't know what questions to ask save what bits should I get first to start up the learning curve!
BTW thanks for the reply and offer of help!
 
First suggestion would be to see if there is a maker space near you. A lot of things are easier if you can pick someones brain in person.

Second is to see if there is a local place selling electronics stuff. You will be paying a 2-3 times premium but even if you don't walk out with anything being able to have a look at some of this stuff before you look at pictures on line can help. And if you need something in a hurry it's good to know what you can get today.

links below for adafruit, but these things are generic so go with what gets them cheapest with shipping.

Buying an Arduino starter kit works. An Arduino Uno is the classic design, it's old and doesn't do the shiny new things (like be a joystick or sim controller) but having one isn't a bad thing and all the tutorials assume one, so the photos/drawings etc will be what you have. Don't have to though, especially if going the hack existing things route. You can also get the bits seperatly, since kit will probably have sensors you don't want:

bread board like https://www.adafruit.com/product/64
Jumper wires- either solid core salvaged from somewhere, or
https://www.adafruit.com/product/3314
or
https://www.adafruit.com/product/758 (you pull these apart)
a resistor assortment
At least one LED, better an assortment but salavaged works too
At least one pot, somewhere between 1 and 50 kilo ohms.
https://www.adafruit.com/product/356
Buttons

You'll also need a teensy or three at some point, though given shipping costs getting to grips with a Uno may be easier. Recommendation would be the Teensy 3.2 or LC. You can also buy the older T2++ or go the mainstream Arduino Leanardo/Nano etc but that sends you down a path of older and potentially harder to work with micro controllers and will be much harder to get the Xplane interface working with.

If you end up with an Arduino/Teensy power for things is easy enough since you just steal it from the board, otherwise you'll need to work out how you get things going.
Tools wise you'll be using
cheap Mulitmeter
side cutters
Safety glasses (both for the cutting and the soldering
Soldering iron - you do want a temperature controlled one, and a reasonably fine tip.
Solder - reasonably fine (not plumbing variety)
With the tools this is where a maker space is great since you can try before plunking down some quite serious money, you can get by without to start with but it limits all sorts of things if you have to bodge things together.
 
Status
Not open for further replies.
Back
Top