Hi,
Thanks for an amazing hard / software.
Im currently using Arduino 1.8.5 and teensy 1.41 software.
I have started doing the tutorials on the web:
https://www.pjrc.com/teensy/td_digital.html
Many of the examples either dont compile properly, or when i try to upload to my board they dont work as expected.
Here is one from the tutorials:
void setup()
{
pinMode(PIN_D6, OUTPUT); // LED
pinMode(PIN_D7, INPUT_PULLUP); // Pushbutton
}
void loop()
{
if (digitalRead(PIN_D7)) {
// D7 pin is high due to pullup resistor
digitalWrite(PIN_D6, LOW); // LED on
delay(400); // Slow blink
digitalWrite(PIN_D6, HIGH); // LED off
delay(400);
} else {
// D7 pin is low due to pushbutton pressed
digitalWrite(PIN_D6, LOW); // LED on
delay(80); // Fast blink
digitalWrite(PIN_D6, HIGH); // LED off
delay(80);
}
}
If in Arduino i choose teensy 2.0 it debugs ok, but when uploading to teensy i tells me im choosing the wrong board:
here are the screenshots:
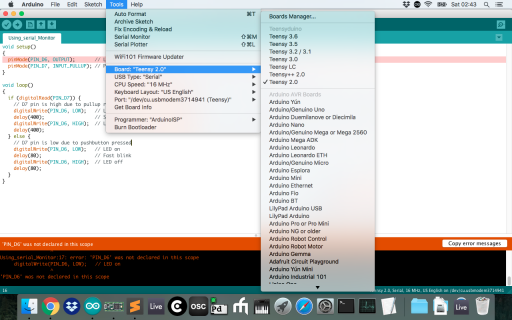
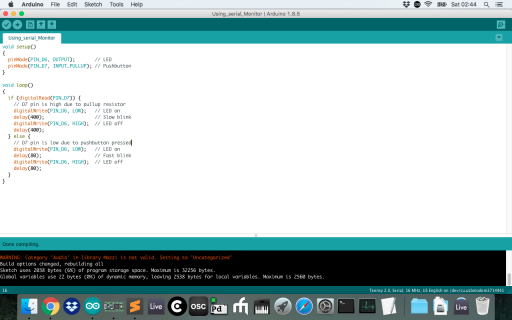
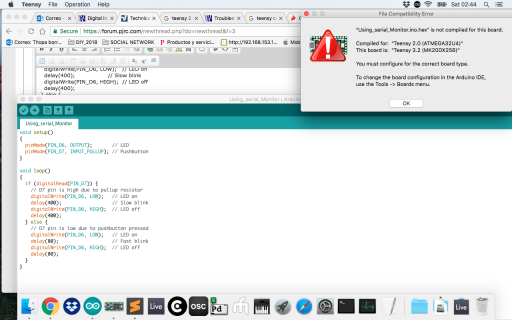
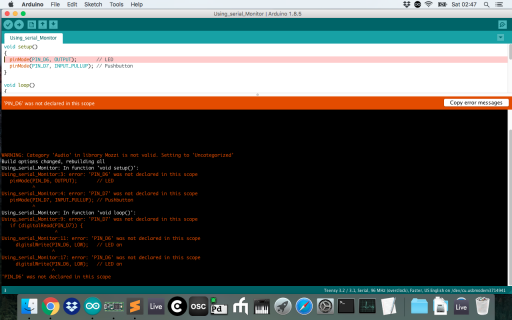
If i choose the right board (Teensy 3.2) and debug inside arduino i get all this error messages, but i can upload to my teensy board:
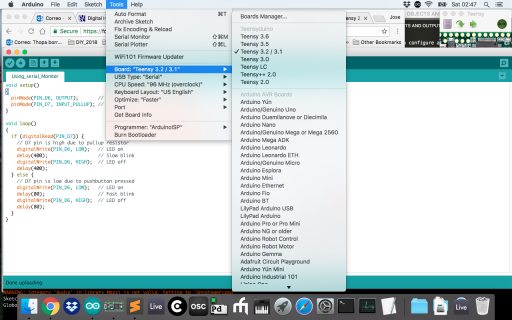
Specially im having trouble with having to define the outs of the boards like
int Led1 = 0;
int Led2 = 1;
int Led3 = 2;
pinMode(Led1, OUTPUT);
pinMode(Led2, OUTPUT);
Also having problems with timers
void setup()
{
pinMode(PIN_D6, OUTPUT); // LED
pinMode(PIN_D7, INPUT_PULLUP); // Pushbutton
}
void loop()
{
if (digitalRead(PIN_D7)) {
// D7 pin is high due to pullup resistor
digitalWrite(PIN_D6, LOW); // LED on
delay(400); // Slow blink
digitalWrite(PIN_D6, HIGH); // LED off
delay(400);
} else {
// D7 pin is low due to pushbutton pressed
digitalWrite(PIN_D6, LOW); // LED on
delay(80); // Fast blink
digitalWrite(PIN_D6, HIGH); // LED off
delay(80);
}
}
In this example when changing the ports to match the ones on the teensy 3.2, pushbutton does not reduce the speed of the blinking light like it should.
Here is my code so it works and uploads to teensy 3.2 board
void setup(){
int Led1 = 0; // Port for led 1
int pushbutton1 = 14; // Port for push button on pin 14
pinMode(Led1, OUTPUT); // LED
pinMode(pushbutton1, INPUT_PULLUP); // Pushbutton
}
void loop()
{
int Led1 = 0; // Port for led 1
int pushbutton1 = 14; // Port for push button on pin 14
if (digitalRead(pushbutton1)) {
// pushbutton1 pin is high due to pullup resistor
digitalWrite(Led1, LOW); // LED on
delay(400); // Slow blink
digitalWrite(Led1, HIGH); // LED off
delay(400);
} else {
// pushbutton1 pin is low due to pushbutton pressed
digitalWrite(Led1, LOW); // LED on
delay(80); // Fast blink
digitalWrite(Led1, HIGH); // LED off
delay(80);
} }
So without pressing the pushbutton1 led blinks normally but does not blink more slow when pressed.
Im concerned im doing something wrong and would like to know before i keep on trying the tutorials and getting to the synthesis models.
Hope someone can point me out in the right direction.
Cheers
Thanks for an amazing hard / software.
Im currently using Arduino 1.8.5 and teensy 1.41 software.
I have started doing the tutorials on the web:
https://www.pjrc.com/teensy/td_digital.html
Many of the examples either dont compile properly, or when i try to upload to my board they dont work as expected.
Here is one from the tutorials:
void setup()
{
pinMode(PIN_D6, OUTPUT); // LED
pinMode(PIN_D7, INPUT_PULLUP); // Pushbutton
}
void loop()
{
if (digitalRead(PIN_D7)) {
// D7 pin is high due to pullup resistor
digitalWrite(PIN_D6, LOW); // LED on
delay(400); // Slow blink
digitalWrite(PIN_D6, HIGH); // LED off
delay(400);
} else {
// D7 pin is low due to pushbutton pressed
digitalWrite(PIN_D6, LOW); // LED on
delay(80); // Fast blink
digitalWrite(PIN_D6, HIGH); // LED off
delay(80);
}
}
If in Arduino i choose teensy 2.0 it debugs ok, but when uploading to teensy i tells me im choosing the wrong board:
here are the screenshots:


If i choose the right board (Teensy 3.2) and debug inside arduino i get all this error messages, but i can upload to my teensy board:


Specially im having trouble with having to define the outs of the boards like
int Led1 = 0;
int Led2 = 1;
int Led3 = 2;
pinMode(Led1, OUTPUT);
pinMode(Led2, OUTPUT);
Also having problems with timers
void setup()
{
pinMode(PIN_D6, OUTPUT); // LED
pinMode(PIN_D7, INPUT_PULLUP); // Pushbutton
}
void loop()
{
if (digitalRead(PIN_D7)) {
// D7 pin is high due to pullup resistor
digitalWrite(PIN_D6, LOW); // LED on
delay(400); // Slow blink
digitalWrite(PIN_D6, HIGH); // LED off
delay(400);
} else {
// D7 pin is low due to pushbutton pressed
digitalWrite(PIN_D6, LOW); // LED on
delay(80); // Fast blink
digitalWrite(PIN_D6, HIGH); // LED off
delay(80);
}
}
In this example when changing the ports to match the ones on the teensy 3.2, pushbutton does not reduce the speed of the blinking light like it should.
Here is my code so it works and uploads to teensy 3.2 board
void setup(){
int Led1 = 0; // Port for led 1
int pushbutton1 = 14; // Port for push button on pin 14
pinMode(Led1, OUTPUT); // LED
pinMode(pushbutton1, INPUT_PULLUP); // Pushbutton
}
void loop()
{
int Led1 = 0; // Port for led 1
int pushbutton1 = 14; // Port for push button on pin 14
if (digitalRead(pushbutton1)) {
// pushbutton1 pin is high due to pullup resistor
digitalWrite(Led1, LOW); // LED on
delay(400); // Slow blink
digitalWrite(Led1, HIGH); // LED off
delay(400);
} else {
// pushbutton1 pin is low due to pushbutton pressed
digitalWrite(Led1, LOW); // LED on
delay(80); // Fast blink
digitalWrite(Led1, HIGH); // LED off
delay(80);
} }
So without pressing the pushbutton1 led blinks normally but does not blink more slow when pressed.
Im concerned im doing something wrong and would like to know before i keep on trying the tutorials and getting to the synthesis models.
Hope someone can point me out in the right direction.
Cheers

