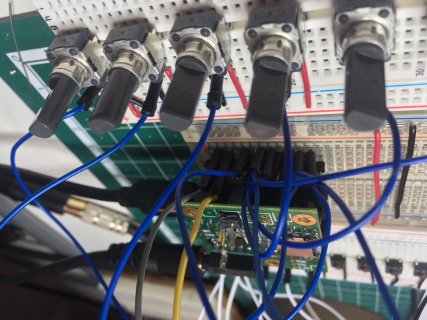
Cv voltage from modular to control teensy oscillator

Status
Not open for further replies.

djthopa

Member
Hi!

I been lurking around the forums and i cant find the right solution to my problem.

I just finished a three voice vco sint pitch, gain and waveforms to choose.

How could i control the pitch of this teensy oscillators from eurorack?

I been reading about dacs, conversions, midi to cv? But what i want is just to sequence the pitch of the teensy oscillators from my eurorack and im quite confused to be honest.

I have lowered the voltage not to hit further than + - 5v, and created variables inside the ide tobcontrol the pitch of the oscillators based on the potentiometers and the cv in but it not really working at all.

Could someone please point me out to where to investigate further?¥

Much appreciated.

Cheers
 
The Teensy‘s ADCs have an input range from 0 to 3.3V or from 0 to 1.2V, depending on the reference voltage which you select in your code. Thus you‘ll have to add some external circuitry around an op-amp to scale and shift your input voltage range accordingly.
To map a range from -5V to +5V into 0 to 3.3V, you‘d have to divide the incoming voltage by 3.0303 (use a 10 turn trimmer pot for precise adjusting) and to add an offset of 1.65V (use a stable voltage reference and another 10 turn trimmer pot for precise adjusting). The resolution of the ADC being 12bit, you might expect your 10 octaves or 120 half tones (I guess you are respecting the Moog standard of 1V/octave) resolved into 4096 steps, which corresponds to a resolution of roughly 34 steps per halftone which corresponds to around 3 musical cents or precisely 3.75 Midi cents.
 
Hi,

Thanks a lot for your time and feedback

.
I have been considering your workaround so i have ordered some 10 turn trimpots for fine adjustment of voltage.

When i read the voltage from one of the teensy´s input, and i want to scale that voltage to the frequency of lets say sine1, i create a variable that reads from the analog input.

I then do:

float knob2 = (float)analogRead(A1) / 1023.0;
waveform1.frequency(knob2 * 1500 + 50);


The problem is i dont know how to scale this analog readouts from the Eurorack to control the pitch of the sine1 oscillator.

I have found code like this but not working in my scenario:

int frequency = map(V_in, 0, 1023, 10, 1000); // Convert analog value to frequency.
half_period = (1000000/(2*frequency)); // Half time-period in microseconds.

Is there a formula to convert Voltage per octave to frequency of an oscillator inside teensy (also controlled by a potentiomenter knob2)

I have asked Olivier from mutable instruments and he has been kind to point me out to his grids eurorack module:

https://mutable-instruments.net/modules/grids/downloads/Grids-v01.pdf

He uses MPC6002 to scale down to 5v.

Also looking into the Arduinos map() function and trying different circuits to bring cv into arduino:

https://www.dorkbotpdx.org/blog/paul/control_voltage_cv_to_analog_input_pin

To end im also following this thread on muffwiggler too:

https://www.muffwiggler.com/forum/viewtopic.php?t=150614&start=

So many options!!! help!

Many thanks
 
The exp2f(x) or powf(2.0, x) function is probably the missing piece you're seeking

float nominal_frequency = 440.0;
float octaves = (float)analogRead(A1) / 10.23;
float frequency = nominal_frequency * exp2f(octaves);
if (frequency > 20000.0) frequency = 20000.0;
Serial.print("frequency = ");
Serial.println(frequency);
 
Last edited:
Man... I told you to read the analog pin with 12bit resolution, so that you get values not from 0 to 1023 but from 0 to 4095 in order to have almost continuous frequency control without noticeable steps. Remember, with the Teensy 3.x series, we are on a powerful ARM processor and not on an old and outdated AVR.

There are in fact different options and standards for the CV to frequency conversion. That‘s why I mentioned the widely used Moog Synthesizer standard of 1V per octave but you didn‘t write if you wanted to use it for your system or if you had chosen different specifications...

With the Moog standard, an Input voltage of 0V would correspond to C5, Midi note 60 or middle C. An input voltage of -5V would correspond to the note 5 octaves lower, C0, Midi note 0. And +5V would correspond to C10, Midi note 120.
Using the scaling and shifting which I suggested above, -5V would correspond to an ADC reading of 0, 0V to 2048, and 5V to 4095.

Using the infos above, we can in a first step scale the analogRead values by multiplying these by 0.0292969f to obtain a float value m between 0.0f and 120.0f which corresponds to to the Midi note number. Converting Midi note numbers to a frequency in a second step is relatively trivial: f = 440 * exp2f(m - 69). And there you are!

Edit: I took too much time to write, Paul‘s answer above which he wrote in the meantime is basically the same, he only did that based on the 10bit analog reading which is less precise and without shifting 0V for middle C. Why not use 12 bits if your processor allows it?
 
Hi, many thanks for your responses!

That looks like the formula i was looking for ;)

Im sorry if i was not clear about using the moog standard. This teesny synth will be triggered by my eurorack, so it does follow the 1V per octave. Apologies.

looking forward to getting out of work and to my workbench.

BTW this forum is great, much appreciated!
 
Hi,

I have been trying without success the following scenarios:

This was my original oscillator code, pitch controlled by a potentiometer knob2 (Analog pin A2), which works fine

float knob2 = (float)analogRead(A1) / 1023.0;
waveform1.frequency(knob2 * 1500 + 50);

But when i try:

float m = analogRead(A9) * 0.0292969f ; //this is the Volt per Octave Analog read pin A9 from the Eurorack
int f = 440 * exp2f(m - 69);
waveform1.frequency(f);

I dont get any results / or sound.

I have also tried this:

float nominal_frequency = 440.0;
float octaves = (float)analogRead(A9) / 10.23;
float frequencyosc = nominal_frequency * exp2f(octaves);
if (frequencyosc > 20000.0) frequencyosc = 20000.0;
waveform1.frequency(frequencyosc);
Serial.print("frequency = ");
Serial.println(frequencyosc);

I get a really high frequency pitch that does not correspond to the values of the sequencer im sending voltage per octave on my Eurorack. This sequencer is a Eloquencer and has tunes pitch readings...

Any ideas of what im doing wrong??

Many thanks
 
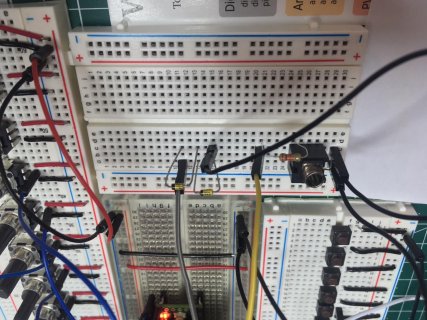
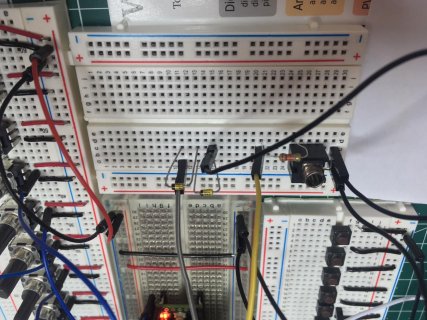
Just in case it helps, this is the wiring of the boards:

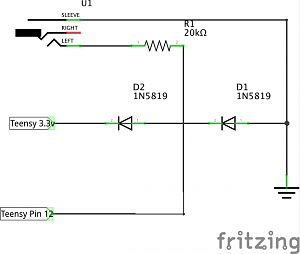
The First one receives the signal from the modular in this board, following this circuit which if found on this forum:

gateInput_schem.png

Board:

IMG_0301.jpg

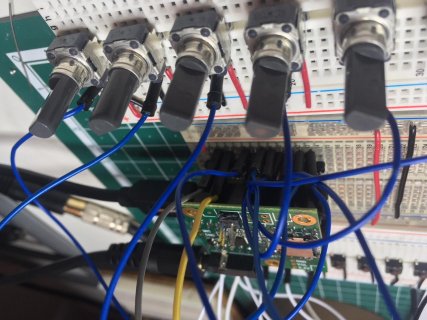
Yellow wire goes to A9 of teensy, and Grey wire goes to 3.3V on the teensy:

IMG_0302.jpg

Hope this helps
 

Attachments

  • IMG_0301.jpg
    IMG_0301.jpg
    173.5 KB · Views: 68
  • IMG_0302.jpg
    IMG_0302.jpg
    141.3 KB · Views: 102
You shouldn‘t try around wildly but proceed systematically, step by step. Don’t you learn that nowadays in your engineering schools and universities?
1. The Eurorack signal goes from -5 to 5V, right? So it has to scaled and shifted to match the input range of the ADC from 0V to 3.3V. Without connecting that external circuit to the Teensy yet, use 2 Voltmeters to check if that voltage conversion is done correctly as follows:
Eurorack => ADC
-5V => 0V
0V => 1.65V
+5V => 3.3V
2. Only if that works, connect that converted voltage to the Teensy, and make sure that for these 3 values above, you get readings of around 0, 2048, and 4095 from ADC to Serial Monitor (don’t forget to set the analog resolution to 12bit in your code.
3. Add the code to convert these readings into frequencies with the formula f = 440*exp2f((0.0292969*r - 69)/12) and print these also to the serial monitor. Paul’s has a bug, since it starts with 440Hz as lowest pitch and will run up to 10 octaves above which is AM radio... ADC read 0 (from -5V Eurorack) should give 8.176Hz, ADC read 2048 (from 0V Eurorack) should give 261.656Hz middle C, and ADC read 4095 (from +5V Eurorack) will give 8372.018Hz.
4. After you made sure that your CV to frequency conversion is 100% correct, you might finally apply the calculated frequency to your waveform object.

Don‘t go to the next step before you aren‘t 200% sure that the previous step works. There is no witchcraft, all that is pretty basic undergraduate stuff.
 
Hi!

Many thanks for your reply!

Im 41 years old, work 8 hours a day and have two kids. A year old girly and a 5 five year old boy.

Yes, back then i should have studied what i really wanted by life has its twists!

Anyway i did all your tests and comprobations and the results are what you told me they shoud be when feeding -5v, 0v, and 5v, c0, c5, and c10.

I did it with a breadboarded voltage divider.

I think im close but im stuck on implementing the result to the oscillator frequency:

int volts = analogRead(A8);
int f = 440*exp2f((0.0292969*volts - 69)/12);
waveform1.frequency(f);

Anything i should change in the formula???

Thanks a lot :)
 
You shouldn‘t try around wildly but proceed systematically, step by step. Don’t you learn that nowadays in your engineering schools and universities?
1. The Eurorack signal goes from -5 to 5V, right? So it has to scaled and shifted to match the input range of the ADC from 0V to 3.3V. Without connecting that external circuit to the Teensy yet, use 2 Voltmeters to check if that voltage conversion is done correctly as follows:
Eurorack => ADC
-5V => 0V
0V => 1.65V
+5V => 3.3V
2. Only if that works, connect that converted voltage to the Teensy, and make sure that for these 3 values above, you get readings of around 0, 2048, and 4095 from ADC to Serial Monitor (don’t forget to set the analog resolution to 12bit in your code.
3. Add the code to convert these readings into frequencies with the formula f = 440*exp2f((0.0292969*r - 69)/12) and print these also to the serial monitor. Paul’s has a bug, since it starts with 440Hz as lowest pitch and will run up to 10 octaves above which is AM radio... ADC read 0 (from -5V Eurorack) should give 8.176Hz, ADC read 2048 (from 0V Eurorack) should give 261.656Hz middle C, and ADC read 4095 (from +5V Eurorack) will give 8372.018Hz.
4. After you made sure that your CV to frequency conversion is 100% correct, you might finally apply the calculated frequency to your waveform object.

Don‘t go to the next step before you aren‘t 200% sure that the previous step works. There is no witchcraft, all that is pretty basic undergraduate stuff.

Hi, hope i did not put you off with my comment. Just trying to explain my noobness regarding this matters.

I have been checking the forum for answers regarding the frequency formula that i posted, but havent found much.

Its a pity because i was really looking forward to using ternsy to control my euro and my euro to control teensy.:confused:
 
I just feel that my approach is obviously not really helpful for you and I’m sorry for that. If the frequency is calculated correctly (as verified), but if the waveform object doesn’t take it, I’d dive into the audio library’s code and add some additional debug code lines to find out why.

Another thing is, it’s impossible to map a range from -5V to +5V linear correctly to 0 to 3.3V just with a simple breadboarded voltage divider. IMNSHFO, a voltage reference and an op amp is needed for that to get precise and reliable results.

Or, I would do another series of tests by putting everything aside for the moment create a new simple sketch and check first with an oscilloscope if the waveform object works well with a series hard coded fixed frequencies, i.e. 200Hz, 400Hz, 800Hz and so on.
 
Thanks a lot.
I think you are rightband im just going to start from scratch and build from there.
The readings im trying are inside a sketch with other oscillators and fm.
Maybe im inducting noise or sone interference from one of the pots or buttons also plugged to the teensy.
Ill get my oscilloscope and start crossing out possibilities/ bugs.
Many thanks will report back!
 
The path to success involves making small steps and checking the results as you go, usually by printing stuff to the Arduino Serial Monitor.

Getting a final formula that you can just copy & paste into Arduino have have work perfectly on the first try together with everything else you've done just isn't a realistic approach. I know that's tempting, but this message is meant to tell you in no uncertain terms that way just isn't realistic. You need to take small steps, check each one carefully, and slowly build on top of each small success. That is the way to make things work. Even after ~30 years of electronics & software experience, that's how I still do everything. You should too.

The very first step is to get your CV signal converted to either 0 to 3.3V, or 0 to 1.2V. Before you even mess with any code at all, you can do this work with resistors (and possibly opamps) and check it with a voltmeter.

Or you could use a pot as a stand-in for the actual CV, just for the sake of creating a voltage you can put on the analog pin and control by turning the knob. There too, you can use a voltmeter to verify the analog pin really has the correct voltage as you turn the knob.

Next is checking analogRead number. If you're using analogReadResolution(12), then the expect range of analogRead() results is 0 to 4095. Don't take this for granted. Actually print just the analogRead numbers. Don't start fiddling with the equation until you've checked that the numbers it gets as input are correct.

Likewise with the math, this isn't high school algebra class where you're supposed to minimize the equation. In msg #4 I tried to show this sort of gradual approach. Do this is small steps, and make sure you print the results and check them carefully before moving on to the next part. I highly recommend using an "octaves" variable, which is zero for some particular voltage input. Again, use your voltmeter and check against the numbers in the serial monitor. When you are at the voltage input meant to be +3 octaves, make sure you're actually printing a number that's 3.0 or very close.

Of course when you get the final frequency computed, then use it with the audio lib. Use the latest beta, since some bugs were fixed and improvements added to the waveform code recently. I have personally spent quite a lot of time recently (with these new beta versions) verifying the waveforms all work properly. But if you do find a problem, please report it (on the beta thread). Create a test program which just sets the waveform to the frequency (doesn't depend on a CV signal). If there is a problem in the audio lib, showing a program like that will lead to a fix. But I'm pretty sure you'll find the latest audio lib works great.

The key to successfully using it, or doing almost any microcontroller project, is making small steps and carefully checking & troubleshooting each one to slowly build upon each success. With an equation that's complicated, don't try to minimize it into 1 compact form. Actually print the intermediate steps and check them carefully. If you do that, you'll find the path to getting your project working!
 
Status
Not open for further replies.
Back
Top