Teensy 3.2 + PropShield + WS2811 LED Issue

Status
Not open for further replies.

teslageek18

New member
Hello all, I have connected WS2811 LED (60 pixels) to the teensy 3.2 board using level shifter 74AHTC125 and I can run the BasicTest available in OctoWS2811 library without any problems.

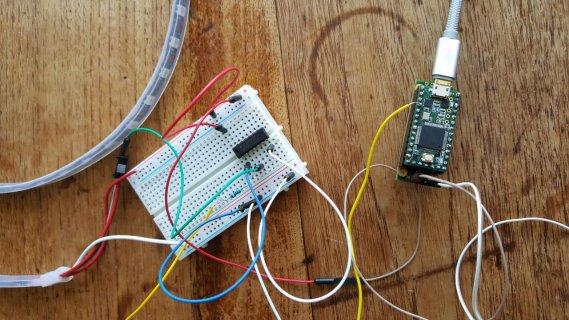
Now I want to make the LEDs interactive using the prop shield and seems I have run into an issue. I've mounted the teensy on the prop shield and used four pins on the prop shield to communicate with the LED: 5v, GND, CLK and Data. I ignored the clock pin (because WS2811 has no relevant pin) and connected the data pin to the level shifter (the same configuration as I used earlier to connect the teensy board to the LED). I wrote a basic code to couple the movement to the light. For unknown reasons the LED does not light up. I checked the data pin value on the prop shield and it produces zero.

By accident I touched the bottom right corner (in the set up you see in the photo attached) of the Teensy board and it lit up the LED with a random colour but no further interaction.

Any thoughts?


20180614_122050.jpg
 
When you are using the propshield to do level conversions, you need to set pin 9 high to enable the level converter, and set it low to disable the converter.

If you aren't using flash memory or any SPI device, you can set the pin high in the setup function:

Code:
const int PROP_SHIELD_LED_ENABLE = 9;

void setup ()
{
    // enable the prop shield level converter
    pinMode (PROP_SHIELD_LED_ENABLE, OUTPUT);
    digitalWrite (PROP_SHIELD_LED_ENABLE, HIGH);
    // ...
}

If you use other SPI devices, you would need to enable/disable the level converter when you do the leds. Note, the OctoWS2811 library is not really appropriate for using the prop shield as it uses different pins. You should use the Adafruit_Neopixel library for this.

Code:
const int PROP_SHIELD_LED_ENABLE = 9;

void setup ()
{
    // disable prop shield LED initially
    pinMode (PROP_SHIELD_LED_ENABLE, OUTPUT);
    digitalWrite (PROP_SHIELD_LED_ENABLE, LOW);
    // ...
}

void loop ()
{
    // ...
    // Enable prop shield level converter
    digitalWrite (PROP_SHIELD_LED_ENABLE, HIGH);

    // print it
    pixels.show ();

    // Disable prop shield level converter
    digitalWrite (PROP_SHIELD_LED_ENABLE, LOW);
}

If you use an advanced library like FastLed that does DMA, you may need to wait until the DMA is finished before turning off the voltage shifter. If you use any other SPI device, you may/may not need to use SPI transactions to signal that you are using the SPI bus for doing the LEDs.

If you are using WS2812Serial which does DMA, in addition to the DMA stuff, you would need to attach the serial output pin (typically 1, 8, or 10) to pin 11 to allow the use of the serial pin, but directing it to the prop shield.

<edit>
Here is some simple code that I wrote to play music from the flash memory on the prop shield and light up a 16 LED neopixel ring:

Code:
// Converted from the WavFilePlay from the Teensy release:
// hardware/teensy/avr/libraries/Audio/examples/WavFilePlayer/WavFilePlayer.ino
//
// Simple RAW file player example for the prop shield to use the Analog DAC
// and prop shield amplifier to play mono sounds.
//         http://www.pjrc.com/teensy/gui/?info=AudioOutputAnalog
//
// On the prop shield, pin 6 selects the serial flash memory controller,
// and pin 5 enables the amplifier.
//
// This example code is in the public domain.
// After the sound plays do a round of neopixels

#include <Audio.h>
#include <Wire.h>
#include <SPI.h>
#include <SD.h>
#include <SerialFlash.h>
#include <Adafruit_NeoPixel.h>

// GUItool: begin automatically generated code
AudioPlaySerialflashRaw  playFlashRaw1;  //xy=149,388
AudioMixer4              mixer1;         //xy=445,386
AudioOutputAnalog        dac1;           //xy=591,379
AudioConnection          patchCord1(playFlashRaw1, 0, mixer1, 0);
AudioConnection          patchCord2(mixer1, dac1);
// GUItool: end automatically generated code

#define PROP_AMP_ENABLE		 5
#define FLASH_CHIP_SELECT	 6
#define PIN_PROP_LED_ENABLE	 7			// Pin to enable 11/13 as outputs
#define PIN_PROP_LED_DATA	11			// Pin #1 for 5v LEDs (data for APA102/dotstar leds) 
#define PIN_PROP_LED_CLK	13			// Pin #2 for 5v LEDs (clock for APA102/dotstar leds) 

#define PIN_NEOPIXEL		PIN_PROP_LED_DATA	// PIN_PROP_LED_DATA to use prop shield level shifter

Adafruit_NeoPixel strip = Adafruit_NeoPixel(16, PIN_PROP_LED_DATA, NEO_GRB + NEO_KHZ800);
int cur_color;
SPISettings neopixel_spi (20000000, MSBFIRST, SPI_MODE0);

void do_ring ()
{
  int red, green, blue;

  red   = (cur_color & 0x4) ? 5 : 0;
  green = (cur_color & 0x2) ? 5 : 0;
  blue  = (cur_color & 0x1) ? 5 : 0;
  Serial.printf ("Neopixel, red = %d, green = %d, blue = %d\n", red, green, blue);

  // Enable LEDs and put the pin back into digital mode
  if (PIN_NEOPIXEL == PIN_PROP_LED_DATA || PIN_NEOPIXEL == PIN_PROP_LED_CLK)
    {
      SPI.beginTransaction (neopixel_spi);
      digitalWrite (PIN_PROP_LED_ENABLE, HIGH);
      pinMode (PIN_NEOPIXEL, OUTPUT);
    }

  // Set the ring to a given color
  for (int i = 0; i < 16; i++)
    strip.setPixelColor (i, red, green, blue);

  strip.show ();
  Serial.println ("Sleep 5 seconds");
  delay (5000);
  Serial.println ("Done sleep");

  cur_color = (cur_color == 0x4) ? 0x1 : cur_color<<1;

  // Return pins 11/13 to be in SPI mode and disable the LEDs
  if (PIN_NEOPIXEL == PIN_PROP_LED_DATA || PIN_NEOPIXEL == PIN_PROP_LED_CLK)
    {
      volatile uint32_t *reg;
      SPI.endTransaction ();
      digitalWrite (PIN_PROP_LED_ENABLE, LOW);

      reg = portConfigRegister (PIN_NEOPIXEL);
      *reg = PORT_PCR_MUX (2);
    }
}

void setup()
{
  Serial.begin (9600);

  // wait up to 3 seconds for the Serial device to become available
  long unsigned debug_start = millis ();
  while (!Serial && ((millis () - debug_start) <= 3000))
    ;

  Serial.println ("Start");

  // Enable the neopixels
  if (PIN_NEOPIXEL == PIN_PROP_LED_DATA || PIN_NEOPIXEL == PIN_PROP_LED_CLK)
    {
      SPI.begin ();
      pinMode (PIN_PROP_LED_ENABLE, OUTPUT);
      digitalWrite (PIN_PROP_LED_ENABLE, LOW);
    }

  strip.begin ();
  cur_color = 0x1;

      // Enable the amplifier on the prop shield
  pinMode (PROP_AMP_ENABLE, OUTPUT);
  digitalWrite (PROP_AMP_ENABLE, HIGH);

  // Do all color variations of the ring before enabling the sound
  for (int i = 0; i < 3; i++)
    do_ring ();

  // Audio connections require memory to work.  For more
  // detailed information, see the MemoryAndCpuUsage example
  AudioMemory (8);

  // Set initial volume
  mixer1.gain (0, 0.5f);

  // Start SerialFlash
  if (!SerialFlash.begin(FLASH_CHIP_SELECT)) {
    while (1)
      {
	Serial.println ("Cannot access SPI Flash chip");
	delay (1000);
      }
  }
}

void playFile(const char *filename)
{
  // Start playing the file.  This sketch continues to
  // run while the file plays.
  playFlashRaw1.play(filename);

  // A brief delay for the library read RAW info
  delay(5);

  // Simply wait for the file to finish playing.
  while (playFlashRaw1.isPlaying()) {
    ;
  }

  Serial.println ("Done playing");
}


void loop()
{
  char filename[12];
  uint32_t filesize;

  SerialFlash.opendir ();
  while (SerialFlash.readdir (filename, sizeof (filename), filesize))
    {
      const char *dot	= strchr (filename, '.');
      bool raw_p	= (dot && strcmp (dot, ".RAW") == 0);

      Serial.printf ("%s %-12s%7lu bytes\n",
		     (raw_p ? "Playing " : "Skipping"),
		     filename,
		     (unsigned long) filesize);

      if (raw_p)
	{
	  playFile (filename);
	  do_ring ();
	}
    }

  Serial.println ("Sleep for 30 seconds");
  delay (30000);
}
 
Thank you for the quick reply!

When you are using the propshield to do level conversions, you need to set pin 9 high to enable the level converter, and set it low to disable the converter.

I am using the 74AHTC125 to do the level conversion. Is this OK?

I am not using any flash memory or SPI devices either.


QUOTE=MichaelMeissner;181560] If you use other SPI devices, you would need to enable/disable the level converter when you do the leds. Note, the OctoWS2811 library is not really appropriate for using the prop shield as it uses different pins. You should use the Adafruit_Neopixel library for this. [/QUOTE]

Thank you for pointing this out. For some reasons Adafruit_Neopixel library does not work with the WS2811 LED. I have not found out where the problem is.

It is also a real pain to connect WS2811 LED strip to the teensy or the propshield. The propshield and teensy are connected to each other through male and female header connectors and this does cause problems for feeding the data connector to the teensy board.

Thank you so much for the code. If I can figure out how to use the Adafruit_Neopixel library, I can eventually use your code.
 
If you are using the 74AHTC125 to do the conversion, you don't need the prop shield. The prop shield just combines several parts into one simple shield (i.e. the prop shield has a mono amplifier, 2 voltage level converters, some flash memory, and the regular version has motion sensors). So like it name says, it is useful for things like making a light saber in a small compact package.

If you aren't using the prop shield to do the voltage level conversion, you don't need to worry about the SPI stuff. I have adapted code that writes two eyes to two separate 128x128 displays, and I added the neopixel/prop shield to the mix, and I had to dig down into the various SPI issues so that both displays and the neopixel could use pins 11 and 13.
 
If you aren't using the prop shield to do the voltage level conversion, you don't need to worry about the SPI stuff. I have adapted code that writes two eyes to two separate 128x128 displays, and I added the neopixel/prop shield to the mix, and I had to dig down into the various SPI issues so that both displays and the neopixel could use pins 11 and 13.


I like to use the prop shield to create interactive light i.e. change the brightness or move a series of lights from left to right and vice versa. I thought if I have 74AHTC125 at least I can do the level conversation separate from the prop shield and then use the motion sensors to control LEDs.
 
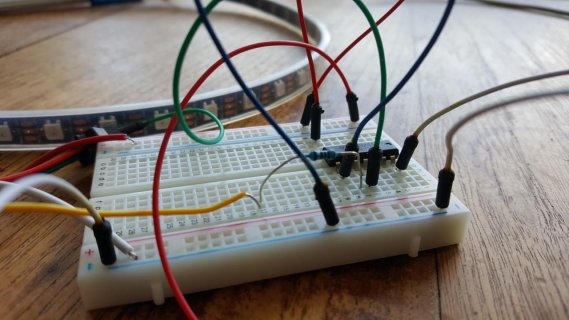
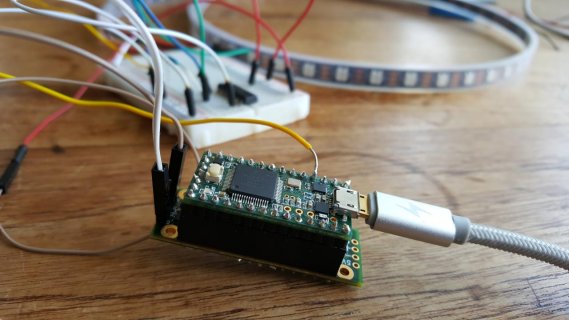
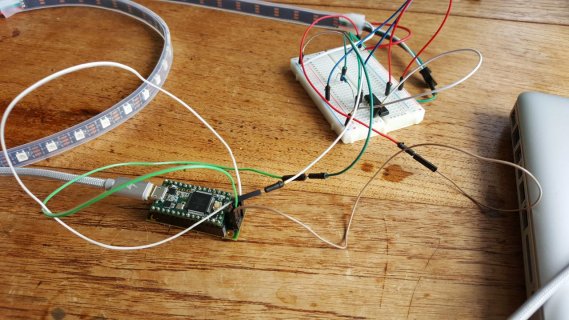
Connecting WS2811 LED strip to teensy + prop shield has been successful. I do not recommend this connection for multiple LED strips though. I de-soldered a wire to the data pin on Teensy 3.2 (picture attached) and fed it to 74AHTC125 to shift the voltage level to 5v which is enough for this LED strip. I placed teensy 3.2 on prop shield using male and female connectors. I used GND and +5V LED pins on the prop shield to connect to the LED strip.

20180616_153415.jpg20180616_153612.jpg20180616_153432_001.jpg

Code to do some interaction with the LED is :

Code:
#include <NXPMotionSense.h>
#include <Wire.h>
#include "FastLED.h"
FASTLED_USING_NAMESPACE

NXPMotionSense imu;
NXPSensorFusion filter;

#define DATA_PIN      2

#define LED_TYPE      WS2811
#define COLOR_ORDER   BGR
#define NUM_LEDS      60

CRGB leds[NUM_LEDS];
#define BRIGHTNESS    255
#define FRAMES_PER_SECOND  200
#define ARRAY_SIZE(A) (sizeof(A) / sizeof((A)[0]))
uint8_t gHue = 20; // rotating "base color" used by many of the patterns
uint8_t gSat = 255;
uint8_t pos = 72;

void setup() {
  imu.begin();
  filter.begin(100);

  FastLED.addLeds<WS2811, DATA_PIN, RGB>(leds, NUM_LEDS);

  // set master brightness control
  FastLED.setBrightness(BRIGHTNESS);
}

void loop() {
  float ax, ay, az;
  float gx, gy, gz;
  float mx, my, mz;
 
  if (imu.available()) {
    // Read the motion sensors
    imu.readMotionSensor(ax, ay, az, gx, gy, gz, mx, my, mz);

    // Update the SensorFusion filter
    filter.update(gx, gy, gz, ax, ay, az, mx, my, mz);

   gHue = abs(2*filter.getYaw()*255/360);
   gSat = 255-abs(filter.getRoll()*255/360);
   pos = abs((filter.getPitch() * NUM_LEDS / 180) - (NUM_LEDS/2)); 
   fadeToBlackBy( leds, NUM_LEDS, 8);
   leds[pos] += CHSV( gHue, gSat, 255);
   
   FastLED.show();
  }
}
 
Status
Not open for further replies.
Back
Top