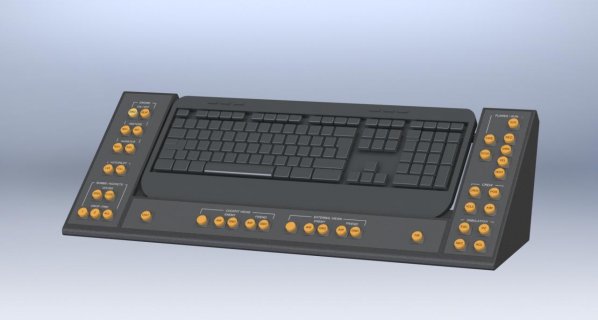
What's the absolutely easiest way to build a simple button box?

Status
Not open for further replies.

whitestar

Member
Hey folks. I'm a total newbie at Arduino, but have some experience in programming, such as VB and VBA.
Yesterday I played a little with my Arduino Uno and went through some simple examples. Not too difficult really.

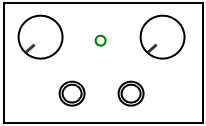
But what I really want is to build a simple button box, with two rotary encoders, two pushbuttons and a power LED. Such as this:

SHFGTGQ.png

The button box will be used in a racing game.

I'm not really sure what's involved and which components I should use. Should I use a Teensy board, Leo Bodnar joystick board, or just my Arduino Uno perhaps?

I have also no soldering skills, as in never done it before. Will there be lots of soldering involved?
 
Depends a bit on what you want those buttons to do - will they be key strokes, joystick inputs or something more complex? Your Uno is restricted to sending serial data so would require some sort of driver on the PC side to translate serial into something the game uses. A couple of games come with or have mods to do this but very uncommon.

If the buttons are being a USB thing then you probably want a USB capable micro controller, of which the Teensy family is one of several. If you are thinking about going down this path probably a place to start is either
https://www.pjrc.com/teensy/td_keyboard.html
or
https://www.pjrc.com/teensy/td_joystick.html
depending on what this box will pretend to be

Next step is probably adding teensyduino to your Arduino install and looking in file->examples->teensy->USB and see if you can poke a relevant example so that it looks like it might do what you want and compiles without error.

You may also need to look at https://www.pjrc.com/teensy/td_libs_Encoder.html - using encoders for a game will involve some custom code from you, since it is not something you will be able to find an out of the box example for.

You could build this with a breadboard and crimped wires, but if you are playing games the potential for a wire bumping loose is going to be pretty high so you are going to have to think about how much soldering you are prepared to do. None of the wiring would be particular complex but will be much more gamer proof with soldered wires.
Thanks for answering. :)
Yes, I pretty much wanted to just send keystrokes. I had a look at this: http://generichid.sourceforge.net/. Could that be useful?

The box will just be sitting there, so no worry about bumping loose anything. By crimped wires you mean those that came in the Arduino starter kit?
 
Should I use a Teensy board?

Yes, use Teensy. (this is a forum for Teensy...)

If you don't have the Teensyduino add-on installed on your copy of Arduino, run this installer.

https://www.pjrc.com/teensy/td_download.html

After installing, run Arduino again and select Teensy from the Tools > Boards menu. This is important, since the other menus auto-update depending on the selected board.

Then click File > Examples > Teensy > USB_Keyboard > Buttons to open the example code. You can run the installer and at least open this code, even if you don't actually have a Teensy board. Obviously to run it you'll need to get a real Teensy. Any model can work. Teensy LC is the least expensive and plenty to run this.

Hopefully the comments in the example make sense? This example does 10 buttons, but if you only need 1 or 2 it's simple enough to delete the stuff you didn't want.
 
I have also no soldering skills, as in never done it before. Will there be lots of soldering involved?

Get the Teensy with pins already soldered. Then you can plug it into a solderless breadboard and make all the connections by just plugging in wires.
 
@whitestar, the linked project is last touched 2013. Nothing is wrong with it but things have moved on and getting that USB stack working would involve lots of steps that you probably do not want to add to this project when in 2018 various Arduinos come out of the box with USB, including Teensy.

I'm of course biased but but I suspect you would have to hunt a quite a lot to get a better mix of price/support/just works than a Teensy LC for this. If you really want to simplfy things you could us https://makeymakey.com/ or descendants but they are fixed in how the input works, so you would not be able to connect encoders.

Re crimped wires yes that would be them. And suspect you will find that soldering is eventually needed but you can certainly build and test it using them.
 
Hey folks. I'm a total newbie at Arduino, but have some experience in programming, such as VB and VBA.
Yesterday I played a little with my Arduino Uno and went through some simple examples. Not too difficult really.

But what I really want is to build a simple button box, with two rotary encoders, two pushbuttons and a power LED. Such as this:

View attachment 14371

The button box will be used in a racing game.

I'm not really sure what's involved and which components I should use. Should I use a Teensy board, Leo Bodnar joystick board, or just my Arduino Uno perhaps?

I have also no soldering skills, as in never done it before. Will there be lots of soldering involved?

Just so happens I am working on a similar project, although a bit more ambitious. Mine is for a control console for the WWI flight simulator Rise of Flight. It has a whole bunch of complex keyboard commands that make it hard to input while trying to fly the danged plane. So I am building this console so that I just have to press the one button and it sends out the keyboard commands.

I am using the Teensy 3.5 because I have at least 40 buttons and also want to control the LED brightness in the buttons. Depending on the number of controls you want, a Teensy 3.1 should do the trick quite nicely.

You can't really use the Uno for this application. It doesn't have the right kind of USB interface. (It can be done but it is more of a hassle.) The Arduino Leonardo can be used but the Teensy is better in my opinion.

I don't know how you are going to get away with no soldering. You are going to have to connect from your controller to the buttons, switches, and knobs somehow.

I don't mind if we work together on this and I can help you. Just PM/email me and I see what I can do.
 

Attachments

  • 18-08-02_Flight Control01.jpg
    18-08-02_Flight Control01.jpg
    53.4 KB · Views: 322
Chevelle have you written a wiring diagram for your project? I am trying to understand how to wire and pinout a larger button array. Does the 3.5 have more pins and therefore allow more space? Please excuse my noob knowledge here.
 
Chevelle have you written a wiring diagram for your project? I am trying to understand how to wire and pinout a larger button array. Does the 3.5 have more pins and therefore allow more space? Please excuse my noob knowledge here.

No problem. We were all noobs once.

My project has 40 buttons and I may add a few more. That means I need a digital input for each button. Because I also want to control the brightness of the LEDs in the switches, I need one analog input to read the potentiometer value and a PWM digital output to control the brightness.

The Teensy 3.5 has up to 54 digital pins. Per the data sheets, the Teensy LC and 3.2 have 27 and 34 I/O pins respectively.

Wiring for switches is very easy. The Teensy (and Arduinos) can be set to have their input pins connected to an internal pull-up resistor. So for the wiring, you just need to connect one side of all the switches to ground and the other side of each switch to a separate input.

I have been fiddling with a protoboard version to be sure everything works. I am in the process of working up a schematic.
 
Ok I understand now so on the the digital pins you can only wire one button per pin instead of using an array setup like on the analog pins.

If I understand correctly I should be able to wire standard two pin momentary button using ground and a digital pin. Also, wire a three pin rotary encoder like this one (http://www.leobodnar.com/shop/index.php?main_page=product_info&cPath=98_75&products_id=191) using the ground on the middle pin and a separate digital pin to each side?

Also on the Teensy 3.5 I notice that a few of the pins are on the flat part of the back of the board, how do you attach? Just solder directly?

Again thanks for helping me understand this.


We are talking about completely different things. It all boils down to what you want to do. Me, I want to have a separate button for each function in the airplane. One button to open bomb bay doors, one to drop bombs, one to fire off a flare, one to richen the carburetor, one to lean it out, etc. That is the way the sim is designed. Each function has a separate key stroke.

You may (probably do) have different requirements. I don't know what your application is but the switch you listed may make better sense for what you are trying to do. As for the pads on the underside of the 3.5/6, you connect to them with either pogo pins or solder to them. I chose to buy an additional board kit. Surface mount header pins are mounted to those pads. The 3.5/6 is then mounted into socket headers on the interface board. Now the 3.5/6 can be removed if needed.

Give me more information on what you are trying to do and I'll be better able to point you in the right direction.
 
I started a post but wasn't getting any response. This is my project post. https://forum.pjrc.com/threads/53376-Replica-of-the-Porsche-919-rim I read this post and figured it was close to what I am trying to build so I joined in.

I am building a SimRacing rim. Which from the electronics side is just a button box, so I figured your example is a great place to get me going. The only reason for using the rotary encoders is to get two buttons for the real estate of one. These encoder function as one button click when turned left and another button when turned right. Which work great in sim racing for adjusting things like brake bias, battery deployment, and similar to your flight sim use fuel mix.

My build is a mix of 17 standard momentary buttons, 9 rotary encoders(equal to 18 buttons with my understanding), and if possible 2 potentiometers. The problem I ran into was that the general joystick example for teensy only allows 32 buttons leaving me short 3. But, if I understand what you have told me there is enough head room on the Teensy 3.5 for what I need. Now I just need to work out wiring the 2 Potentiometers.
 
Yep. Sounds like the 3.5 will do the trick and you won't need the I/O on the underside. The first 40 I/O pins are accessible through the headers on the outer edge. The pots are easy. Doesn't matter much what the value is. 10k-100k will work fine. Connect one end to ground, the other end to 3.3V, and the wiper to the analog I/O pin of your choice.

Good luck.
 
OK thanks man. I really appreciate the help. Is there a generic script I should start with? Or do i need to write something completely custom?
 
Given your application, I would think that you really have to write it from scratch. You aren't doing anything too difficult but you have a lot of stuff that has to be mapped into the 3.5 and only you know what will go to what pin. Then there is the part of the code that does something when a button is pressed or a knob turned.

I suggest that if you already have an Arduino, play with that for a while. Work with one or two switches, that rotary encoder, and anything else that your project needs. Start small with a few features as you need for testing and learning. Expand as you get more familiar with what you need to do.
 
A comment for big controller builds is to work in steps and if possible buy enough hardware to have a spare everything including the microcontroler.

Idea is you build up a prototype unit that is purely function and get your code and wiring right - it probably will not have all the inputs connected at once but let you work with say one put you move from pin to pin as you sort the code out. Then once you have all the quirks sorted out you start on the physical part of the build with a really good idea how much internal space you need, how long the wires are etc. And you leave the prototype alone, since you brought enough parts to do so.

If you start with the physical part of the build and then hack the code to fit very easy to end up damaging things trying to sort things out, and if things stop working you have no idea what is actually busted. If you have final+prototype you have something to compare with, and a test bench for ideas that does not involve pulling apart the thing you are hopefully gaming on.

Also if using lots of buttons think about
https://www.pjrc.com/teensy/td_libs_Keypad.html
and things like https://www.adafruit.com/product/732

If your pin numbers support it I'm also a really big fan of putting a cheap LCD display on things like this to make debugging easier, showing which buttons are pressed and what state things are in makes chasing wiring faults and such a lot easier.
 
Thank you for the advice. My current idea is I am treating it as two separate builds. One build is the electronics and the second is the physical steering wheel. The electronics part I plan on building a prototype board with all of the buttons laid out on a project board in a similar fashion to the final design of the steering wheel so I can work on wiring scheme and make sure everything works before I put it in the final project.

The second part has its own challenges, building paddle shifter housing and mechanics, getting the grips shaped, allowing shape and space for buttons, board, and wiring. Also I have to maintain the structural strength to withstand long races on my direct drive servo. So it only makes sense to build this project in two separate stages and bring them together in the end.

So starting by buying the electronic components and building a test bed is the first step. Can you guys recommend where I can start to learn how and what I will need to write the teensy sketch. Like as far as how to program each component separately before i bring them together. Is there someone on youtube or a write up somewhere that does a good job of breaking this down that I can dive into to get started?
 
There are several ways to got to grips with Arduino depending on how your brain works. I personally loath videos as a learning tool so am not aware of any good ones. Other routes include:
https://learn.adafruit.com/
https://learn.sparkfun.com/tutorials
https://www.arduino.cc/en/Main/Tutorials
And simply following the instructions at
https://www.pjrc.com/teensy/td_download.html and https://www.pjrc.com/teensy/td_joystick.html and hacking away at the examples until it does what you want - suggest trying this before you spend money on a micro controller.

The code for this is not complex but will be quite long since every thing you interact with will have a couple of lines of code to make something happen on the joystick (you can get clever with loops and macros but you probably want long but simple code). these lines will be almost all the same, reading a digital or analog input doing something the the joystick output. If you are running out of joystick buttons remember a Teensy can be a mouse, a joystick and a keyboard at the same time so some functions can map to keys or mouse actions.

Another option is to just buy a cheap gamepad or joystick and re-wire the buttons and parts. This avoids programing but will be more complex to sort out wiring and will not have neat rows of solder pads.
 
If you buy a Teensy it will work and be more capable with less trouble with encoders and usb. If you can handle basic then c as used in Arduino isn't too hard - I started in BASIC as well and taught myself c as my core BSCS classes all used other languages of the day. With all the web tutorial sites to answer c coding issues, this forum and Arduino specific tutorials the code shouldn't be difficult to follow and adapt.

For that Teensy 3.2 has the pins and software for rotary encoders. To minimize soldering risk - perhaps buy the $23 one with the pins pre-installed and a long breadboard like the one PJRC sells.

If you picked up this parts kit with the Teensy for $6. it will give a couple pushbuttons for the breadboard and a couple analog pots that require minimal large pin soldering on not so sensitive parts. Those will plug in to the breadboard as well. With those buttons and pots you can simulate two knobs ( encoder not like the analog pots for reading - but similar enough to learn coding with them perhaps )

If you got something like this $5 tutorial kit it would have LED's and resistors. That set of parts would work for the PJRC tutorial. with the T_3.2 and breadboard without soldering anything else. With the above $6 parts kit one or two of these $1 RGB LEDS would also work for the tutorial it seems.

That would replace the Uno - and the add on parts you may have or could get as a kit elsewhere should make for an easy and productive start to work through some tutorials - and would likely work as well with the Uno with it's sockets not being as stable a base to build on as the breadboard.


If you had those parts and worked though the coding should come along as you see working examples and learn to play with them. All will be invaluable when trying to make the button box work. With the Teensy and pjrc parts above you could mock up the button box and work out the USB interface without much trouble and then find recommended/working encoders and swap them in for the analog pots.
 
Alright so I have been doing some playing around to familiarize myself with how things work. I got a Teensy 3.5 as my board of choice and I also got the $6 parts kit for the same reasons as you pointed out it gave me basic parts to learn with. I also went ahead and bought the encoders I intend on using for my project seeing as they would need to be bought at some point anyways. This allowed me to have all of the components for testing my project and progress with my sketch and wire diagram. I have figured out how to program and wire all of the components separately and have started write the final sketch.

My only issue I see currently is how do you get the usb joystick in Windows to see more than 32 buttons. This is my only hold up currently.
 
This is my Code. I got it all working to the best of my knowledge. I tested it with the limited hardware(5 encoders, 3 buttons, 2 potentiometers) I have on hand by testing the controls in batches. I have set all the final pin assignments and control layout. I plan on ordering the rest of my controls and building a full size test board as soon as I can get all the components.


I still don't know how to make the usb joystick go above 32 buttons. I wrote the Sketch as if it can but I don't how to make the last three buttons actually work. Any help in this would be greatly appreciated.

Code:
#include <Encoder.h>

long oldPosition1  = -999;
long oldPosition2  = -999;
long oldPosition3  = -999;
long oldPosition4  = -999;
long oldPosition5  = -999;
long oldPosition6  = -999;
long oldPosition7  = -999;
long oldPosition8  = -999;
long oldPosition9  = -999;

//Encoder pin A and B Callouts
Encoder myEnc1(22, 23);
Encoder myEnc2(24, 25);
Encoder myEnc3(26, 27);
Encoder myEnc4(28, 29);
Encoder myEnc5(30, 31);
Encoder myEnc6(32, 33);
Encoder myEnc7(34, 35);
Encoder myEnc8(36, 37);
Encoder myEnc9(38, 39);


//   avoid using pins with LEDs attached

void setup() {
  Serial.begin(9600);
  Serial.println("Basic Encoder Test:");

  // Initialize Joystick Library
  Joystick.begin();
  
//Button Pin Callouts
  pinMode(0, INPUT_PULLUP);
  pinMode(1, INPUT_PULLUP);
  pinMode(2, INPUT_PULLUP);
  pinMode(3, INPUT_PULLUP);
  pinMode(4, INPUT_PULLUP);
  pinMode(5, INPUT_PULLUP);
  pinMode(6, INPUT_PULLUP);
  pinMode(7, INPUT_PULLUP);
  pinMode(8, INPUT_PULLUP);
  pinMode(9, INPUT_PULLUP);
  pinMode(10, INPUT_PULLUP);
  pinMode(11, INPUT_PULLUP);
  pinMode(12, INPUT_PULLUP);
  pinMode(13, INPUT_PULLUP);
  pinMode(14, INPUT_PULLUP);
  pinMode(15, INPUT_PULLUP);
  pinMode(16, INPUT_PULLUP);
}

void loop() {
  
  //Joystick Analog Pin Callout for Clutch Paddles
  Joystick.sliderRight(analogRead(A22));
  Joystick.sliderLeft(analogRead(A21));

//Digital Inputs to Button setup

  //Button 1
   if(digitalRead(0) == LOW)
{ 
 Joystick.button(1,1);
}
  else
  {
    Joystick.button(1,0);
  }
    //Button 2
   if(digitalRead(1) == LOW)
{ 
 Joystick.button(2,1);
}
  else
  {
    Joystick.button(2,0);
  }
    //Button 3
   if(digitalRead(2) == LOW)
{ 
 Joystick.button(3,1);
}
  else
  {
    Joystick.button(3,0);
  }
    //Button 4
   if(digitalRead(3) == LOW)
{ 
 Joystick.button(4,1);
}
  else
  {
    Joystick.button(4,0);
  }
    //Button 5
   if(digitalRead(4) == LOW)
{ 
 Joystick.button(5,1);
}
  else
  {
    Joystick.button(5,0);
  }
    //Button 6
   if(digitalRead(5) == LOW)
{ 
 Joystick.button(6,1);
}
  else
  {
    Joystick.button(6,0);
  }
    //Button 7
   if(digitalRead(6) == LOW)
{ 
 Joystick.button(7,1);
}
  else
  {
    Joystick.button(7,0);
  }
    //Button 8
   if(digitalRead(7) == LOW)
{ 
 Joystick.button(8,1);
}
  else
  {
    Joystick.button(8,0);
  }
    //Button 9
   if(digitalRead(8) == LOW)
{ 
 Joystick.button(9,1);
}
  else
  {
    Joystick.button(9,0);
  }
    //Button 10
   if(digitalRead(9) == LOW)
{ 
 Joystick.button(10,1);
}
  else
  {
    Joystick.button(10,0);
  }
    //Button 11
   if(digitalRead(10) == LOW)
{ 
 Joystick.button(11,1);
}
  else
  {
    Joystick.button(11,0);
  }
    //Button 12
   if(digitalRead(11) == LOW)
{ 
 Joystick.button(12,1);
}
  else
  {
    Joystick.button(12,0);
  }
    //Button 13
   if(digitalRead(12) == LOW)
{ 
 Joystick.button(13,1);
}
  else
  {
    Joystick.button(13,0);
  }
    //Button 14
   if(digitalRead(13) == LOW)
{ 
 Joystick.button(14,1);
}
  else
  {
    Joystick.button(14,0);
  }
    //Button ? 15/33
   if(digitalRead(14) == LOW)
{ 
 Joystick.button(33,1);
}
  else
  {
    Joystick.button(33,0);
  }
   //Button ? 16/34
   if(digitalRead(15) == LOW)
{ 
 Joystick.button(34,1);
}
  else
  {
    Joystick.button(34,0);
  }
   //Button ? 17/35
   if(digitalRead(16) == LOW)
{ 
 Joystick.button(35,1);
}
  else
  {
    Joystick.button(35,0);
  }
   
  /////////////////////////////////////

//Encoder 1  
long newPosition1 = myEnc1.read();
  if (newPosition1 > oldPosition1) {
    oldPosition1 = newPosition1;
    Serial.println(newPosition1);
    Joystick.button(15,1);
    Joystick.button(16,0);
  }
   if (newPosition1 < oldPosition1) {
    oldPosition1 = newPosition1;
    Serial.println(newPosition1);
    Joystick.button(15,0);
    Joystick.button(16,1);
  }
else
    Joystick.button(15,0);
    Joystick.button(16,0);
 
  delay(5);

//Encoder 2
  long newPosition2 = myEnc2.read();
  if (newPosition2 > oldPosition2) {
    oldPosition2 = newPosition2;
    Serial.println(newPosition2);
    Joystick.button(17,1);
    Joystick.button(18,0);
  }
   if (newPosition2 < oldPosition2) {
    oldPosition2 = newPosition2;
    Serial.println(newPosition2);
    Joystick.button(17,0);
    Joystick.button(18,1);
  }
else
    Joystick.button(17,0);
    Joystick.button(18,0);
 
  delay(5);

 //Encoder 3
  long newPosition3 = myEnc3.read();
  if (newPosition3 > oldPosition3) {
    oldPosition3 = newPosition3;
    Serial.println(newPosition3);
    Joystick.button(17,1);
    Joystick.button(18,0);
  }
   if (newPosition3 < oldPosition3) {
    oldPosition3 = newPosition3;
    Serial.println(newPosition3);
    Joystick.button(17,0);
    Joystick.button(18,1);
  }
else
    Joystick.button(17,0);
    Joystick.button(18,0);
 
  delay(5);
  
  //Encoder 4
  long newPosition4 = myEnc4.read();
  if (newPosition4 > oldPosition4) {
    oldPosition4 = newPosition4;
    Serial.println(newPosition4);
    Joystick.button(17,1);
    Joystick.button(18,0);
  }
   if (newPosition4 < oldPosition4) {
    oldPosition4 = newPosition4;
    Serial.println(newPosition4);
    Joystick.button(17,0);
    Joystick.button(18,1);
  }
else
    Joystick.button(17,0);
    Joystick.button(18,0);
 
  delay(5);
  
  //Encoder 5
  long newPosition5 = myEnc5.read();
  if (newPosition5 > oldPosition5) {
    oldPosition5 = newPosition5;
    Serial.println(newPosition5);
    Joystick.button(17,1);
    Joystick.button(18,0);
  }
   if (newPosition5 < oldPosition5) {
    oldPosition5 = newPosition5;
    Serial.println(newPosition5);
    Joystick.button(17,0);
    Joystick.button(18,1);
  }
else
    Joystick.button(17,0);
    Joystick.button(18,0);
 
  delay(5);
  
  //Encoder 6
  long newPosition6 = myEnc6.read();
  if (newPosition6 > oldPosition6) {
    oldPosition6 = newPosition6;
    Serial.println(newPosition6);
    Joystick.button(17,1);
    Joystick.button(18,0);
  }
   if (newPosition6 < oldPosition6) {
    oldPosition6 = newPosition6;
    Serial.println(newPosition6);
    Joystick.button(17,0);
    Joystick.button(18,1);
  }
else
    Joystick.button(17,0);
    Joystick.button(18,0);
 
  delay(5);
  
  //Encoder 7
  long newPosition7 = myEnc7.read();
  if (newPosition7 > oldPosition7) {
    oldPosition7 = newPosition7;
    Serial.println(newPosition7);
    Joystick.button(17,1);
    Joystick.button(18,0);
  }
   if (newPosition7 < oldPosition7) {
    oldPosition7 = newPosition7;
    Serial.println(newPosition7);
    Joystick.button(17,0);
    Joystick.button(18,1);
  }
else
    Joystick.button(17,0);
    Joystick.button(18,0);
 
  delay(5);
  
  //Encoder 8
  long newPosition8 = myEnc8.read();
  if (newPosition8 > oldPosition8) {
    oldPosition8 = newPosition8;
    Serial.println(newPosition8);
    Joystick.button(17,1);
    Joystick.button(18,0);
  }
   if (newPosition8 < oldPosition8) {
    oldPosition8 = newPosition8;
    Serial.println(newPosition8);
    Joystick.button(17,0);
    Joystick.button(18,1);
  }
else
    Joystick.button(17,0);
    Joystick.button(18,0);
 
  delay(5);
  
  //Encoder 9
  long newPosition9 = myEnc9.read();
  if (newPosition9 > oldPosition9) {
    oldPosition9 = newPosition9;
    Serial.println(newPosition9);
    Joystick.button(17,1);
    Joystick.button(18,0);
  }
   if (newPosition9 < oldPosition9) {
    oldPosition9 = newPosition9;
    Serial.println(newPosition9);
    Joystick.button(17,0);
    Joystick.button(18,1);
  }
else
    Joystick.button(17,0);
    Joystick.button(18,0);
 
  delay(5); 
}
 
A member Chevelle gave me a solution that I think for my use will work just fine. He suggested that I use keyboard buttons to cover the extra buttons I need. Since I am making this for gaming use it should work just fine seeing as keyboard buttons map just as well in game. So, my last 3 buttons that I need to code I will do so just using keyboard buttons.

I will share the updated sketch when I have the changes made.

Again Thank you Chevelle for your help. I was definitely making my project harder than it needed to be.

Also thank you Defragster and GremlinWrangler for your assistance.


Sorry WhiteStar for highjacking your thread. I hope the conversation of my stuff has helped you work on yours. However, my sketch would work perfectly for your project. All you would need to do is delete out what your not using. I can help if you need. We are both using the same controls and basically trying to create the same end product just on different size scales.
 
Status
Not open for further replies.
Back
Top