Error while setting serial port parameters: 115,200 N 8 1

Status
Not open for further replies.

Astronautical97

New member
Hello everyone. Firstly, I'm sorry that I cannot share my code with you because the code is prepared for a competition.

Firstly, I was working with my teensy 3.5 for hours, but I did not take any error. Then, I supplied a proximity sensor connected to Teensy by an external 9V battery for working better and plug the ground of battery to Teensy's ground. After that, proximity sensor did not worked with this connections, and I removed 9V battery in a short interval. Subsequently, I upload my code again to Teensy and I took this error.


Code:
Teensy did not respond to a USB-based request to enter program mode. 
Please press the PROGRAM MODE BUTTON on your Teensy to upload your sketch.

Then, I pressed the program button and program is uploaded. Afterwards, I tried to open the serial port, it did not open and the screen was frozen. Finally, I took this error.


Code:
Error while setting serial port parameters: 115,200 N 8 1


Afterwards, I tried blinks code in the basics folder for Teensy and it worked , but any other code is not uploaded automatically and serial port does not open.

Lastly, I have another Teensy 3.5 ,which is soldered a circuit that's why I cannot use it, and it works very well with this code.

I'm waiting for your help and I'm sorry for limited code information.
 
Please provide a sample showing the steps and code in a program that will paste to the IDE and run.

What "Serial" port is failing with the .begin?
 
Can you write a small example that reproduces the error and post that? There isn't really any information here to go on.
 
Is this problem happening on Mac, Linux or Windows? Which version? And which version of Arduino & Teensyduino are in use? (to check, click Help > About, or if using Mac, Arduino > About) And what's selected in the Tools menu? A screenshot of the menu is the easiest way to show us. Especially the Tools > USB Type setting matters.

Also important is whether you selected something in the "Teensy" part of the Ports menu, or the "Serial ports" part. (versions before 1.42 have only the "Serial ports" part in Ports - definitely upgrade if you have such an old version.) When using the "Teensy" specific ports, Arduino doesn't run its serial stuff at all, so try selecting Teensy from that part of the menu.

Maybe also try one of the non-serial options, like MIDI or RawHID. In those modes, serial isn't used at all. It's emulated with HID, so you can still open the serial monitor and have Serial.print() work.

If none of this helps, try telling us more info about your system and show as a screenshot with the Tools menu so we can see what you're really doing. From what you've told us so far, we can't even know if you have Macintosh, Linux, Windows 10 (where USB works well) or an older version of Windows (where USB support is not nearly as good as Mac, Linux and Win 10 - but still usually works).
 
Please provide a sample showing the steps and code in a program that will paste to the IDE and run.

What "Serial" port is failing with the .begin?


Can you write a small example that reproduces the error and post that? There isn't really any information here to go on.


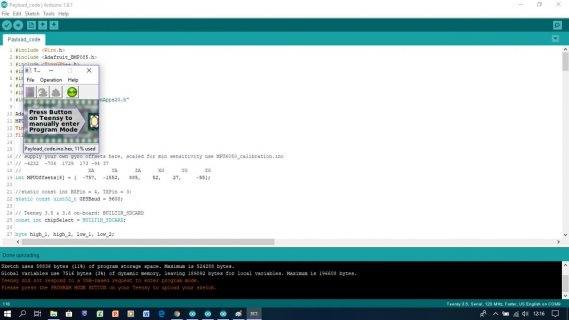
Firstly, I upload the code to Teensy 3.5


1.jpg


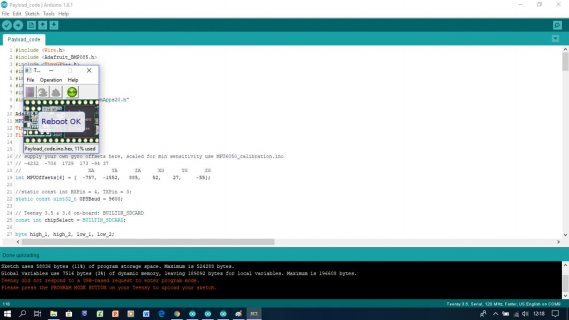
I took this reaction.


2.jpg


Then, I press the program mode button and code is uploaded.


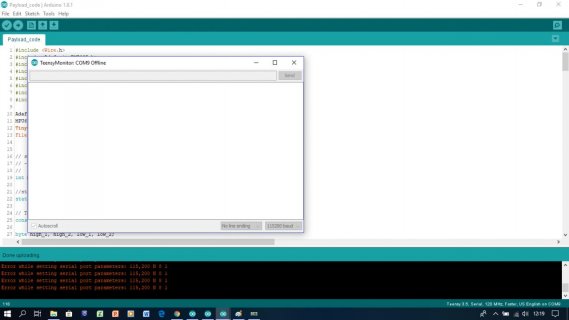
3.jpg


Finally, I took this error and Serial monitor cannot open.


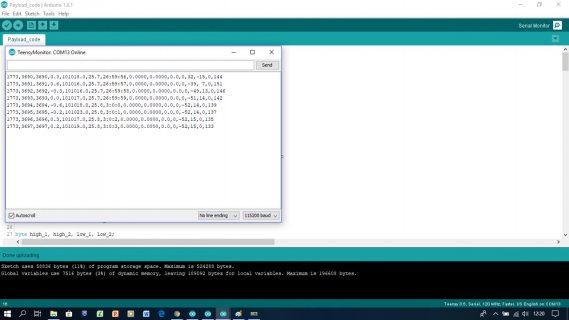
4.jpg


This is my other Teensy 3.5 soldered a circuit, and the code is directly uploaded and telemetry data is shown on the monitor smoothly.


5.jpg


Besides, I realised now, Teensy giving error work normally with separate code parts forming my competition code. For example;

GPS Code for Adafruit Ultimate GPS:

Code:
#include <TinyGPS++.h>
//#include <SoftwareSerial.h>
/*
   This sample code demonstrates just about every built-in operation of TinyGPS++ (TinyGPSPlus).
   It requires the use of SoftwareSerial, and assumes that you have a
   4800-baud serial GPS device hooked up on pins 4(rx) and 3(tx).
*/
//static const int RXPin = 4, TXPin = 3;
static const uint32_t GPSBaud = 9600;
//unsigned long gps_time;
float gps_lat, gps_lng, gps_alt; 
int gps_sats, gps_hour, gps_min, gps_sec;

// The TinyGPS++ object
TinyGPSPlus gps;
String gps_telemetry;
unsigned long new_second, old_second = 0;
// The serial connection to the GPS device
//SoftwareSerial ss(RXPin, TXPin);

// For stats that happen every 5 seconds
//unsigned long last = 0UL;

void setup()
{
  Serial.begin(115200);
  Serial1.begin(GPSBaud);
}

void loop()
{
  // Dispatch incoming characters
  new_second = millis();

     while (Serial1.available() > 0) {
    gps.encode(Serial1.read());
    gps_hour = gps.time.hour(); 
    gps_min = gps.time.minute();
    gps_sec = gps.time.second();
    gps_lat = gps.location.lat();
    gps_lng = gps.location.lng();
    gps_alt = gps.altitude.meters();
    gps_sats = gps.satellites.value();
    
   
  }


  if (new_second - old_second > 1000) {
  old_second = new_second;

gps_telemetry = String(gps_hour) + ':' + String(gps_min) + ':' + String(gps_sec) + ',' + String(gps_lat,4) + ',' + String(gps_lng,4) + ',' + gps_alt + ',' + gps_sats;
   Serial.println(gps_telemetry);
  }

}


MPU6050 sensor for gyroscope data:

Code:
#include <Wire.h>
#include "I2Cdev.h"
#include "MPU6050_6Axis_MotionApps20.h"

MPU6050 mpu;


// supply your own gyro offsets here, scaled for min sensitivity use MPU6050_calibration.ino
// -4232  -706  1729  173 -94 37
//                       XA      YA      ZA      XG      YG      ZG
int MPUOffsets[6] = {  1800,  -537,   723,    92,    0,     -18};


unsigned long new_second, old_second = 0;
float pitch, roll, yaw;
String telemetry;


// ================================================================
// ===                      i2c SETUP Items                     ===
// ================================================================
void i2cSetup() {
  // join I2C bus (I2Cdev library doesn't do this automatically)
#if I2CDEV_IMPLEMENTATION == I2CDEV_ARDUINO_WIRE
  Wire.begin();
  //TWBR = 24; // 400kHz I2C clock (200kHz if CPU is 8MHz)
#elif I2CDEV_IMPLEMENTATION == I2CDEV_BUILTIN_FASTWIRE
  Fastwire::setup(400, true);
#endif
}


// ================================================================
// ===               INTERRUPT DETECTION ROUTINE                ===
// ================================================================
volatile bool mpuInterrupt = false;     // indicates whether MPU interrupt pin has gone high
void dmpDataReady() {
  mpuInterrupt = true;
}


// ================================================================
// ===                      MPU DMP SETUP                       ===
// ================================================================
int FifoAlive = 0; // tests if the interrupt is triggering
int IsAlive = -20;     // counts interrupt start at -20 to get 20+ good values before assuming connected
// MPU control/status vars
uint8_t mpuIntStatus;   // holds actual interrupt status byte from MPU
uint8_t devStatus;      // return status after each device operation (0 = success, !0 = error)
uint16_t packetSize;    // expected DMP packet size (default is 42 bytes)
uint16_t fifoCount;     // count of all bytes currently in FIFO
uint8_t fifoBuffer[64]; // FIFO storage buffer

// orientation/motion vars
Quaternion q;           // [w, x, y, z]         quaternion container
VectorFloat gravity;    // [x, y, z]            gravity vector
float ypr[3];           // [yaw, pitch, roll]   yaw/pitch/roll container and gravity vector
byte StartUP = 100; // lets get 100 readings from the MPU before we start trusting them (Bot is not trying to balance at this point it is just starting up.)


void MPU6050Connect() {
  static int MPUInitCntr = 0;
  // initialize device
  mpu.initialize(); // same
  // load and configure the DMP
  devStatus = mpu.dmpInitialize();// same
  mpu.setXAccelOffset(MPUOffsets[0]);
  mpu.setYAccelOffset(MPUOffsets[1]);
  mpu.setZAccelOffset(MPUOffsets[2]);
  mpu.setXGyroOffset(MPUOffsets[3]);
  mpu.setYGyroOffset(MPUOffsets[4]);
  mpu.setZGyroOffset(MPUOffsets[5]);
  
  mpu.setDMPEnabled(true);
  // enable Arduino interrupt detection
  attachInterrupt(0, dmpDataReady, RISING); //pin 2 on the Uno
  mpuIntStatus = mpu.getIntStatus(); // Same
  // get expected DMP packet size for later comparison
  packetSize = mpu.dmpGetFIFOPacketSize();
  //delay(1000); // Let it Stabalize
  mpu.resetFIFO(); // Clear fifo buffer
  mpu.getIntStatus();
  mpuInterrupt = false; // wait for next interrupt
}


// ================================================================
// ===                    MPU DMP Get Data                      ===
// ================================================================
void GetDMP() { // Best version I have made so far
  mpuInterrupt = false;
  FifoAlive = 1;
  fifoCount = mpu.getFIFOCount();
  if ((!fifoCount) || (fifoCount % packetSize)) { // we have failed Reset and wait till next time!
    mpu.resetFIFO();// clear the buffer and start over
  } else {
    while (fifoCount  >= packetSize) { // Get the packets until we have the latest!
      mpu.getFIFOBytes(fifoBuffer, packetSize); // lets do the magic and get the data
      fifoCount -= packetSize;
    }
    MPUMath();
  }
}


// ================================================================
// ===                        MPU Math                          ===
// ================================================================
void MPUMath() {
  mpu.dmpGetQuaternion(&q, fifoBuffer);
  mpu.dmpGetGravity(&gravity, &q);
  mpu.dmpGetYawPitchRoll(ypr, &q, &gravity);
  pitch = (ypr[1] *  180.0 / M_PI);
  roll = (ypr[2] *  180.0 / M_PI);
  yaw = (ypr[0] *  180.0 / M_PI);
}


void setup() {
  // put your setup code here, to run once:
  Serial.begin(115200);
  i2cSetup();
  MPU6050Connect();

}

void loop() {
  // put your main code here, to run repeatedly:
   
    new_second = millis();
    GetDMP();
 
 if (new_second - old_second >= 1000) {
 
  old_second = new_second;


telemetry = String (pitch,0) + ',' + String(roll,0) + ',' + String(yaw,0) ;

Serial.println(telemetry);
 
 }

}


And finally this is the library and Serial.print part of my code which is not working with my failure Teensy:

Code:
#include <Wire.h>
#include <Adafruit_BMP085.h>
#include <TinyGPS++.h>
#include <SD.h>
#include <SPI.h>
#include <EEPROM.h>
#include "I2Cdev.h"
#include "MPU6050_6Axis_MotionApps20.h"

Adafruit_BMP085 bmp;
MPU6050 mpu;
TinyGPSPlus gps;
File telemetryFile;


Code:
telemetry = String(teamID) + ',' + mis_time + ',' + packet + ',' + String(h,1) + ',' + String(pressure,1) + ',' + String(temperature,1) + ',' + String(gps_hour) + ':' + String(gps_min) + ':' + String(gps_sec) + ',' + String(gps_lat,4) + ',' + String (gps_lng,4) + ','+ String(gps_alt,1) + ',' + gps_sats + ',' + String(pitch,0) + ',' + String(roll,0) + ',' + String(rpm) + ','  + String(yaw,0) ;

Serial.println(telemetry);


Is this problem happening on Mac, Linux or Windows? Which version? And which version of Arduino & Teensyduino are in use? (to check, click Help > About, or if using Mac, Arduino > About) And what's selected in the Tools menu? A screenshot of the menu is the easiest way to show us. Especially the Tools > USB Type setting matters.

Also important is whether you selected something in the "Teensy" part of the Ports menu, or the "Serial ports" part. (versions before 1.42 have only the "Serial ports" part in Ports - definitely upgrade if you have such an old version.) When using the "Teensy" specific ports, Arduino doesn't run its serial stuff at all, so try selecting Teensy from that part of the menu.

Maybe also try one of the non-serial options, like MIDI or RawHID. In those modes, serial isn't used at all. It's emulated with HID, so you can still open the serial monitor and have Serial.print() work.

If none of this helps, try telling us more info about your system and show as a screenshot with the Tools menu so we can see what you're really doing. From what you've told us so far, we can't even know if you have Macintosh, Linux, Windows 10 (where USB works well) or an older version of Windows (where USB support is not nearly as good as Mac, Linux and Win 10 - but still usually works).

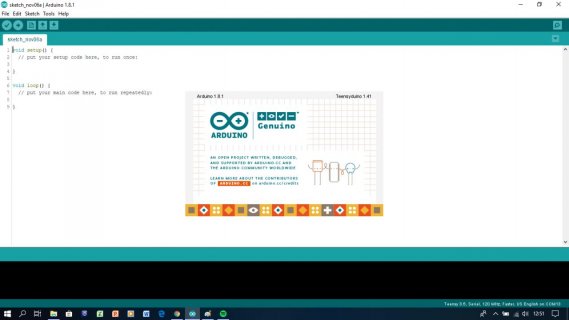
I use latest version of Windows 10 and this is version of my arduino and teensyduino:


6.jpg


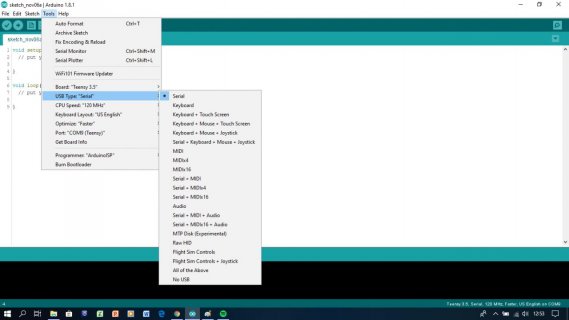
This is a screenshot of my tools menu with USB Type section:


7.jpg


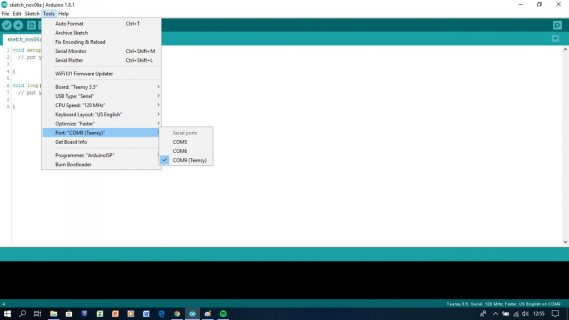
This is ports section:


8.jpg


As you said, I tried MIDI and RawHID. Serial monitor opened for both of them but serial.print did not work.
 
Please install a newer version of Teensyduino. You have 1.41. The latest is 1.44.

Windows will usually assign a new COM port number to each Teensy. So if you have selected COM9 and it works with your first Teensy, then you program another board, you will find the new board is *not* COM9. It will be a new port, perhaps COM10?

Teensy uses HID (not serial) for uploading. So even if you have the wrong COM port selected, uploading can still work because HID protocol is used. But opening the serial monitor will not work if no COM port is selected.
 
Not seeing code doing use of : serial port parameters: 115,200 N 8 1

That is the default - and certainly doesn't apply to Serial.begin() for USB is what I was wondering.

What is the working COM13 shown? Once assigned a given com# will generally follow that Teensy on Windows.

Upgrading to TeensyDuino newer like 1.42 - where 1.44 is the current would offer a new PJRC supplied 'Teensy' that offers better feedback if there is a problem.
 
if your getting that serial error its most likely your code the issue, if your program crashes and hard faults the cpu you’ll get the same error youre getting
 
As tonton81 mentioned, if your code hard crashes in the initialization it will act like you mention and say that the Serial...

There are many things that can cause it, sort of hard to help when we don't see the code.

Things like:

a) global objects with constructors that do things... Examples that have hit me in past is having a constructor either directly or indirectly call to something like: Serial.print(), which gets called before the hardware for the USB was initialized...

b) Having code that touches memory associated with a device, without having that memory made available. For example to use look or write to any of the registers associated with Serial1, you need to: SIM_SCGC4 |= SIM_SCGC4_UART0; // turn on clock
That is why if you look at the code all of functions that normally could be called during the setup of Serial1 have this in it...

c) call to NULL pointer...
...


As I mentioned in another thread yesterday. I would probably setup to blink the LED several times at the start of Setup... That way you can find out if your code is making it there. If so, then try moving it down a bit in setup to see if you can localize it.

@defragster has library code to help debug faults, that might help.
 
Status
Not open for further replies.
Back
Top