Just getting started, new to Teensy!

Status
Not open for further replies.

paynesystems

New member
I’m wanting to begin learning about the Teensy and programming. My primary areas of interest will be lighting and sound effects for scale modeling, and also for experimenting with MIDI applications for personal use. A friend recommends the 3.2, but says the 3.6 will also work. I would like to put together an initial order for one or the other with headers preinstalled, a breadboard, and whatever other peripheral items that I would need just to get started learning it. Can anyone recommend what I should order just to begin learning the platform and coding? Also, from a beginner standpoint, would there be any advantage or disadvantage to the 3.2 vs the 3.6 from a beginner standpoint, given my areas of interest? Thanks in advance for everyone's insight, and have a great day!
 
Welcome aboard.

While I also came into the Teensy world because the initial Teensys came with headers soldered, you likely will need to learn how to solder to join the boards together.

I suspect what you want to start is a Teensy 3.2, the Teensy Prop Shield, a cheap speaker, and a small set of ws2812b/apa102 lights. The Prop Shield comes in two flavors, one with motion sensors (so you could do something like a light saber and have it key off of your movement) and the cheaper version that does not have the motion sensors. Both prop shields have an amplifier for a mono speaker, 2 fast voltage level converters for ws2812b (Adafruit neopixel) or apa102 (Adafruit dotstar) light strings, and 8 megabytes of flash memory to hold sounds. While the Teensy 3.6 will work if you run a wire connecting the primary DAC (digital to analog converter for sound) to the position it is on the prop shield, the prop shield was designed for the 3.2.


Now if you've never built projects before, don't try to build everything at once. Instead tackle things one at a time, and join them together.
 
Thanks for your input Michael! I’m already good with soldering, as I’ve worked as a certified Mac tech for many years. I just know zip about the Teensy/Arduino platform, and very little in coding. I was thinking perhaps having the headers pre-soldered would simply save a step and make my first Teensy more breadboard ready.
 
Thanks for your input Michael! I’m already good with soldering, as I’ve worked as a certified Mac tech for many years. I just know zip about the Teensy/Arduino platform, and very little in coding. I was thinking perhaps having the headers pre-soldered would simply save a step and make my first Teensy more breadboard ready.
Yep. The issue is how do you attach the prop shield to the Teensy.

If you go with the pre-soldered headers, it depends on whether you want to attach the prop shield permanently or if you want to go with the shield approach where you stack boards on top of the Teensy or underneath. The prop shield is kind of special in that you need to attach at least one pin on the back that doesn't line up for breadboard usage. I'll see if I have some pictures of how I attach it.

Usually I like to attach the prop shield underneath the teensy with right angle pins on the two ends (to connect the speaker on one end and the ws2812b/apa102 leds on the other).
 
Isn’t it also possible to solder male/female headers to the Teensy and Prop Shield so you can plug the two together in a non permanent fashion?
 
Isn’t it also possible to solder male/female headers to the Teensy and Prop Shield so you can plug the two together in a non permanent fashion?

Yes, you can use stacking headers, but you have be careful about the stacking headers on the end pins. If you are going to use a breadboard, you don't want those five pins extending to where the breadboard is.

If you search around, you can find longer strands of stacking headers and you would use diagonal cutters to cut the headers down to size, and then use a rotary tool (like a dremel [tm]) to remove the rough edges. Or you can order the stacking kit from Sparkfun (order 2 kits, one for the Teensy, and one for the Propshield).

This of course assumes you are using the propshield. Alternatively if you are more into sound processing, the audio shield might be what you want. The audio shield gives you a lot more audio support, plus direct support for speakers and headphones:

The audio shield is easier to solder the stacking headers because you don't have to worry about the back row of 5 pins (especially the DAC output). You get better sound with the audio shield, but then you need to use the micro-SD card for storing sounds, and for doing LEDs, you probably have to add a voltage level booster (the prop shield includes a level booster). With the prop shield, you do NOT want the Teensy LC.

I should note that if you mix audio and LEDs you can run into issues (the ws2812b LEDs have a rather strict timing window, that if you are doing complex things, you might miss the window). If you are doing a small number of LEDs it may work, but if you are doing complex audio and complex LEDs, you may need to either be careful in writing your code, or use two teensys, and have one teensy send commands to the other.

However since you are starting out, perhaps things will work for simple combinations of the two.
 
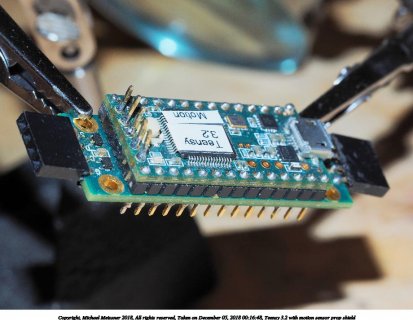
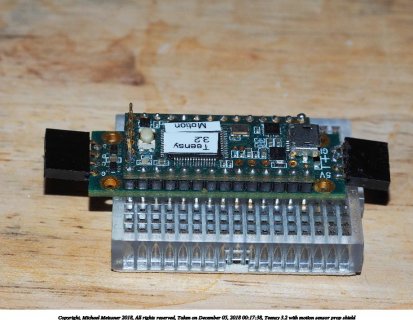
Here are some pictures of the Teensy 3.1/3.2 with the prop shield. Note, the Teensy 3.1 and 3.2 are the same in terms of processor and pinout. The 3.2 just has a better voltage regulator on it, and it has completely replaced the 3.1, which is no longer for sale. I generally prefer to solder the prop shield underneath the Teensy, so that I can still press the program button if needed:

Here is the Teensy 3.2 with the motion prop shield soldered underneath the Teensy. Note I'm using standard sized header pins here, so there isn't much depth to putting the teensy into a breadboard. But it is long enough to make contact. I used 2 right angle female headers for the speaker and LED attachments (and you can see they sometimes get bent):
2018-12-05-00-16-001-electronics.jpg
2018-12-05-00-17-002-electronics.jpg

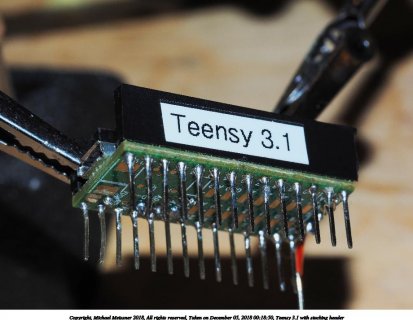
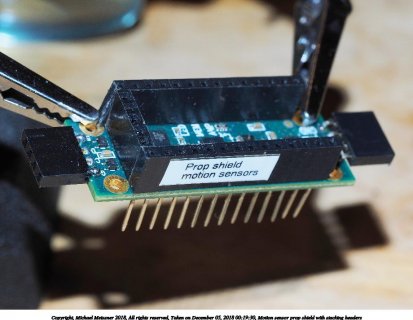
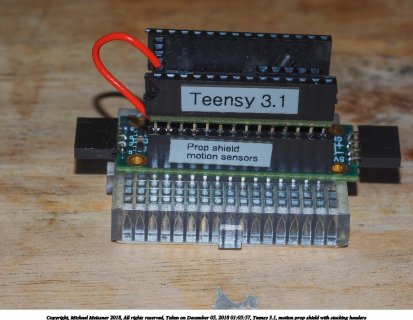
Here is a Teensy 3.1 that I had lying around with stacking headers, and I also had a motion sensor prop shield with stacking headers. Note the wire in the back that connects A14 from the Teensy to the prop shield. This is needed to be connected if you want to use the DAC (digital to analog converter) to play sounds. If you were soldering them together like the first pictures, you would directly connect them, but in order to use a breadboard, you don't want pin 13 and A14 in the same row of pins.
2018-12-05-00-18-003-electronics.jpg
2018-12-05-00-19-004-electronics.jpg
2018-12-05-01-05-005-electronics.jpg
 
Status
Not open for further replies.
Back
Top