[duplicate] Arduino Debug via Serial

visual_micro

Active member
We have a created a Debugging tool compatible with the Teensyduino platform, for all Teensy boards, running over the Serial port. This is part of the Visual Studio development extension Visual Micro.

This allows you to:
  • Step by Step execution using breakpoints
  • Performance Monitoring for execution time between breakpoints
  • Conditional breakpoints (based on data or hit count)
  • Variable monitoring with automatic min/max tracking
  • Change variables at runtime
  • Automatic Visual Pin monitoring
  • Easy to use Charting (for any data)

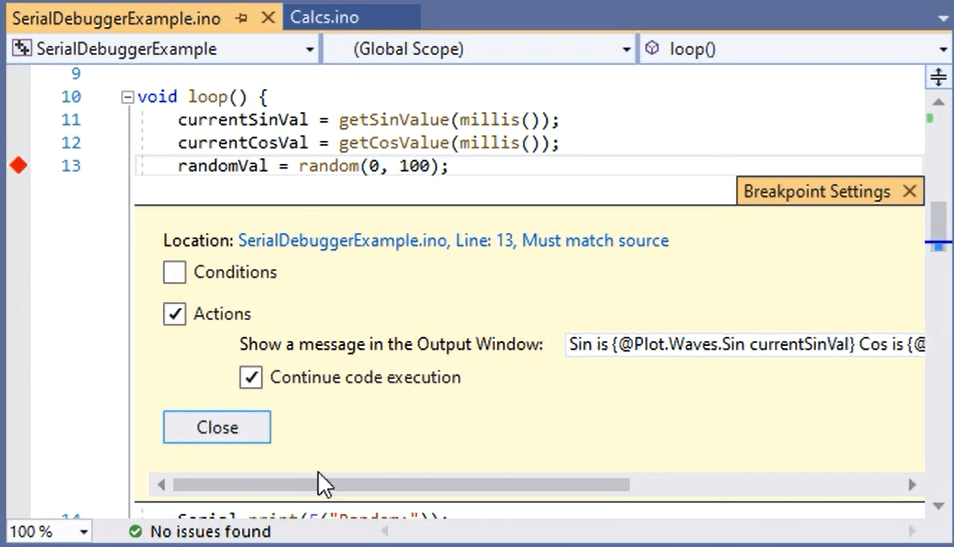
Code Example (all features use standard breakpoints):
Example__DebugBreakpoint.png


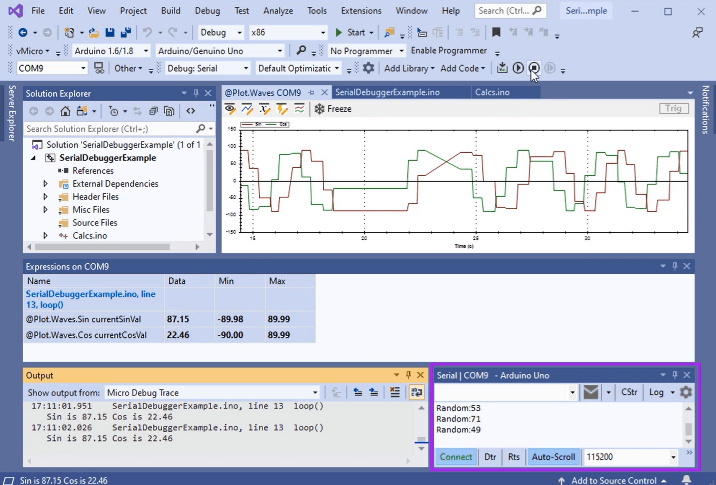
Example of Charting Running, with data tracking and Min/Max data visible:
Example__DebugChart2.png


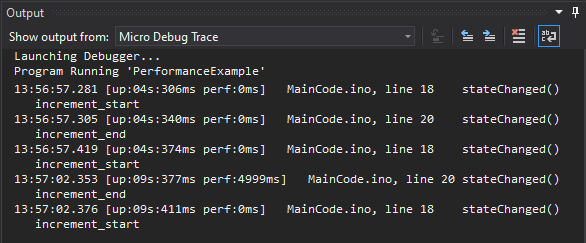
Example of Performance Output:
PerfMon_BreakpointSurround_2_Output.png


Video of Teensy Install + Basic Serial Debugging in Action

Video of @Plot Charts with Serial Debugger (works the same on Teensy)

@Plot Charting Further Info

Visual Micro VS Extension Website
 
Last edited:
Technically, how does this work? There seems to be additional code on the Teensy - what exactly does it?
Or, better, do you have a link where the sourcecode is available? I'd like to see it.
 
It's a good question. We support both the injected serial (or software serial) debugger described in this post and also hardware debuggers.

Both types of debuggers have advantages and disadvantages. Without hardware debug users either add their own serial debug statements throughout their code and/or they can use the Visual Micro break/trace points. The number of break/trace points is limited only by mcu memory and do not change the real code.

Manually adding serial statements to track min/max values, monitor the millis() between code points, update variable values at runtime can be tedious, therefore Visual Micro adds the same (or similar) serial statements, based on the configuration of each breakpoint. Debug message strings remain on the pc which can often end up consuming less memory than large serial.print diagnostics messages in the code.

Injecting code into the temporary build files prior to compile works quite well for Arduino projects because, as you will know, the the build always happens in a hidden temp folder. This is because the .ino code needs to be merged into .cpp. The use of the temp folder gives perfect opportunity to inject code when in debug mode.

To ensure this solution works with all Arduino board types, Visual Micro injects standard Arduino code such as Serial.read(), Serial.print() based on the user configured debug settings. All of the code produced by Visual Micro can be seen in the temp build folder after compliation. tip: The temp build folder is displayed in the build output when "vMicro>Compiler>Show build folder" or "Compile>Verbose" is enabled.

Breakpoint properties such as {@plot} simply add the value (or expression result) to a delimited serial.print() prefixed by a breakpoint id (such as #1) The pc knows what to do with the data in terms of displaying messages, watches, plots or pin maps.

Hopefully the following links explain a little more?

https://www.visualmicro.com/page/User-Guide.aspx?doc=Debugging-Explained.html

https://www.visualmicro.com/page/User-Guide.aspx?doc=Debugging.html

https://www.visualmicro.com/page/User-Guide.aspx


Main Restrictions: It is not currently possible to single step code lines, it is only possible to step from one point to another. Variables and/or expressions to be watched and/or updated during runtime must be added to the breakpoint before upload. Breakpoint positions must be set prior to upload. Not possible to use in ISR. Not possible to use inside code parts that have mission critical timings but that applies to most debuggers.
 
Ah.. got it. This means, for Teensy, the sourcecode has to be rebuilt if you change a breakpoint or a variable-watch.
Some code I wrote takes a minute to compile.. of course not all :) But it gets interesting on large projects. So If I enable or disable a breakpoint I have to wait... :)
Well, I have to wait now - without your debugger - too.

(I wonder if something similar can be done by inserting a (more or less complex) macro.)

Nevertheless - it seems easy to use.
 
Yes we are currently looking at giving some more flexibility to serial debug without need to recompile. It's looking quite exciting so will update this post with more info when/if it works.

One gotcha of dynamic breakpoints will be optimization settings. By identifying variables and expressions before upload ( and injecting references) we won't have to worry about the compiler optimization settings in the same way that we do for hardware debug. For hardware debug, changing the optimization is easy via our menus but some platforms have been designed not to work well or become too large with less optimization. Therefore dynamic breakpoints might not be as great as they sound.

BTW: Teensy used to be a very fast build as did all the old avr tools. If I recall pjrc have been waiting for the Arduino IDE to move to newer toolchains, which I think they have just done. Hopefully we will shortly see super fast Teensy builds again. A couple of minutes will likely be reduced to sub 20 secs (going on past experience). Fingers crossed :)
 
Thanks for the update on the GDBStub you have produced, it really is brilliant! We have added the options into Visual Micro so your GDBStub can be used easily (once installed) in our latest update (posted here).

We still feel the Serial debugger is a separate offering due to its universal operation (on all models of board) as well as additional visualisation features and performance tracking which are built in.
 
This sounds great.

I thought I would give some of this a try again.

Most of the time I have been using sublimetext for editing, of anything other than simple sketches. Using @FrankB/@defragster build scripts which work great most of the time.

There are some interesting issues of error messages showing up against the copy of the files in the temporary directory instead of the sources, where I have fixed the error there and then compiled and had the same error...

So It great to see that you properly get to a sketches included header or cpp file instead of the copy that Arduino makes.


But a lot of the time I spend most of my energy fixing or extending library code, and often times the sketches are just simple test cases.
With Sublime text I can create projects and add those library directories to the project and then search through the project files and the like.

Is there something equivalent in the VisualMicro setup. Note: when I am done with things, I want everything built using the Arduino IDE tools, such that anyone else can run the examples by justing using the Arduino IDE. Hope that makes sense.

Suggestions on how to work on Arduino libraries would be great.

Thanks
Kurt
 
Visual Micro does have equivalent functionality to achieve what you need.

Libraries can be added to your sketch, with the "Add Libraries" > "Clone for Project when Including Libraries" option checked. Ensure the "Use Library Version in Clones" is unchecked.
When adding them to your sketch they will be automatically cloned to the \Libraries\ folder within the project, and the relevant #include <header.h> references.
Just update these references to be surrounded by double quotes instead of chevrons to ensure they are seen as relative references.

These same sketches can also be compiled in the Arduino IDE.

The options listed above are shown in this You Tube video, and in our Documentation
 
Last edited:
Quick update here: - Maybe should post on Visual_Micro forum... But thought I would mention more here in case anyone else tries it here.

Took me a couple of attempts to get some of this stuff to work. Still trying to figure some stuff out.

I brought up Visual Studio and it said there was an update for VisualMicro stuff, so thought it was THIS update... Turns out it is not... You need to go to the version of their post, to get this support.

Visual Micro does have equivalent functionality to achieve what you need.

Libraries can be added to your sketch, with the "Add Libraries" > "Clone for Project when Including Libraries" option checked. Ensure the "Use Library Version in Clones" is unchecked.
When adding them to your sketch they will be automatically cloned to the \Libraries\ folder within the project, and the relevant #include <header.h> references.
Just update these references to be surrounded by double quotes instead of chevrons to ensure they are seen as relative references.

These same sketches can also be compiled in the Arduino IDE.

The options listed above are shown in this You Tube video, and in our Documentation

Looks like I need to look more at this as I am not sure which of these settings make sense for what I want to do.

For example currently I brought in a sketch, where it uses several system libraries, example USBHost_t36, Lynxmotion Smart Servo, ...
(https://github.com/KurtE/LSS_Test_sketches/tree/master/LSS_PhoenixUSBJoystick)

My hope is to debug my code here. However some of my code is also within these libraries, example USB Host code, as I am trying to debug and extend Bluetooth support for some of the joysticks.

Any fixes I make for this sketch, I wish for those to be made to the actual library such that I then can test with other sketches and to do commits to Github and depending on if I am owner of the library or using a clone either to simply push up to github or to create a Pull Request.

So I am trying to understand best approach for this.

Note: I just started fresh again and deleted all of the Visual studio files. from this project and then went to Open Existing Arduino project... I did this as I deleted a source file external from Visual Studio and when I tried to build again, the build failed as it could not find that file... I know there are easier ways to recover but used the sledgehammer approach ;)

So it loaded up the files. I went into configuration manager and changed to debug. I have the options for Dual Serial, 600mh (T4.1) Faster...
Set to Debug Hardware, GDBStub Default optimization and then I tried the Debug Start command...

It started building... Link failed:
Code:
LSS_Phoenix_Input_USB_Joystick.cpp.o: In function USBDriver::USBDriver()

Error linking for board Teensy 4.1
USBHost_t36.h:429: undefined reference to vtable for USBDriver
Build failed for project 'LSS_PhoenixUSBJoystick'
 
LSS_Phoenix_Input_USB_Joystick.cpp.o: In function USBHIDInput::USBHIDInput()
USBHost_t36.h:505: undefined reference to vtable for USBHIDInput
I ran into this earlier when I compiled an example with #pragma O0
like command. So wondering if there is anywhere that some of this data persists external to this build, that the current build options do not effect?

For getting farther along, I may try the clone the library option, but my understanding, is that this will simply put the changed files as subdirectories of my sketch and not update the official versions of these files... Of course I know I can always than try to remember to copy these updated files back to github project...

Now back to experimenting!
 
Yes probably better in the Visual Micro forum. You can either leave the libraries where they are and click "vMicro>Show Hidden Files". That adds short cuts for the real sources into the project explorer which makes the originals easier to edit and explore. Alternatively the clone library function allow you to make a copy of a library (optionally with version number) to either a local solution folder or a folder below the sketch/project. You can then edit the copy but at anytime right click and have the library copied/published back over the top of the version in the "Sketch Book\Libraries" folder. Any questions please open a thread in our forum and we will assist.

Thanks
 
Two years later...

I've found that the easiest / fastest way to work on TeensyDuino (or Arduino) libraries using Visual Micro is to create a /dev folder inside the library (at the same level as the usual "examples" folder). Inside the /dev folder, create a solution/project with an .ino file referencing the library. The referenced library files then appear as part of the project and will be modified in place if you edit them. It's equally effective to work directly on examples within the /examples folder, if you don't mind seeing visual studio's solution and project files alongside the ino file. To release the library, you can delete the /dev folder (or remove the visual studio solution files from the examples directory, if working directly on examples).

The approach described here is much, much easier than the "shared library" and "publish" workflow suggested on the Visual Micro site, which I found confusing enough that I made mistakes repeatedly even after several years of using Visual Micro on a daily basis.

Overall, the ability to develop for teensy with visual studio has been a lifesaver, especially for projects that may involve hundreds of files and dozens of libraries. I cannot imagine going back to any of the other workflows I had tried over the years.

Also, the ability to do real-time single-step sourcecode debugging on Teensy using the Visual Studio debugger (through the magic of dbg with visual micro) is really liberating.
 
@CraigF thank you for the useful update and the nudge. We should certainly post an update about the more recent GDB Stub addition for Teensy.

Editing/Viewing libraries and examples

There are few other options that might be useful sometimes...

1) The "vMicro>Show/hide hidden files" menu item adds a virtual folder and shortcuts to all library and core codes that the current project uses. The shortcuts do not touch the physical project/sketch folder and do not affect the compilation. It is an easy way to see/open the library and core sources based on the current board selection. This works with any standard Arduino/teensy project from any location.

2) The Platform Explorer in Visual Micro should show all examples (on the "Examples" tab). Clicking the name of an example prompts to "open the example" or "open a copy of the example". Opening a copy avoids the possibility of the example being overritten (or lost) after future library/teensy update or reinstall. Opening a copy, creates a "/myExamples/[LibName]" folder below the current "sketch folder" (usually my documents/arduino) and then opens it for edit/build. For libraries and examples located alongside the IDE, the clone avoids permissions errors that users might encounter when trying to save changes. (Users often install Arduino into the "Program Files" folder, that usually requires Visual Studio to be run with Administrator permission to make changes/edits to that location.).

3) The "Publish" option is only required for shared libraries that have been cloned from their original location. The "Add" menu for libraries provides the option to "Clone" but that does not have to be used. When a shared library is not cloned, then it will point directly to a library located below the IDE or sketchbook folder. In this case we will be editing the live library sources.

We will review the docs and try to make all these options clearer.

Thanks again.
 
Last edited:
Back
Top