How to connect Teensy 4.0?

Status
Not open for further replies.

burkino

Member
Hello dear Teensy-Friends.

I want easily connect the Teensy 4.0 as well to the audioboard but also the the breadboard.

I don't want to solder too much, if not really necessary.

The best way would be to get a teensy breakoutboard or protoboard to easily connect to all of its pins.

Thanks for help.

Burki.
 
Last edited:
I tend to like stacking headers. If you haven't soldered the Teensy, I tend to prefer put the stacking header on the Teensy, but you can also do it on the audio shield (remember you need revision D of the audio shield). For maximum flexibility, I put stacking headers on both the Teensy and Audio Shield.

Adafruit has a stacking header kit meant for their Itsy Bitsy processors (which has the same pinout as the Teensy 3.2 and 4.0). I tend to clip off the bottom pins of the back 5 header so that it is just a normal female header and so you can use the Teensy in a normal breadboard or a prototype board. Adafruit is primarily shipping Covid-19 supplies for NY health workers (which means it might take a long time to get the headers), but Digikey still has some stock:

If you were putting the stacking header on the audio shield, you would just ignore the 5 pin header.

Sparkfun also sells a stacking header kit made for the Teensy, but I don't like it compared to the Adafruit Itsy Bitsy header. The Adafruit version has 2 14-pin headers for the sides, and a 5 pin header for the back. The Sparkfun version has 2 13-pin headers for the sizes and a 7 pin header for the back. Either one is ok for the Teensy itself, but if you were doing the Audio Shield, it wouldn't work since the Audio Shield does not have the back 5 pins. In addition, since the kit is made for the Teensy 3.2, there are some headers to access the bottom pins that won't be useful on the Teensy 4.0 (which lays out the bottom pads differently than the 3.2).

If you were wanting to do the Teensy 3.5, 3.6, or forthcoming Teensy 4.1, you need a longer stacking header. Typically, you would get a longer one and cut it down to size (pull out the pin after the rows you want to use, use diagonal cutters to cut the header, and then use a rotary tool like a Dremel to smooth down the edges). Be sure to buy more than you need immediately, since it has been my experience that I usually cut one too close and the end pin comes out. Adafruit sells a packet of 5 36-pin stacking headers, but digikey doesn't seem to sell them. The other place I can find the longer stacking headers is dipmicro, which sells 18, 20, and 40-pin stacking headers (for dipmicro, you need to use 'female header' as the search term, not 'stacking header').

Another way to do it is to build up a prototype board that has the 2x14 pins for the Teensy 4.0 and then run wires to another part for the audio shield. However, Paul notes that in the audio shield, you really want to keep the wires as short as possible (hence stacking the shield on top of or under the Teensy 4.0). But if you wanted to do it, I would suggest perhaps these Prototype boards, all of which have four parallel tracks for laying out boards side to side:

FWIW, I've used several of the various DrAzzy boards (the 2x4" board mentioned above, the 1x2" board, the board that fits in a mint tin, etc) and they are quality boards that can be soldered on either side. I have bought, but not yet used the ElectroCookie double prototype board. It too looks like a nice board that can be soldered on both sides. I have not yet bought the snappable board, but I can imagine places where it might be useful.
 
Last edited:
Hello Michael,

Thank you for your reply. I live in Germany so I will not order from US.

So, not everthing is so easily available. But I will try to get something similar.

I found this may probably work:


Best Regards,
Burki.
 
Last edited:
Hello Michael,

Thank you for your reply. I live in Germany so I will not order from US.

So, not everthing is so easily available. But I will try to get something similar.

Best Regards,
Burki.
Yep, there are many ways to do it, it depends on what you can get at a reasonable price, how long it will take to get there, and what you want to accomplish.

The double row of male pins will work providing you are either willing to solder the audio shield permanently to the Teensy, or if you solder female headers on the underside on the Audio Shield. It does require that your Teensy not have the pins already soldered in (or that you are willing to unsolder the pins).

One thing you can do with the double row of pins is adjust the plastic headers up/down, to get the right spacing. Then you can have the outside 28 pins have enough of the male pin below the board so that it can be used in a breadboard or in a prototype board with female headers.

If you have the pins soldered in on the Teensy, the best way is to mount the audio shield underneath the Teensy. If you aren't connecting too much else, you could use normal female headers, and just solder a few wires to the pins. But that tends to be an area where it is easy to create accidental solder bridges and shorts. Also, it has been my experience if the Teensy is mounted in a prop that moves, eventually wires soldered to pins will come off and have to be re-soldered.

I tend to prefer having the Teensy and Audio Shields be removable, since I tend to work on a project for awhile, and move on to the next. A lot of times, what I do is solder up a prototype board with female headers, and then do all of the connections on the board. That way, I can just take the Teensy out of the board and move it to the next one. That's why I prefer using stacking headers.

However, there is one place I don't like the stacking headers, and that is when I'm soldering one of the Teensy 3.2/3.5/3.6/4.0 breakout boards to access the bottom pins. I find it much harder to solder, so I tend to just use male pins on the Teensy that I can solder on the top of the Teensy, and on the bottom of the breakout card. One of the things I'm looking forward to the Teensy 4.1 is not having to mess with breakout boards.

What I do is if possible have a set of stacking headers, normal female headers, normal male headers, and longer male headers. Then I can spend time figuring out which configuration I want before getting to the soldering. I sometimes need to remind myself that at some stage it doesn't matter as much getting it perfectly correct, and just solder up something and move on. :)

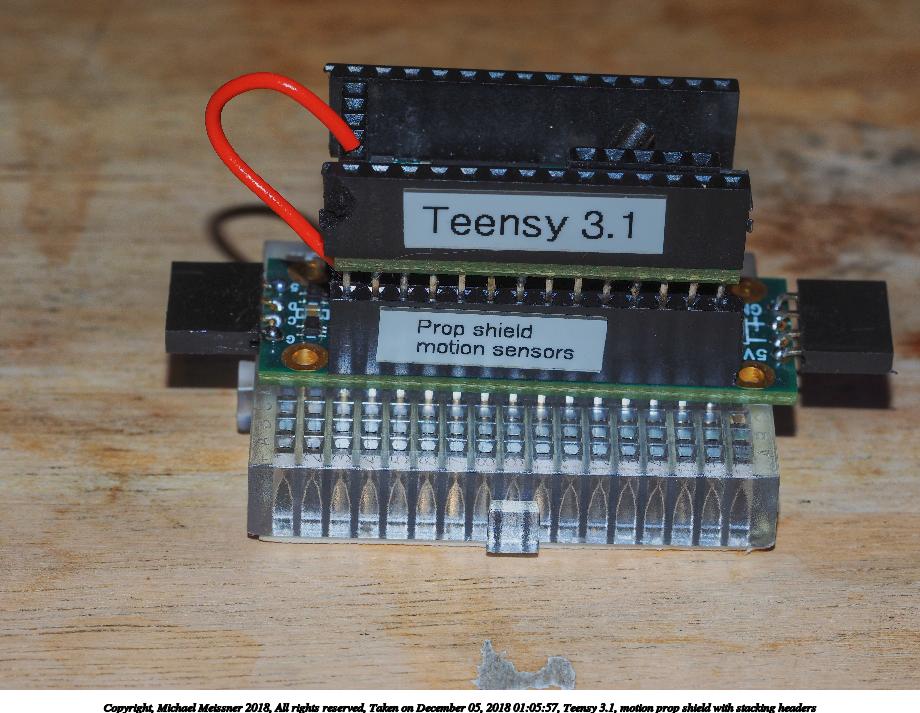
As an example, here is a picture I did some time ago of the Teensy 3.1 connected to the prop shield, each one using stacking headers:
2018-12-05-01-05-005-electronics.jpg
 
Hello Michael,

Thank you for your reply. I live in Germany so I will not order from US.

There are good online shops in Germany with fast delivery. I got my Teensy and a Feather adapter from there.
But soldering was still required.
 
Unfortunately the exact part, what Micheal pointed out, is not available in Germany:

https://www.adafruit.com/product/3883

I checked all the online shops, asked in Arduino Groups, I got a lot that is similar.

Coz no matter where I look: sometimes the number of pins is not matching (10 pins or 13 pins), sometimes the pin length is too short.

But the exact part from Adafruit is nowhere available...

Damn!!
 
I don't know if this link is allowed, i post it in the intention to help this member. I'm not affiliated with this shop besides i bought my teensy from.

https://www.distrelec.de/en/stackin...ng&pos=1&origPos=1&origPageSize=10&track=true

666 in stock :cool:

Ok. Looks like they are feather headers, so one is too long and one too short. If you buy two packs you have 2 spare and 2 too long but you could cut the wires of the too long ones.

Or buy a soldering iron in that shop, they also have teensy feather adapter (which work great)
 
But the exact part from Adafruit is nowhere available...

Damn!!
Yes, I recall in the past that 8 and 10 pin headers were often available due their use with Arduino Shield, but longer ones were hard to find.

If you don't mind wasting the 12-pin header, one possibility for the Teensy 3.2/4.0 is getting two feather stacking headers. These come with one 12 pin header and one 16 pin header. Just use the 16 pin headers and cut them down:

Or you can use a long male pin header and then solder a female header under the audio shield. Then you use the long pin to connect to the breadboard and audio shield.

If all you can get are shorter stacking headers, then you can use a rotary tool to file down the edges so you can use them.
 
I don't know if this link is allowed, i post it in the intention to help this member. I'm not affiliated with this shop besides i bought my teensy from.

https://www.distrelec.de/en/stackin...ng&pos=1&origPos=1&origPageSize=10&track=true

666 in stock :cool:

Ok. Looks like they are feather headers, so one is too long and one too short. If you buy two packs you have 2 spare and 2 too long but you could cut the wires of the too long ones.

Or buy a soldering iron in that shop, they also have teensy feather adapter (which work great)

The feather adapter includes one set of feather stacking pins (12/16). I put some compatibility notes for the Teensy 3.5, 3.6, and 4.0 in the unofficial Teensy wiki:
 
For stacking headers, I use Samtec SSQ series receptacles. What I use for a T4.0 is:

SSQ-114-03-G-S - 14 circuits
SSQ-105-03-G-S - 5 circuits (optional)

-03 means 10mm long pins (stacking)
-G means gold plating. Tin (-T) is available at lower cost over gold.

You might be able to find 13 and 7 circuit versions as well (-113 and -107.)

In the US these are available from Digi-Key and Mouser. You'll need to check European vendors yourself. Try doing a web search on the part numbers; see what comes up.
 
Status
Not open for further replies.
Back
Top