TelephoneBill
Well-known member
The Si5351 Clock Generator chip has several excellent mentions in this forum previously, but I wanted to create a very simple design that anyone can put together in a few moments with a breadboard. This article is really a simple "How To" for beginners. Lots available on eBay. Here is what I produced.
Its a signal generator (sq waves only) that can be set from 4 KHz through to 100 MHz (with 1 Hz resolution if desired). The high frequency end extends beyond 100 MHz but above this figure my scope runs out of bandwidth, and I'm interested in measuring true amplitude settings for testing RF transformer designs.
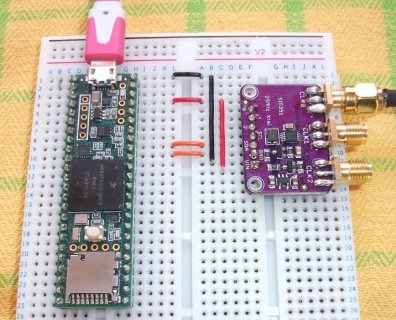
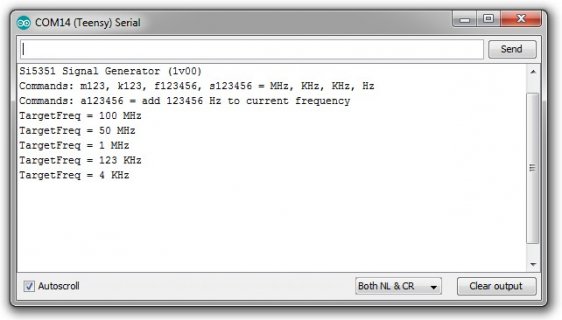
Only four wire connections need to be made +3v3, GND, SDA, and SCLK, as shown in the left picture. I use the Arduino IDE serial monitor as command input control shown in the right picture. This picture also lists the commands available e.g. m100 will set to 100 Mhz etc.
To illustrate the outputs, I include the following set of screenshots. The frequency counter reads high by 1 part in 10e5. I'm only using CLK0 of the three available outputs. There are some limitations on the simultaneous settings for the others (CLK1, CLK2) - see the data sheet for more detail.
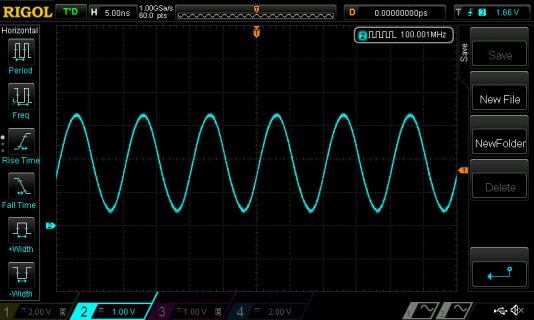
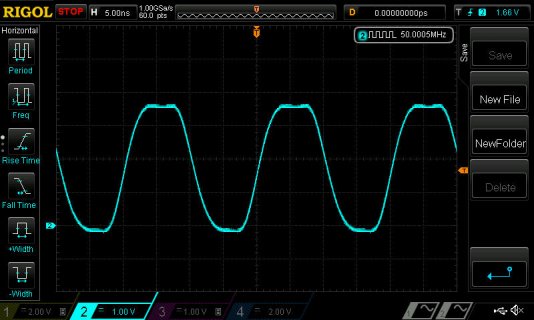
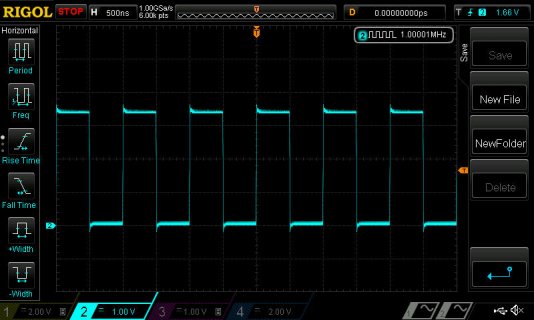
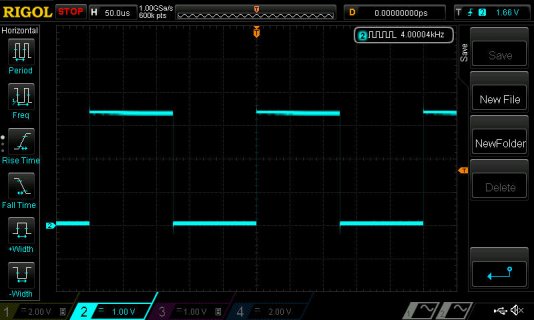
As you can see, the amplitudes are really superb at almost a full 3.3 volts over the whole range. The output driver is HCSL (High Speed Current Steering Logic). There is also a feature to correct for drift/offset of the onboard 25 MHz master crystal in parts per billion. This will be temperature dependant but does take out most of the variations in clock crystal components. I have also used the higher current drive setting to get more drive into capacitive loading at high frequency.
My code sketch is as follows... (with thanks to Jason Milldrum for his library).
Its a signal generator (sq waves only) that can be set from 4 KHz through to 100 MHz (with 1 Hz resolution if desired). The high frequency end extends beyond 100 MHz but above this figure my scope runs out of bandwidth, and I'm interested in measuring true amplitude settings for testing RF transformer designs.
Only four wire connections need to be made +3v3, GND, SDA, and SCLK, as shown in the left picture. I use the Arduino IDE serial monitor as command input control shown in the right picture. This picture also lists the commands available e.g. m100 will set to 100 Mhz etc.


To illustrate the outputs, I include the following set of screenshots. The frequency counter reads high by 1 part in 10e5. I'm only using CLK0 of the three available outputs. There are some limitations on the simultaneous settings for the others (CLK1, CLK2) - see the data sheet for more detail.


As you can see, the amplitudes are really superb at almost a full 3.3 volts over the whole range. The output driver is HCSL (High Speed Current Steering Logic). There is also a feature to correct for drift/offset of the onboard 25 MHz master crystal in parts per billion. This will be temperature dependant but does take out most of the variations in clock crystal components. I have also used the higher current drive setting to get more drive into capacitive loading at high frequency.
My code sketch is as follows... (with thanks to Jason Milldrum for his library).
Code:
//T36_Si5351_1v00
//===============
//Date: 15 JUN 2020
//Author: Telephone Bill
//Notes: Teensy 3.6 to Si5351. (Wiring: 3v3 - Vin, Gnd - Gnd, Pin18 - SDA, Pin19 - SCL)
//       Using "Etherkit si5351" Library v2.1.4 (installed using "Manage Libraries...")
//       Copyright (C) 2015 - 2016 Jason Milldrum <milldrum@gmail.com>
//       CLK0 Output = 4KHz to 120 MHz
#include "si5351.h"
#include "Wire.h"
#define Si_5351_crystal 25000000 //Si5351 on board crystal frequency
char Version[] = "Si5351 Signal Generator (1v00)";
Si5351 si5351;
long calibration_constant = 8000; //constant will adjust for errors in the 25 MHz crystal master clock
uint64_t SetFreq;
uint32_t TargetFreq, AddFreq;
int const LED = 13;
byte Byte1, Byte2, Byte3, Byte4, Byte5, Byte6, Byte7;

void setup() {
  //initialise serial input from monitor
  Serial.begin(115200);
  delay(1000);
  Serial.println(Version);
  delay(1000);
  // initialize the digital pin as an output for the LED blink
  pinMode(LED, OUTPUT);
  Blink(150); Blink(150); Blink(150); //setup diagnostic
  TargetFreq = 100;

  si5351.init(SI5351_CRYSTAL_LOAD_10PF, Si_5351_crystal, calibration_constant);
  si5351.set_freq(10000000000,SI5351_CLK0); //100 MHz
  //si5351.set_freq(100000000,SI5351_CLK1); //1 MHz
  //si5351.set_freq(200000000,SI5351_CLK2); //2 MHz
  si5351.drive_strength(SI5351_CLK0, SI5351_DRIVE_4MA);
}

void loop() {
  //loop diagnostic
  Blink(950);

  //set frequency from monitor keyboard
  KeyInput();                         //read key input (if any)
}

//SUBROUTINES
//-----------
void Blink(int dly) {
  digitalWrite(LED, HIGH); delay(50);  // turn the LED on
  digitalWrite(LED, LOW); delay(dly);   // turn the LED off
}

//KeyInput Routine
void KeyInput() {
  //blink the LED
  if (Serial.available()>1) {
    //read the incoming byte
    Byte1 = Serial.read();
    if (Byte1>0x20) {
      switch (Byte1) {
      case 'm':  //freq 001 to 199 MHz
        //task goes here...
        Byte2 = Serial.read();
        Byte3 = Serial.read();
        Byte4 = Serial.read();
        TargetFreq = ((Byte2-0x30) * 100) + ((Byte3-0x30) * 10) + ((Byte4-0x30)* 1);
        if ((TargetFreq>0)||(TargetFreq<=200)) {
          SetFreq = 100000000ULL * TargetFreq;
          si5351.set_freq(SetFreq,SI5351_CLK0);
        }
        Serial.print("TargetFreq = "); Serial.print(TargetFreq); Serial.println(" MHz");
        break;
      case 'k':  //freq 004 KHz to 999 KHz
        //task goes here...
        Byte2 = Serial.read();
        Byte3 = Serial.read();
        Byte4 = Serial.read();
        TargetFreq = ((Byte2-0x30) * 100) + ((Byte3-0x30) * 10) + ((Byte4-0x30)* 1);
        if ((TargetFreq>3)||(TargetFreq<=999)) {
          SetFreq = 100000ULL * TargetFreq;
          si5351.set_freq(SetFreq,SI5351_CLK0);
        }
        Serial.print("TargetFreq = "); Serial.print(TargetFreq); Serial.println(" KHz");
        break;
      case 'f':  //freq XXX,XXX KHz
        //task goes here...
        Byte2 = Serial.read();
        Byte3 = Serial.read();
        Byte4 = Serial.read();
        Byte5 = Serial.read();
        Byte6 = Serial.read();
        Byte7 = Serial.read();
        TargetFreq = ((Byte2-0x30) * 100000) + ((Byte3-0x30) * 10000) + ((Byte4-0x30)* 1000) + ((Byte5-0x30) * 100) + ((Byte6-0x30) * 10) + ((Byte7-0x30)* 1);
        if ((TargetFreq>3)||(TargetFreq<=199999)) {
          SetFreq = 100000ULL * TargetFreq;
          si5351.set_freq(SetFreq,SI5351_CLK0);
        }
        Serial.print("TargetFreq = "); Serial.print(TargetFreq); Serial.println(" KHz");
        break;
      case 's':  //freq XXX,XXX Hz
        //task goes here...
        Byte2 = Serial.read();
        Byte3 = Serial.read();
        Byte4 = Serial.read();
        Byte5 = Serial.read();
        Byte6 = Serial.read();
        Byte7 = Serial.read();
        TargetFreq = ((Byte2-0x30) * 100000) + ((Byte3-0x30) * 10000) + ((Byte4-0x30)* 1000) + ((Byte5-0x30) * 100) + ((Byte6-0x30) * 10) + ((Byte7-0x30)* 1);
        if ((TargetFreq>3)||(TargetFreq<=199999)) {
          SetFreq = 100ULL * TargetFreq;
          si5351.set_freq(SetFreq,SI5351_CLK0);
        }
        Serial.print("TargetFreq = "); Serial.print(TargetFreq); Serial.println(" Hz");
        break;
      case 'a':  //add freq XXX,XXX Hz to TargetFreq
        //task goes here...
        Byte2 = Serial.read();
        Byte3 = Serial.read();
        Byte4 = Serial.read();
        Byte5 = Serial.read();
        Byte6 = Serial.read();
        Byte7 = Serial.read();
        AddFreq = ((Byte2-0x30) * 100000) + ((Byte3-0x30) * 10000) + ((Byte4-0x30)* 1000) + ((Byte5-0x30) * 100) + ((Byte6-0x30) * 10) + ((Byte7-0x30)* 1);
        if ((AddFreq>3)||(AddFreq<=199999)) {
          SetFreq = SetFreq + (AddFreq * 100);
          TargetFreq = SetFreq / 100;
          si5351.set_freq(SetFreq,SI5351_CLK0);
        }
        Serial.print("TargetFreq = "); Serial.print(TargetFreq); Serial.println(" Hz");
        break;
      case 'v':  //freq up 999 KHz
        //task goes here...
        Serial.println(Version);
        Serial.println("Commands: m123, k123, f123456, s123456 = MHz, KHz, KHz, Hz");
        Serial.println("Commands: a123456 = add 123456 Hz to current frequency");
        break;
      } //end of switch statement
   } //end of Byte1>0x20
 } //end of if Serial Available
}
