wrightflyer
Active member
OK, I know the very worst thing is to develop some code then on the first occasion it "kind of works" immediately post it on the internet saying "here's a perfect example of ..." but here I am anyway!
I am actually trying to piece together my own Teensy4 + Audio Adapter synthesizer and, with that in mind (because I love UIs!) I decided to put one of those very popular $10 ILI9341 2.8TFT + touch screens on it (in fact, already, I have it so you can adjust ADSR by poking the screen with a pen).
But what I found is that when trying to layout a user interface, every time you make a tweak, like "move that slider 3 pixels to the right", you have to rebuild and re-flash to see if it "looks right". With Teensy 4 + audio the build time is significant. Also I don't like re-flashing things too often how ever long the manufacturer may say a micros flash erase cycle life is.
Besides that my day-job is actually writing simulators so I am always a great fan of simulators to speed development.
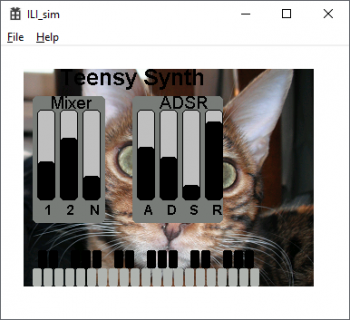
So I ended up with this:

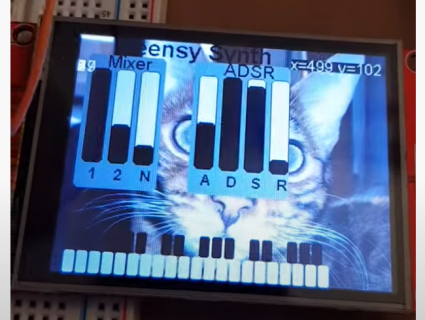
(which proves that black text does not really work on top of pictures of beautiful Bengal cats - that's "Amelia" by the way!). Meanwhile on a Teensy 4 + ILI9341 (almost!) the same code creates:

So it seems to work kind of OK. I'm keeping the code for this in a subdirectory of my Synth project on Github:
https://github.com/wrightflyer/Synth/tree/master/ILI_sim
As the readme.md says this basically involved lifting ILI9341_t3.* from the Teensy 4 libs in Teensyduino together with the Print and Wstring and stuff in the "core" that it derives from then hacking it about so it would build in isolation from the Arduino/Teensyduino. Whacking a Win32 "blitter" on the front. Then noticing the fact that in all the SPI activity to the ILI9341 in the graphic lib almost every operation starts by defining an x0,y0 to x1,y1 rectangle on the display then just constantly "pushing bytes" at it. So by replacing those bits with something that just holds the rectangle dimensions for the display array then, as 565 color words are pushed, walking across the X's and down the Ys until the rectangle is complete then (probably too often) doing InavlidateRectangles to force WM_PAINTs and the display magically appears.
Normally I'd "polish the turd" before release but I was so chuffed to see this work the first time I thought I'd better get out there and brag about it a bit.
Hopefully others might find this useful? You just put all your drawing stuff in setup()/loop() in Display.cpp and the sim will (in theory) do the rest.
However note this ONLY simulates the display so if you were doing tft.something();delay(50);tft.something() it's possible the tft.something()s will do what was expected but this knows nothing about delay() or anything else in the rich Arduino library.
Enjoy.
(I will continue to "polish" this)
I am actually trying to piece together my own Teensy4 + Audio Adapter synthesizer and, with that in mind (because I love UIs!) I decided to put one of those very popular $10 ILI9341 2.8TFT + touch screens on it (in fact, already, I have it so you can adjust ADSR by poking the screen with a pen).
But what I found is that when trying to layout a user interface, every time you make a tweak, like "move that slider 3 pixels to the right", you have to rebuild and re-flash to see if it "looks right". With Teensy 4 + audio the build time is significant. Also I don't like re-flashing things too often how ever long the manufacturer may say a micros flash erase cycle life is.
Besides that my day-job is actually writing simulators so I am always a great fan of simulators to speed development.
So I ended up with this:

(which proves that black text does not really work on top of pictures of beautiful Bengal cats - that's "Amelia" by the way!). Meanwhile on a Teensy 4 + ILI9341 (almost!) the same code creates:

So it seems to work kind of OK. I'm keeping the code for this in a subdirectory of my Synth project on Github:
https://github.com/wrightflyer/Synth/tree/master/ILI_sim
As the readme.md says this basically involved lifting ILI9341_t3.* from the Teensy 4 libs in Teensyduino together with the Print and Wstring and stuff in the "core" that it derives from then hacking it about so it would build in isolation from the Arduino/Teensyduino. Whacking a Win32 "blitter" on the front. Then noticing the fact that in all the SPI activity to the ILI9341 in the graphic lib almost every operation starts by defining an x0,y0 to x1,y1 rectangle on the display then just constantly "pushing bytes" at it. So by replacing those bits with something that just holds the rectangle dimensions for the display array then, as 565 color words are pushed, walking across the X's and down the Ys until the rectangle is complete then (probably too often) doing InavlidateRectangles to force WM_PAINTs and the display magically appears.
Normally I'd "polish the turd" before release but I was so chuffed to see this work the first time I thought I'd better get out there and brag about it a bit.
Hopefully others might find this useful? You just put all your drawing stuff in setup()/loop() in Display.cpp and the sim will (in theory) do the rest.
However note this ONLY simulates the display so if you were doing tft.something();delay(50);tft.something() it's possible the tft.something()s will do what was expected but this knows nothing about delay() or anything else in the rich Arduino library.
Enjoy.
(I will continue to "polish" this)

