PCM1802 -> Teensy4.x -> PCM5102

xpeace

Member
Hello *.*

I`m trying to connect an ADC(1802) and DAC Board(5102) to the Teensy 4.0.

So far I think I could use the same connectors as the audio shield.

But I don`t know if I simply can share common pins such as MCLK to both boards to get the I/O synched or if both boards need seperate pins from Teensy.

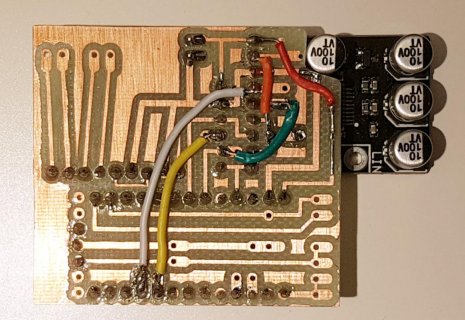
(I`m creating a template in Fritzing. Then I`ll create a PCB with component headers using a cheap chinese CNC where I can simply attach Teensy and the AD / DAC boards without soldering)

Can someone confirm this could be working - or if I need to correct the design before routing the pcb?
Do I need to add a resistor, or cap to GND when connecting both modules to a single clock line to get rid of 'reflections' or noise?


ADC(1802)DAC(5102)Teensy 4.xFunction
SCKSCL23 (MCLK1)Audio Master Clock, 11.29 MHz
BCKBCK21 (BCLK1)Audio Bit Clock, 1.41 or 2.82 MHz
LRCKLCK20 (LRCLK1)Audio Left/Right Clock, 44.1 kHz
DIN7 (OUT1A)Audio Data from Teensy to DAC
DOUT8 (IN1)Audio Data from ADC to Teensy
 
Last edited:
But I don`t know if I simply can share common pins such as MCLK to both boards to get the I/O synched or if both boards need seperate pins from Teensy.

Yes, you can share the 3 clock signals.

The key is both chips need to be configured in slave mode, so they listen for those signals from Teensy. If either chip is configured for master mode, it will try to transmit BCLK and LRCLK, which won't work.
 
The DAC Part with the PCM5102 module instantly played Zelda.

But when adding the PCM1802 ADC module there is no more playback on the DAC when powering up via USB.

I already assumed syncing both modules via the same pins might be a challenge unless I messed up something else...

I`ve added the schematic I`ve used to route the PCB and some photos. If someone has an idea - please let me know.

20220302_215817.jpg

20220302_215919.jpg

FritzingPCB.jpg

20220302_220001.jpg
 

Attachments

  • 20220302_215919.jpg
    20220302_215919.jpg
    170.9 KB · Views: 64
But when adding the PCM1802 ADC module there is no more playback on the DAC when powering up via USB.

Maybe something is wrong in the code? Can you show the program you used for testing?

Sometimes minor details matter a lot, so please make sure to copy the full program from Arduino so we can see those little details.
 
Looks like you found the info about fixing that PCM1802 board.

https://www.pjrc.com/pcm1802-breakout-board-needs-hack/

In your photo, difficult to see how the orange wire connects. It it important to connect to both FMT0 pads. Looks like maybe it's only connected to 1 side?

Maybe try running the code from that web page, but change AudioOutputAnalogStereo to AudioOutputMQS, and look for a PWM pulsing audio signal on pins 10 and 12.
 
Orange wire connects +3.3V from PCM1802 3.3V out to FSync (high->setting Slave Mode) and PDW (Powerdown to high = enable)

I`ll resolder FMT0 - I considered the possibility that the clock signals are affected when sharing those pins - eventually I can check how they do look using an osci.
 
Vpp LRCLK drops from 2.8V to 1.2V when the PCM1802ADC module is attached. Square signal is barely visible. Can the PCM1802 heat up during operation? Resoldered FMT0 without change.
 
Vpp LRCLK drops from 2.8V to 1.2V when the PCM1802ADC module is attached. Square signal is barely visible.

It's supposed to be a 50% duty cycle square wave at 44.1 kHz. Since it's a 3.3V signal, a DC voltage measurement should read about 1.65 volts.
 
Might be the DSOquad osci I`ve used needs some calibration, there is a 50% duty cycle square - which dropped about 50% in Vpp value when I attached the ADC module.
Should I try using the second teensy audio port instead and redo the design ? How can the masterclocks (MCLK1/MCLK2) be synched in this case - or is this done automatically in the audiolibrary ?
 
The MODE0 and MODE1 pins control this. Both must be logic low.

screenshot.png

Try measuring their voltage. Maybe one or both are accidentally connected high?
 
You`re right MODE1 Pin has 3.90V - about the same that I measure at FMT0 (without the need for an additional 3.3V jumper cable).
The + strip is already powered without that hack - is this a new design ?
So I need to find the combination for 0V on MODE0 and MODE1 pins ?

20220304_004154.jpg
+strip already supplied with 3.9? V

Mode.JPG

20220304_003701.jpg
MODE1 pin (right upper corner) I`ve also measured 3.90V same as on the FMT0 short.
If FMT0 is not shorted - both pins are high when measured to GND with about 4.5V.
 
Last edited:
As next step I connected FMT1- and FMT0- (the left side) and connected them to GND but a quick measurement between GND and MODE1 still showed around 4V.

20220304_121600.jpg

Then I was connecting the four pins FMT1 to MODE0 pin (left side I assumed GND) and hooked it to GND - and that was the moment the PCM1802 ADC started to smoke...

20220304_121636.jpg

I disconnected MODE1 and MODE0 pins and could measure +5V on MODE1 (shorted +5V via MODE1 pin to GND). So this unit is no more...

As Teensy is still playing ZELDA (Arduino AudioShield ZELDA demo code) via DAC5102 - and Notebook still outputs +5V USB power trials can continue - there are a few spare units left...
 
Is the GND connected?

gnd.jpg

If you are missing GND connection, then the PCM1802 will only have 5V and 3.3V connection, plus signals. Everything will measure higher voltages.
 
The pins had been soldered from the other side - I did test GND - all on common ground ADC, DAC and Teensy. I just rechecked - upper pcb layer and ring had been also contacted.
-> Maybe it would be easier to use the second I2S to have seperate connections? Eventually this does reduce the chance for HW issues and result in higher quality?
 
The PCB can be cleaned up a bit when using the bridges on the PCM5102 DAC chip, without using some of the header pins.

The following is valid for the PCM5102 module used here (can be verified by checking the pin connection):

H1L:H=+3.3V1=FLTL=GNDFilter: Fast 80µs vs norm 500µs sig latency (low) use normal for best audio quality
H2L:H=+3.3V2=DEMPL=GNDDeemphasis: Do not use turn off (low)
H3L:H=+3.3V3=XSMTL=GNDSoft Mute High: High = Not muted
H4L:H=+3.3V4=FMTL=GNDFormat: Left justified High, I²S Low


PCB5102.jpg
 
Some additional information on the PCM1802 ADC:

There are faulty PCM1802 units (pcb design error) - it looks like these have been produced quite recently 01/22 and are on sale...

package.jpg

Buying several sample units from different sellers - about 70% had been faulty. :mad:

front.jpg

How to recognize a faulty module:

Connect +5V and GND -> Mode 1 PIN (upper right pin on photo above) on PCM1802 chip has to be low (otherwise I²S slave mode is not possible).
After a minute of operation PCM1802 chip is getting hot.


rear.jpg

Mode1 up to QSR (left side pad) are about 4V when measured to GND. On a working unit there is 0V referred to GND...
 
Prototype is running - and the soundquality is simply amazing. I will add a headphone preamp to the PCM5102 DAC next. I could not hear any noise during testing with headphone output and the dynamic was really impressive - wow.

For a quick test the following code can be used. Straight forward pass-through - if working PCM1802 modules are available...

#include <Audio.h>

AudioInputI2S i2s1;
AudioOutputI2S i2s2;

AudioConnection patchCord1(i2s1, 0, i2s2, 0);
AudioConnection patchCord2(i2s1, 1, i2s2, 1);

void setup()
{
AudioMemory(10);​
}

void loop()
{
}
 
Last edited:
Glad it's working!

I saw your message. As usual, I'm far behind on emails and other communication. Realistically, if you were to send me one of those defective PCM1802 boards, it would probably just sit here unused for many months, maybe forever. I really can't spend much time on PCM1802 again, at least not in 2022.

Probably the very best thing you could do is take some good photos of the good & bad modules side by side. Maybe experiment with camera angle and light position to try to get those hard-to-see traces under the black solder mask to show up. Hopefully some way to spot the difference between them will be visible.
 
On the bad PCM1802s, do you get any response on Dout when you provide FSYNC (high), LRCK and BCK? I have 5 boards I bought end of December from MT Technology on AliExpress, and 2 built up with the FMT0-3.3V jumper don't do anything, but a third that I just powered with 5V and GND doesn't seem to get hot (as xpeace suggested above). Are the sellers shipping mixed batches of working and non-working? (That would explain why they're so cheap!)
 
I had one seller sending bad units only - all with the same issue (AliExpress: "ElectronicFans" https://www.aliexpress.com/item/32803705647.html).
Unfortunately I left a positive review as I never experienced such a problem before...
Good units from another vendor had descriptions printed on the pcbs.

Just make sure after arrival checking if eg FMT0 GND is 0V and not 4V if you add +5V/GND. There might be some other units with minor defects as well - quality control in this price range isn`t very reliable :)
Usually you get modules from the same batch these are either working or sometimes not...
 
Last edited:
Back
Top