Simple WORKING JTAG+UART for Teensy 4.1

lilltroll77

Member
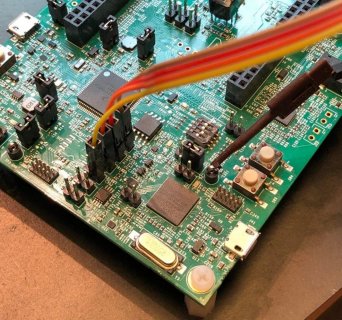
Below is my simple mod to add JTAG with UART to Teensy 4.1.

Tools needed:
Small screwdriver, small solder tip, small knife, optical magnification, Isopropanol and good flux.
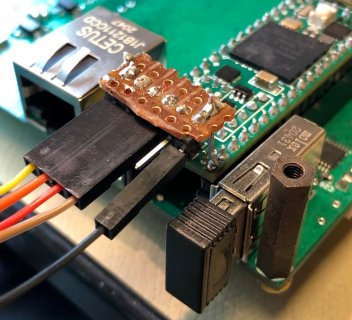
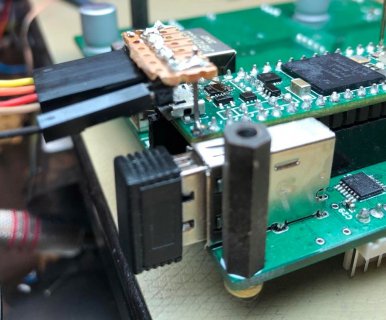
274880611_626777748622876_163997087310944113_n.jpg
275097958_529834115369822_8544872795138338450_n.jpg

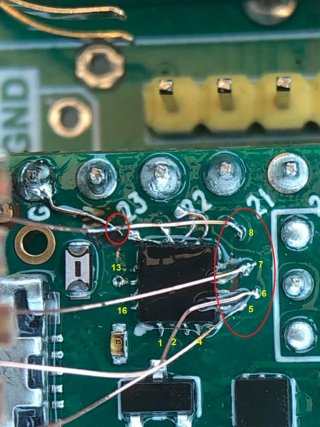
YOU ONLY NEED TO MOD PIN 5-8 and pin 13!
I have just played around with the Cortex M0 chip to understand how things work.
275177598_514885846926835_1920473491003707047_n.jpg

A RT1010-EVK flashed with Segger JTAG firmware.
274880944_1606779182988619_4101684401983671144_n.jpg

The vias for pin 5-8 are easily accessible for the MKL02 chip.
Rub off the solder mask on the vias with a small screwdriver and Isopropanol. Flux the free copper, and add solder to (the top-side of) the vias. Make 2 parallel cuts with a sharp knife between the pads and the via. DO NOT CUT DEEP! Peel off the copper between the cuts for pin 5-8. Solder four thin wires to the four vias. You now have the JTAG connection. I made a JTAG-header above the USB connector.
If you want to use the NXP specific JTAG, you need to cut the copper from pin 13 - JTAG_MOD, and ground (on the RT1062 side) it to the G pin instead.

Teensy will still boot from Flash, if no JTAG is connected.

I my case, I have a custom board connected to Teensy, so I redirected PRINTF to UART7, and connected that pin to the UART pin of my "Segger" JTAG thing.

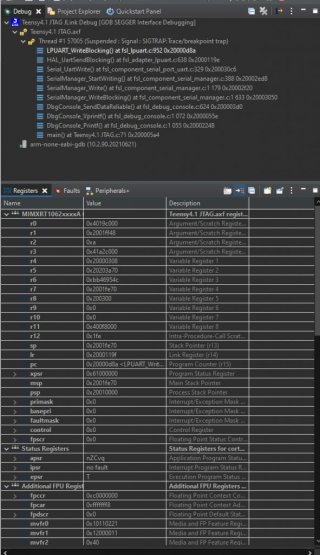
I can now debug my Teensy in MCUXpresso, and Hello world prints to the terminal in MCUXpresso.
MCUXpresso.jpg

If it's your first time doing HW hack like this, train on some other (broken) PCB first. Any old computer PCB, should be good for training.
 
Last edited:
Visual Studio Code

I verified that JTAG worked in VSC & platformIO, meaning I can use the Teensy Arduino framework with JTAG.

A working platformio.ini shown below (for Segger JLINK)

Code:
[env:teensy41]
platform = teensy
board = teensy41
framework = arduino
debug_tool = jlink
debug_port = :2331
; JTAG interface

debug_server =
  {FULL PATH HERE}.platformio\packages\tool-jlink\JLinkGDBServerCL.exe
  -singlerun
  -if
  JTAG
  -select
  USB
  -port
  2331
  -device
  MIMXRT1062xxx6A
  -speed 
  4000

upload_protocol = jlink-jtag
 
Nice work! Glad to see someone else take on the challenge, it sure is satisfying when you get it working. My setup is VSCode issuing commands to Arduino_debug.exe to build and JLink.exe to upload.

Just a warning for anyone attempting this. I'm not sure if the new bootloader firmware has made it's way on to the new teensy 4s yet but there is a chance of the Teensy not booting up when you cut off the JTAG lines from the bootloader chip. You may see the led blink twice repeatedly meaning no JTAG connection, I believe it was preventing the CPU from being powered up in my case. This caused me to replace the MKL02.
 
Thanks for the warning regarding MKL02!

I made 2 versions, one larger mod with 2 external delay-reset circuits, where the MKL02 was removed, but since my MKL02 worked without issues, I cont. to work with the simple mod.
 
Vias

Can also explain the reason I solder on vias, instead of tracks/pads:
In my experience, vias can take more force and heat than pads. I have ripped off many pads in my days doing mods, but since I started to add small wires to vias instead of pads, the soldered wire will pull loose before the vias are torn. Also, the vias will not disconnect from the FR4, like a pad, due to the heat from the soldering iron.
I have not so far ripped any vias apart.
 
Hi, I would like to wire up a Jtag interface as you have shown here but seem to be missing some information. Do you have a schematic diagram of the connections? I see several additional wires on the CPU, but it's not entirely clear what those are. Also, what are the pin connections on the Jtag connector? Which wire goes where?
Thanks for your post.
Louis
 
Remade my paint schematic

JTAG.png

To be sure, how to connect TDI and TDO, connect GND, VDD, TMS, and TCK first, then check which pin is sending data from the JTAG adapter, and from the MXRT1062. Connect the sending pin of the JTAG-adapter with the MXRT1062 reciever (not sending pin), and vice versa.
 
Thanks for your quick reply. This info is all I needed. I am looking forward to having a better debug tool using this.
I will post a note on how that goes when I get it up and going.
Thanks again. It's most appreciated.
Louis
 
JTAG in flash boot mode

Spencez, when I use JTAG, I need to press the program button first for J-Link Commander to connect, otherwise i get a
"Invalid implemeter code read from CPUIDVal[31:24] = 0xFF" error


​Do you have the same issue, and if so, have you figured out why?

EDIT: Ohh google knows. Do not use __WFI(); (wait for interupt) in your code together with J-Link in JTAG mode. J-link will not find your device in wait mode.
 
Last edited:
Serial Wire Debug

It is possible to switch to SWD again by writing

OCOTP->CFG5 = 0x18 in your C code;

That is BootConfig5 shadow register, where bit 19 sets SWD or JTAG.


or if you want to do it in J-Link commander over JTAG, you can run this (Enable_SWO.jlink) commander script


Device MIMXRT1062XXX6A
SelectInterface JTAG
Speed 4000
JTAGConf -1,-1
connect
write4 0x401f4460 0x18
SelectInterface SWD

You can run the script like this in Windows

:> "J-Link Commander V7.62a.lnk" -CommanderScript C:\tmp\Enable_SWO.jlink


Connecting to target via SWD
InitTarget() start
InitTarget() end
Found SW-DP with ID 0x0BD11477
DPv0 detected
CoreSight SoC-400 or earlier
AP map detection skipped. Manually configured AP map found.
AP[0]: AHB-AP (IDR: Not set)
AP[0]: Core found
AP[0]: AHB-AP ROM base: 0xE00FD000
CPUID register: 0x411FC271. Implementer code: 0x41 (ARM)
Found Cortex-M7 r1p1, Little endian.
FPUnit: 8 code (BP) slots and 0 literal slots
CoreSight components:
ROMTbl[0] @ E00FD000
[0][0]: E00FE000 CID B105100D PID 000BB4C8 ROM Table
ROMTbl[1] @ E00FE000
[1][0]: E00FF000 CID B105100D PID 000BB4C7 ROM Table
ROMTbl[2] @ E00FF000
[2][0]: E000E000 CID B105E00D PID 000BB00C SCS-M7
[2][1]: E0001000 CID B105E00D PID 000BB002 DWT
[2][2]: E0002000 CID B105E00D PID 000BB00E FPB-M7
[2][3]: E0000000 CID B105E00D PID 000BB001 ITM
[1][1]: E0041000 CID B105900D PID 001BB975 ETM-M7
[1][2]: E0042000 CID B105900D PID 004BB906 CTI
[0][1]: E0040000 CID B105900D PID 000BB9A9 TPIU-M7
[0][2]: E0043000 CID B105F00D PID 001BB101 TSG
Cache: Separate I- and D-cache.
I-Cache L1: 32 KB, 512 Sets, 32 Bytes/Line, 2-Way
D-Cache L1: 32 KB, 256 Sets, 32 Bytes/Line, 4-Way
Cortex-M7 identified.
 
JTAG instrumentation - FreeMaster

Verifying that NXP FreeMaster works with Teensy 4.1

FreeMaster.png
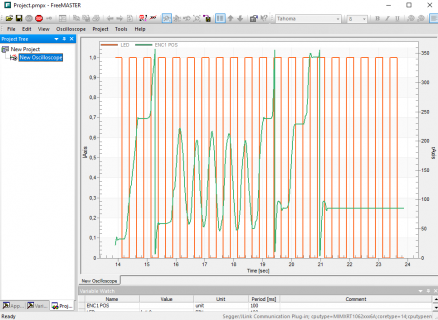
Example showing the live status of my blinking LED, and the angle position [deg] of a rotary encoder, that I'm turning.

Using JTAG instrumentation, no extra code is needed on the device. I seem to be able to access all peripheral + SRAM :D

Makes peripheral debugging much easier, without any extra coding.

https://www.nxp.com/video/freemaster-debug-monitor-and-data-visualization-tool:FREEMASTER-VID
 
It is possible to switch to SWD again by writing

Hmm, but it's only possible when start with JTAG. As far as I know Paul did burn the flag to disable SWD, right? So it seemes to be inpossible to start with SWD after reset.
 
Last edited:
Remade my paint schematic

View attachment 27843

To be sure, how to connect TDI and TDO, connect GND, VDD, TMS, and TCK first, then check which pin is sending data from the JTAG adapter, and from the MXRT1062. Connect the sending pin of the JTAG-adapter with the MXRT1062 reciever (not sending pin), and vice versa.

According to this idea, maybe you can omit the separation to the MKL02. It would be worth a try to connect PTA1 to ground without any trace disconnection. As long as the MKL02 is held in reset, all ports are inputs. The same as for the EMC_01 pin on the RT1062 wich is an input per default. But I did not test that yet.

Another hint, the pin AD_B0_04 [F11] is the BOOT_MODE0 input which shoud be at GND to boot from Fuses, or rather not from serial.
Boot_Modes.png
 
Last edited:
Thanks for the great job done. I am trying to replicate what you did here on a Teensy 4.1 with MIMXRT1062xxxxB onboard. I did the modification and I am using a J-Link EDU mini: it connect fine wit J-Flash, but I cannot erase the device since the EDU is not licensed for J-Flash (I guess according the message error I got). Therfore I tried with MCU Xpresso, but even here I couldn't debug: "The error message says that the selected device is unkown to the Jlink software I am using (7.66b)> Anyone can help on this?
 
Resolved! I have had a conflict with two Segger J-link SW version installed. I confirm that I can program and debug even with my EDU mini Jlink.
Thanks
 
Paul, could you share details (or a schematic) regarding how the GD32E230F8 pins on the Teensy 4.1 correspond with the older revision's MKL02 pins? Wanting to set up a similar mod for debugging, and I suppose I could desolder the the chips to test the connections, but I'd like to avoid sacrificing one of my Teensys :p. Thanks in advance!
 
Thanks Paul! Also, regarding the MicroMod now, does the MKL02 there use the same pins as on the (first couple revisions of) Teensy 4.1? I presume it does (so the Teensy 4.1 and the MicroMod could utilize identical firmware for the MKL02, easing production of both boards), but wanted to double check. I'd like to perform similar modifications there as well :)
 
jtag mod and openocd

I have what I think is a successfully modded 4.1. I am attempting to get it working with a cheap cmsis-dap daplink clone probe using openocd. I have the basic config done and I am talking to the target via the probe.

HTML:
roger@dragon:~/openocd$ openocd -f cmsis-dap.cfg -d3
Open On-Chip Debugger 0.11.0
Licensed under GNU GPL v2
For bug reports, read
        http://openocd.org/doc/doxygen/bugs.html
User : 13 0 options.c:63 configuration_output_handler(): debug_level: 3
User : 14 0 options.c:63 configuration_output_handler():
Debug: 15 0 options.c:244 add_default_dirs(): bindir=/usr/bin
Debug: 16 0 options.c:245 add_default_dirs(): pkgdatadir=/usr/share/openocd
Debug: 17 0 options.c:246 add_default_dirs(): exepath=/usr/bin
Debug: 18 0 options.c:247 add_default_dirs(): bin2data=../share/openocd
Debug: 19 0 configuration.c:42 add_script_search_dir(): adding /home/roger/.config/openocd
Debug: 20 0 configuration.c:42 add_script_search_dir(): adding /home/roger/.openocd
Debug: 21 0 configuration.c:42 add_script_search_dir(): adding /usr/bin/../share/openocd/site
Debug: 22 0 configuration.c:42 add_script_search_dir(): adding /usr/bin/../share/openocd/scripts
Debug: 23 0 configuration.c:97 find_file(): found cmsis-dap.cfg
Debug: 24 0 command.c:146 script_debug(): command - adapter driver cmsis-dap
Debug: 26 0 command.c:146 script_debug(): command - cmsis_dap_vid_pid 0xc251 0xf001
Debug: 28 0 command.c:146 script_debug(): command - cmsis_dap_backend hid
Debug: 30 0 command.c:146 script_debug(): command - adapter speed 500
Debug: 32 0 core.c:1822 jtag_config_khz(): handle jtag khz
Debug: 33 0 core.c:1785 adapter_khz_to_speed(): convert khz to interface specific speed value
Debug: 34 0 core.c:1785 adapter_khz_to_speed(): convert khz to interface specific speed value
Debug: 35 0 command.c:146 script_debug(): command - transport select jtag
User : 36 0 options.c:63 configuration_output_handler(): jtagUser : 37 0 options.c:63 configuration_output_handler():
Info : 38 0 server.c:311 add_service(): Listening on port 6666 for tcl connections
Info : 39 0 server.c:311 add_service(): Listening on port 4444 for telnet connections
Debug: 40 0 command.c:146 script_debug(): command - init
Debug: 42 0 command.c:146 script_debug(): command - target init
Debug: 44 0 command.c:146 script_debug(): command - target names
Debug: 45 0 target.c:1639 handle_target_init_command(): Initializing targets...
Info : 46 63 cmsis_dap.c:788 cmsis_dap_get_caps_info(): CMSIS-DAP: SWD  Supported
Info : 47 63 cmsis_dap.c:790 cmsis_dap_get_caps_info(): CMSIS-DAP: JTAG Supported
Info : 48 64 cmsis_dap.c:768 cmsis_dap_get_version_info(): CMSIS-DAP: FW Version = 2.0.0
Info : 49 113 cmsis_dap.c:921 cmsis_dap_init(): CMSIS-DAP: Interface Initialised (JTAG)
Debug: 50 114 cmsis_dap.c:953 cmsis_dap_init(): CMSIS-DAP: Packet Size = 64
Debug: 51 115 cmsis_dap.c:966 cmsis_dap_init(): CMSIS-DAP: Packet Count = 64
Debug: 52 115 cmsis_dap.c:969 cmsis_dap_init(): Allocating FIFO for 3 pending packets
Info : 53 116 cmsis_dap.c:803 cmsis_dap_get_status(): SWCLK/TCK = 1 SWDIO/TMS = 1 TDI = 1 TDO = 0 nTRST = 0 nRESET = 1
Info : 54 120 cmsis_dap.c:1023 cmsis_dap_init(): CMSIS-DAP: Interface ready
Debug: 55 120 core.c:1785 adapter_khz_to_speed(): convert khz to interface specific speed value
Debug: 56 120 core.c:1789 adapter_khz_to_speed(): have interface set up
Debug: 57 121 core.c:1785 adapter_khz_to_speed(): convert khz to interface specific speed value
Debug: 58 121 core.c:1789 adapter_khz_to_speed(): have interface set up
Info : 59 121 core.c:1565 adapter_init(): clock speed 500 kHz
Debug: 60 121 openocd.c:143 handle_init_command(): Debug Adapter init complete
Debug: 61 121 command.c:146 script_debug(): command - transport init
Debug: 63 121 transport.c:229 handle_transport_init(): handle_transport_init
Debug: 64 124 core.c:830 jtag_add_reset(): SRST line released
Debug: 65 124 core.c:855 jtag_add_reset(): TRST line released
Debug: 66 124 core.c:327 jtag_call_event_callbacks(): jtag event: TAP reset
Debug: 67 124 command.c:146 script_debug(): command - jtag arp_init
Debug: 68 124 core.c:1578 jtag_init_inner(): Init JTAG chain
Warn : 69 124 core.c:1593 jtag_init_inner(): There are no enabled taps.  AUTO PROBING MIGHT NOT WORK!!
Debug: 70 124 core.c:327 jtag_call_event_callbacks(): jtag event: TAP reset
Info : 71 124 cmsis_dap.c:1076 cmsis_dap_execute_tlr_reset(): cmsis-dap JTAG TLR_RESET
Debug: 72 126 core.c:1243 jtag_examine_chain(): DR scan interrogation for IDCODE/BYPASS
Debug: 73 126 core.c:327 jtag_call_event_callbacks(): jtag event: TAP reset
Info : 74 132 cmsis_dap.c:1076 cmsis_dap_execute_tlr_reset(): cmsis-dap JTAG TLR_RESET
Error: 75 134 core.c:1131 jtag_examine_chain_check(): JTAG scan chain interrogation failed: all zeroes
Error: 76 134 core.c:1133 jtag_examine_chain_check(): Check JTAG interface, timings, target power, etc.
Error: 77 134 core.c:1623 jtag_init_inner(): Trying to use configured scan chain anyway...
Debug: 78 134 core.c:1374 jtag_validate_ircapture(): IR capture validation scan
Error: 79 136 core.c:1441 jtag_validate_ircapture(): IR capture error at bit 0, saw 0x00 not 0x...3
Debug: 80 136 core.c:327 jtag_call_event_callbacks(): jtag event: TAP reset
Info : 81 136 cmsis_dap.c:1076 cmsis_dap_execute_tlr_reset(): cmsis-dap JTAG TLR_RESET
Warn : 82 138 core.c:1646 jtag_init_inner(): Bypassing JTAG setup events due to errors
Debug: 83 138 command.c:146 script_debug(): command - dap init
Debug: 85 138 arm_dap.c:106 dap_init_all(): Initializing all DAPs ...
Debug: 86 138 openocd.c:160 handle_init_command(): Examining targets...
Debug: 87 138 command.c:146 script_debug(): command - flash init
Debug: 89 138 tcl.c:1385 handle_flash_init_command(): Initializing flash devices...
Debug: 90 138 command.c:146 script_debug(): command - nand init
Debug: 92 138 tcl.c:498 handle_nand_init_command(): Initializing NAND devices...
Debug: 93 138 command.c:146 script_debug(): command - pld init
Debug: 95 138 pld.c:206 handle_pld_init_command(): Initializing PLDs...
Warn : 96 138 gdb_server.c:3585 gdb_target_add_all(): gdb services need one or more targets defined

The openocd config is

HTML:
adapter driver cmsis-dap

# Optionally specify the serial number of CMSIS-DAP usb device.
#cmsis_dap_serial 02200201E6661E601B98E3B9

cmsis_dap_vid_pid 0xc251 0xf001
cmsis_dap_backend hid
adapter speed 500
transport select jtag

Even to get this far with openocd has been a steep learning curve. Has anyone got any example openocd target config for the teensy 4.1 mimxrt1062, or any other tips?

Thanks,

Roger
 
I verified that JTAG worked in VSC & platformIO, meaning I can use the Teensy Arduino framework with JTAG.

A working platformio.ini shown below (for Segger JLINK)

Code:
[env:teensy41]
platform = teensy
board = teensy41
framework = arduino
debug_tool = jlink
debug_port = :2331
; JTAG interface

debug_server =
  {FULL PATH HERE}.platformio\packages\tool-jlink\JLinkGDBServerCL.exe
  -singlerun
  -if
  JTAG
  -select
  USB
  -port
  2331
  -device
  MIMXRT1062xxx6A
  -speed 
  4000

upload_protocol = jlink-jtag

Is it possible to use JTAG to program a blank iMXRT1062 MCU?
 
Check out this thread about the location of the JTAG signals, and some other important details you will need to consider.
This overall strategy towards hardware debug isn't really working any more, at least for me: Teensy ≥ 3 clones always could have had significantly more functionality than authentic devices, and similar non-crippled devices from US vendors were starting to be competitive at the end of the 3.x era. At the scale of the 4.0/4.1, hardware debugging significantly improves productivity for most engineers.

We know why the secondary chip has to be there. But JTAG and SWD being taken out as collateral damage is only going to be a greater and greater cost to customers, many of whom would find a SWD-only clone or similar hardware of greater value than an authentic device. I think we would all be better off if that doesn't happen, and bringing out a usable hardware debug interface to *pins* — even an interface with wonky signal characteristics and protocols like "first /RESET then switch out of JTAG mode three times" — would keep people from looking (and designing) elsewhere. I worry that as a far-more-than-competent C programmer and overall debugger, you unknowingly value this feature less than many of your customers would.

The day I can order a future 4.x with pins, and get a device which could be hardware-debugged, I'll write and attempt to upstream any OpenOCD code necessary. (Offer void for pad-only signals.)
 
Back
Top