Question | Teensy 4.1 | Direct port I/O programming

Axelman8

Member
Hey there,

I have a working solution with an Arduino Due, where I am writing directly to the GPIO ports instead of using digitalWrite(); .

For basic usage, you would use REG_PIO?_SODR to set output lines high and REG_PIO?_CODR to set them low.
For example
REG_PIOC_SODR = 0x00000002 would set bit 1 (numbered from zero) on PORTC (this is Due digital pin 33) high. All other pins on PORTC remain unchanged.
REG_POIC_CODR = 0x00000002 would set bit 1 on PORTC low. Again all other pins would be unchanged.

With this code, my program is running much faster.


The question is:
Will this pin I/O option work for the Teensy 4.1 or is there a better solution for the teensy to LOW / HIGH pins?


Here is an example for the scema that im using with the Due:
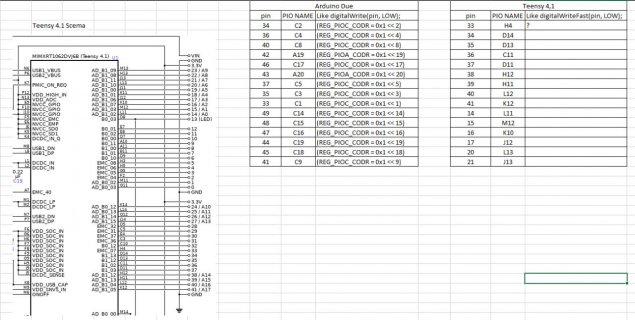
Teensy 4.1 io pin Due comparison.jpg


Thank you in advance

Cheers
 
Yes, there is a better way.

On Teensy you can use digitalWriteFast(). If the pin number is a constant, it compiles to fastest possible direct register access. You really only need to use to use the registers if you’ll access all 32 bits at once.
 
Following on to what Paul mentioned.

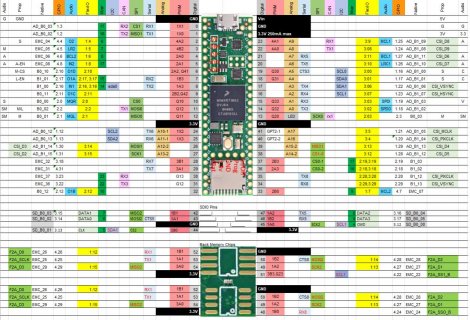
Yes the Teensy IO pins are on GPIO ports: I often refer to my own cheat sheets on what port/pin each one is on
Like:
Screenshot.jpg

Note my documents show the GPIO ports as 1-4 which is standard mode, however they are switched to fast mode which is 6-9 (1->6)

If you have not already downloaded the Reference manual for processor, you can from the website: https://www.pjrc.com/store/teensy41.html#tech\
If you look at chapter 12 you will see there are registers to set, clear, toggle pins in a port (DR_SET, DR_CLEAR, DR_TOGGLE)

Note for the simple cases like Paul mentioned, like digitalWriteFast(13, HIGH) will convert into one instruction using DR_SET on the specific port/pin
 
Hey there PaulStoffregen and KurtE,

Thank you very much for the reply's.

Yes the pin numbers are contant so the digitalWritFast() could be the easiest solution, but I am looking for the solution that will make the Teensy run my code as fast as possible. The code is handling Sysex messages between machine and peddleboard that is updating 15 TFT screens, that are responding by button clicks.
I am new to the Teensy platform and have never used it before. I have just implemented the digitalWriteFast() in my program code, so I will start using that and see the result.

The registers toggle is new to me. Thank you very much for pointing that out KurtE, I will download and read the chapter 12 about it...

There is a bunch to learn and explore. So cool to find new solutions to get a program running on the best possible way on new hardware. Hope the T4.1 is more productive than the Arduino Due. Have no complains about the Due, but hope to level up on performance with the Teensy and learning bunch of new stuff.


Cheers
 
Bear in mind that the Arduino Due runs at 84Mhz, while the Teensy 4.1 typically runs at 600Mhz, but I would imagine that setting external pins may run at a slower bus rate.
 
Hey there @PaulStoffregen, KurtE

1st: I got the digitalWriteFast() implemented and the Teensy accepted my arduino based program. I am checking the program with the serial monitor and it boots up correctly and is working very fast that is a big plus for the Teensy.

I added a ST7735 TFT to the Teensy and it shows the correct information for that screen connected to the CS of that screen. (In my project I have 15 screens all showing diffrent information on diffrent CS(1-15)numbers).

1 Big Issue:
When I disconnect the Teensy from the computer and hook it up to a USB power supply, the Teensy is booting, but will not run the program and show the information on de TFT.
When I connect the Teensy to the computer it wont boot the screen, BUT when I start the serial monitor, everything is working correctly.

How can I make the teensy run the program when on external power?
I found this thread, but the solution that Paul Stoffregen gave there to pinMode(13, output); didnt work: https://forums.adafruit.com/viewtopic.php?t=172466


Hope the solution is out there,

Thank you in advance


Cheers
 
Oh wow, you people are good..... I just found the solution to ^^^^^ Its working now on external USB power.

My program contains the folowing code: (Its needed for the arduino Due)
Code:
  while (!Serial);
  Serial.begin(9600);
  Serial.flush();

I deleted this from my program and it works perfectly.

Thanks again
cheers
 
Better to put
Code:
Serial.begin(9600);
while (!Serial && millis()<5000){}
This means that the while loop will wait for 5 seconds, and then continue if it does not find Serial.
You could probably use a smaller number than the 5000 (5000 = 5 seconds).
 
Better to put
Code:
Serial.begin(9600);
while (!Serial && millis()<5000){}
This means that the while loop will wait for 5 seconds, and then continue if it does not find Serial.
You could probably use a smaller number than the 5000 (5000 = 5 seconds).

Hey there

Thank you for the reply. I took out this line of code and everything is working as expected, even the serial monitor works if I start it from Arduino IDE. If it ever will give problems, your option is my first edit to the program.

Cheers
 
Back
Top