teensy security sketch... merging into 1 sketch possible?

donperryjm

Well-known member
I've used the teensy security menu in arduino to write the sketch in the order they appear, successfully.
I have those hex files (fuse sketch and lock sketch bin files) that i write to the teensy.

Is it possible to merge both sketches into 1 hex write fuse and lock in 1 go?
 
Possible, yes. Recommended, certainly not. If you remove the safety checks from the final step and go into locked mode without your key properly written, the hardware can become forever bricked.
 
OK. I was thinking of leaving the safety checks in place with the LED blinking to indicate failure,
if failure then the rest of code (locking) would be ignored?

I'm too scared to even write this though lol.
 
I do not recommend altering the 3 Teensy code security programs.

To save time, step #2 which just verifies encryption is working can be skipped.

If you're manufacturing hundreds or even thousands of a commercial product which embeds Lockable Teensy, my main recommendation would be to leverage Teensy Loader's auto mode. For high volume, you might even set up an assembly line 3 computers, the first with the fusewrite HEX file loaded, and the 2nd with the final secure lock HEX file, and the 3rd with your EHEX file. But that's probably overkill for most applications.

With the fusewrite HEX in auto mode, plug each Teensy into PC and press its button. The process takes only a few seconds per Teensy. Then do the same with the security lock sketch, and again with your EHEX. Yes, it's 3 steps. But each step is only seconds. Even if even if you spend 15 seconds picking each Teensy up and setting it back down, repeated 3 times, a single worker can program over 500 per 8 hour shift. Optimizing how you handle the materials to minimize the time between each Teensy actually plugged into the USB cable and being programmed is where you'll realize the best improvements. If you whittle down the handling time, you can get through thousands per day per worker.

After 14 years of manufacturing Teensy, where each one is final tested by plugging into a USB cable, I can say with confidence the human handling time between each button press remains the pace setting factor. It's easy to get too focused on the tech stuff, but the mundane aspects of manufacturing and handling materials are what really matters.

Also keep in mind USB Micro-B cables are rated for 5000 insertions. As you scale up, a system to periodically replace the USB cables before they wear out saves a lot of frustration. They almost never clearly fail, but instead become flaky & inconsistent.
 
After 14 years of manufacturing Teensy, where each one is final tested by plugging into a USB cable, I can say with confidence the human handling time between each button press remains the pace setting factor. It's easy to get too focused on the tech stuff, but the mundane aspects of manufacturing and handling materials are what really matters.

Wow, didn't realize it has been so long! Congrats! And thanks you!
 
I do not recommend altering the 3 Teensy code security programs.

To save time, step #2 which just verifies encryption is working can be skipped.

If you're manufacturing hundreds or even thousands of a commercial product which embeds Lockable Teensy, my main recommendation would be to leverage Teensy Loader's auto mode. For high volume, you might even set up an assembly line 3 computers, the first with the fusewrite HEX file loaded, and the 2nd with the final secure lock HEX file, and the 3rd with your EHEX file. But that's probably overkill for most applications.

With the fusewrite HEX in auto mode, plug each Teensy into PC and press its button. The process takes only a few seconds per Teensy. Then do the same with the security lock sketch, and again with your EHEX. Yes, it's 3 steps. But each step is only seconds. Even if even if you spend 15 seconds picking each Teensy up and setting it back down, repeated 3 times, a single worker can program over 500 per 8 hour shift. Optimizing how you handle the materials to minimize the time between each Teensy actually plugged into the USB cable and being programmed is where you'll realize the best improvements. If you whittle down the handling time, you can get through thousands per day per worker.

After 14 years of manufacturing Teensy, where each one is final tested by plugging into a USB cable, I can say with confidence the human handling time between each button press remains the pace setting factor. It's easy to get too focused on the tech stuff, but the mundane aspects of manufacturing and handling materials are what really matters.

Also keep in mind USB Micro-B cables are rated for 5000 insertions. As you scale up, a system to periodically replace the USB cables before they wear out saves a lot of frustration. They almost never clearly fail, but instead become flaky & inconsistent.

I have a device with a touch screen. It would be super smooth to have one sketch and then just buttons on the screen to apply each step, or even just one button that runs all 3 of them.
The issue I come across is ofc the memory address checks, they don't match if you alter the sketch.

So my question @paulstoffregen is, how can those addresses be changed, or rather, how do I check which addresses to add?
Or is this completely stupid and I should not continue? :)
 
You shouldn't be using the buttons to load the encryption sketches...
This step should be done at your factory.

For update in the field, you don't need the button at all. Just the teensy loader with file loaded, and then execute teensy reboot.exe. IT will load the file right up. THat's how my customers currently do it.

I do wish that process was a little smoother though.
 
A upload isn't feasible. Brand new hardware doesn't have your key until after you've run step #1. While you could reduce the number of steps, the shortest (but perhaps risky) possible path would involve at least 1 .HEX upload to burn your key into the fuse memory, and then a second .EHEX upload to do the rest and then run your application.


or even just one button that runs all 3 of them.

The 3 step process (which is 4 uploads if you count uploading your actual application code after doing the 3 steps) is designed with many checks to detect if anything goes wrong.

If something goes wrong in the earlier parts and you execute the final part of step #3, your Teensy can become permanently bricked. Be careful. Or buy enough spare "learning experience" boards! FWIW, standard Teensy is designed the way it is so messing with the fuses can't permanently brick the hardware. Lockable Teensy is a separate product because the ability to permanently lock secure mode means you can brick it or get forever locked out of updates if you lose you key.pem file.

If you try to bring the code from step #2 and #3 into your own application, which it would do the first time it runs and hopefully on every future run detect that the process was already completed and skip it, you need to be very careful about the final security lock step. If your key isn't written properly or if the key which got written into fuses isn't a match to the one used to create your EHEX file, there is no way to recover after you've permanently set secure mode. Your Teensy will forever only be able to run EHEX files which match the key which step #1 burned into the fuses.


The issue I come across is ofc the memory address checks, they don't match if you alter the sketch.

So my question @paulstoffregen is, how can those addresses be changed, or rather, how do I check which addresses to add?

I don't understand your question.
 
A upload isn't feasible. Brand new hardware doesn't have your key until after you've run step #1. While you could reduce the number of steps, the shortest (but perhaps risky) possible path would involve at least 1 .HEX upload to burn your key into the fuse memory, and then a second .EHEX upload to do the rest and then run your application.


The 3 step process (which is 4 uploads if you count uploading your actual application code after doing the 3 steps) is designed with many checks to detect if anything goes wrong.

If something goes wrong in the earlier parts and you execute the final part of step #3, your Teensy can become permanently bricked. Be careful. Or buy enough spare "learning experience" boards! FWIW, standard Teensy is designed the way it is so messing with the fuses can't permanently brick the hardware. Lockable Teensy is a separate product because the ability to permanently lock secure mode means you can brick it or get forever locked out of updates if you lose you key.pem file.

If you try to bring the code from step #2 and #3 into your own application, which it would do the first time it runs and hopefully on every future run detect that the process was already completed and skip it, you need to be very careful about the final security lock step. If your key isn't written properly or if the key which got written into fuses isn't a match to the one used to create your EHEX file, there is no way to recover after you've permanently set secure mode. Your Teensy will forever only be able to run EHEX files which match the key which step #1 burned into the fuses.


I don't understand your question.

I am aware of the risks, I will try to make Write and Verify into one sketch. And then Locking (last step) to be a part of the production firmware. I will do this with external EEPROM that is set by the first sketch Verify, if successful. Many thanks!
 
Combining step #1 with step #2 (or any other steps) probably isn't feasible. Tried to explain this in msg #8. Here goes again...

Your very first upload can't be .EHEX, because the brand new hardware does not yet have your key. First upload which writes the key has to be .HEX.

The next step to verify if decryption really is working is only possible if you uploaded .EHEX. If you upload .HEX (when you have both Teensy Loader automatically uploads EHEX if it can work but falls back to HEX if not), all the code in flash memory is original plaintext. It's not encrypted at all. Hopefully it's obvious that to verify whether decryption works to need to have encrypted code in memory to be decrypted.

Likewise for the authentication test done as the final check in step #3, it can't possible pass if the code uploaded was .HEX. Only .EHEX has the stuff that final check tests.

Sorry, I overlooked that. I did read it tho.
It should be possible to run #1, then combine 2 and #3, but obviously not remove any of the checks. It’s super important to make it fool proof.

Thanks for your patience with explaining.
 
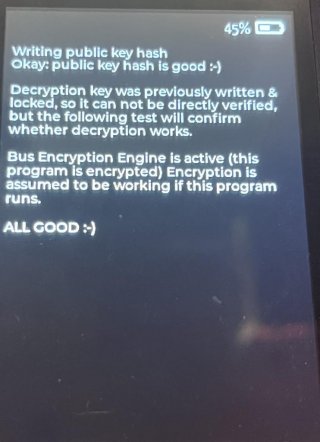
Just wanted to drop this here. Thanks for the inputs Paul. This code will write the key to the device. Second firmware I’m gonna make will verify and lock it in. Simply using the Teensy Security sketches without removing any checks.

AF1DF1D0-29F2-4D72-B6AD-B1D73D4A5890.jpg
 
Back
Top