teensyduino midi sync

Status
Not open for further replies.
I have a syncing device project for midi and gates, I have achieved thanks to little scale to sync the gate of my synth but now I would like to sync a midi device too and I am really not confortable with midi. Does anyone know a way or where I could investigate to be able to transmit the midi clock (the byte that say 248?) or other elements from the usb midi signal to the tx pins, the more tx pins the merrier :)
Thanks a lot.
 
Ok, I am not understanding the code... I don't know what do what... I keep on looking for a solution to transmit the clock from midi din to midi usb and in the other way...
 
Are you looking to use a MIDI DIN connector? There is code at the bottom of this page: http://orchardelica.com/wp/?page_id=558 and an explanation.
You can change the standard code and use Serial1 rx tx as the input pins. Hooking up the Midi connector to the Teensy3 Serial1 pins really requires the signal to be sent through an opto-isolator to protect the Teensy circuitry.

Once you have the midi code coming from the DIN into serial, you can spit it out to the usb via some serial write.
 
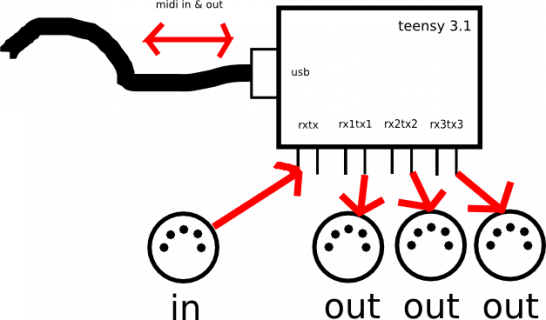
I would like to do this :
mid.png
 
I want to send the midi clock to the ouputs and to the usb midi connexion. Maybe if that works, I could add a switch to change if the clock come from usb or midi din input.
 
Ah, to send a shared clock, maybe it would be as simple as setting up one midi out on serial1 as shown here: https://www.pjrc.com/teensy/td_libs_MIDI.html but then splitting the connection from tx pin (pin 1) to multiple midi din connectors?
Hook up the Midi din connector transmit pin to rx pin of teensy (pin 0), and the midi out connectors to the teensy tx pin. Both in and out use the same rxtx set, not separate serials.

I don't think that you can have four serials as you have described in your diagram. Accessing the rx tx pins, you need to use serial1, serial2 and serial3 commands. Serial1 is for TX1/RX1, Serial2 handles TX2/RX2 and Serial3 is for TX3 and RX3. I believe that there are only three, but i did read that you can set alternative pins for rx and tx somewhere on the forum, using CORE_PIN0_CONFIG = 0; and CORE_PIN1_CONFIG = 0;.
 
I can live with only one midi out diplicated. For now I am just trying to blink an led. I managed to do it from the usbmidi setting the teensy as an usb device but I can't do it from the rx pin connected to the midi input. I was wondering how hard it would be to do it without the midi libraries using only serial.read() and serial.write() or other command that I don't know yet :) as it should only be a transmission of data from one port to another.
 
Have you tried printing what is received on the midi in pin to the serial monitor to see what if anything is coming in via the midi in? Maybe post the code you are currently playing with.
 
I have tryed a lot of codes, one that worked and other that didn't. I can't continue for today but I'll keep going tomorrow and keep you informed
 
Ok, so I have managed to make it work with midi notes over usb. Apparently the usbmidi library of the teensy doesn't handle the midi clock. I have a code that make the led and another pin blink from a midi note sequence. How could I send to one of the serial outputs the midi clock signal? Can I send it to all of the serial outputs? can I chose the midi channel it sends? I have read that the expected byte is 0xF8 or (decimal) 248. I don't really understand how the serial commands can send it properly.
I want to sync midi din devices or really archaic midi to trig adapter.
thanks a lot.
 
I have tried to send the 248 number with :

(...)
Serial2.begin(31250);
(...)
void loop(){
Serial2.write(248);
}
(...)

but it doesn't work. I have a square wave on the oscilloscope out of the serial port but it seems that it's not the expected midi clock...
 
here is the best code I had, maybe it's not much for you but for me it's already enough trouble....

Code:
#define ledPin 13
byte midi_clock = 0xF8;
byte midi_start = 0xFA;
byte data;

void OnNoteOn(byte channel, byte note, byte velocity)
{
  digitalWrite(ledPin, HIGH);
  
}

void OnNoteOff(byte channel, byte note, byte velocity)
{
  digitalWrite(ledPin, LOW);
}


void setup()
{
  pinMode(ledPin, OUTPUT);
  usbMIDI.setHandleNoteOff(OnNoteOff);
  usbMIDI.setHandleNoteOn(OnNoteOn) ;
  digitalWrite(ledPin, HIGH);
  delay(1000);
  digitalWrite(ledPin, LOW);
  delay(1000);
Serial2.begin(31250);

}

void loop()
{
  usbMIDI.read();
  Serial2.write(midi_start);
  Serial2.write(midi_clock);
  
}
 
@did, I am not near my setup today, I will have a look tomorrow. I think that it is the MIDI library rather than the usb MIDI library you need

EDIT - nope, it can be done with usbMidi lib - see below
 
Last edited:
I have read some documentation about the midi libraries but I don't understand everything. Anyways, I need the usbMidi library because I need to communicate with my computer. I would like to be able to send or receive the midi clock from the computer to hardware and in the other way. It would be a plus if I could also transmit notes but I have to admit that I haven't tried, the devices I try to sync are not generating notes from a midi command. If you have an idea, tell me :)
 
I now see your issue a bit more clearly, because I had not been using DIN to send, just receive, I had not thought about the clock element. Anyhow, I followed the instructions at little scale for accessing the clock time as it works well, I sent a clock message from Ableton to the Teensy LED no problem, changing the flashing rate by changing the ableton live bpm. You can access the functions if you follow this: http://little-scale.blogspot.co.uk/2011/08/how-to-deal-with-real-time-midi-beat.html

I will have a look further at the output to MIDI Din and wiring.
 
OK, so the following works, it send a usbmidi clock signal via MIDI DIN connector to run the clock of a midi device. After you have changed your usb midi files as described in the little scale blog at the link above, you just need to change the teensy code to include a serial1 write:
Code:
byte counter; 
byte CLOCK = 248; 
byte START = 250; 
byte CONTINUE = 251; 
byte STOP = 252; 

void setup() { 
Serial.begin(31250); 
Serial1.begin(31250);
pinMode(13, OUTPUT); 
digitalWrite(13, HIGH); 
usbMIDI.setHandleRealTimeSystem(RealTimeSystem); 
} 


void loop() { 
usbMIDI.read(); 

} 

void RealTimeSystem(byte realtimebyte) { 
if(realtimebyte == 248) { 
  Serial1.write(248);
counter++; 
if(counter == 24) { 
counter = 0; 
digitalWrite(13, HIGH);
} 

if(counter == 12) { 
digitalWrite(13, LOW);
} 
} 

if(realtimebyte == START || realtimebyte == CONTINUE) { 
counter = 0; 
digitalWrite(13, HIGH); 
} 

if(realtimebyte == STOP) { 
digitalWrite(13, LOW); 
} 

}

This will send a midi clock signal to the tx pin of the serial1, which is pin1. You connect up your DIN cable with two 220ohm resistors as described in Pauls Teensy midi page. Here is a video of ableton live driving the teensy via usbmidi, and the teensy sending this clock signal to Korg Electribe:
 
Last edited:
I would like to do this :
View attachment 5457
regarding your setup, yes you can send the clock out signal to serial1 2 and 3 by using the serial.write function, just include the serialX.begin in the setup:

void setup() {
Serial.begin(31250);
Serial1.begin(31250);
Serial2.begin(31250);
Serial3.begin(31250);
pinMode(13, OUTPUT);
digitalWrite(13, HIGH);
usbMIDI.setHandleRealTimeSystem(RealTimeSystem);
}

void loop() {
usbMIDI.read();
}

void RealTimeSystem(byte realtimebyte) {
if(realtimebyte == 248) {
Serial1.write(248);//pin1 =transmit
Serial2.write(248);//pin10 =transmit
Serial3.write(248);// pin8 =transmit
 
Last edited:
Thanks a lot. I don't know why I didn't try this one. I tried quite a lot of codes. Anyways, it worked. I can sync devices. Now I guess I need to learn more about the midi protocol. I need to control a sampler and the clock is the only thing that works for now, it's fantastic, but the start/continue/stop commands are not recognised by the sampler. I send my midi commands from Puredata. I'll try again soon. I would like to add a sync24 output. If I manage to do that I'll post it here.
 
Status
Not open for further replies.
Back
Top