Cant catch a break using SD card / teensy 4.0

owhite

Active member
Folks,

I'm on my second PCB design using an SD card with the Teensy 4.0, and I can not figure out what is wrong. A partial schematic for the PCB is this:
KK7ZkrY.png


The data sheet for the SD card is here:
https://datasheet.lcsc.com/lcsc/2112141630_SOFNG-TF-013_C444917.pdf

The complete schematic is a bit more complex and is:
yqNrSQL.png


A pdf of the schematic is here:
https://github.com/owhite/data_logger/blob/main/V1.1/data_logger.pdf

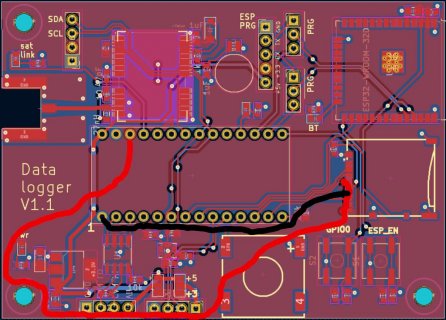
The PCB layout is here:
https://i.imgur.com/x3KWj10.png

I've been using the examples of Paul's SD programs:
https://github.com/PaulStoffregen/SD/tree/Juse_Use_SdFat/examples
The code always hangs at sections like:
Code:
 if (!card.init(SPI_HALF_SPEED, chipSelect)) {
    Serial.println("initialization failed. Things to check:");
    Serial.println("* is a card inserted?");
    Serial.println("* is your wiring correct?");
    Serial.println("* did you change the chipSelect pin to match your shield or module?");
    return;
  } else {
   Serial.println("Wiring is correct and a card is present.");
  }

CS pin is set with:
Code:
chipSelect = 10;

The SD card DOES works fine in a teensy 4.1 with:
Code:
chipSelect = BUILTIN_SDCARD;

I would really appreciate some help. I have testing equipment such as voltmeter & scope.

thanks in advance.
 
I can't help troubleshoot, but just in case this isn't clear, the T4.1 built-in SD card is not connected via SPI. It is an SDIO connection. The value of BUILTIN_SDCARD is 255 (I think) which is really just a flag to indicate to the SD library that it should initialize SdFat for SDIO rather than SPI. Can you pick a specific example program and provide the actual output?
 
If I use the code:

Code:
#include <SD.h>
#include <SPI.h>

Sd2Card card;
SdVolume volume;
SdFile root;

const int chipSelect = 10;

void setup()
{
  Serial.begin(9600);

  Serial.print("\nInitializing SD card...");

  if (!card.init(SPI_HALF_SPEED, chipSelect)) {
    Serial.println("your circuit doesnt work");
  }
  else {
   Serial.println("Wiring is correct and a card is present.");
  }
}


void loop(void) {}

I get the following result
Code:
Initializing SD card...your circuit doesnt work
 
Thanks. Would you mind trying SD\Examples\SdFatUsage? Also, what version of TeensyDuino are you using? For a while now, SD has been just a wrapper on SdFat, and that's the example that helped me understand SdFat a little better. I don't have a T4.0 with SD card, but I do have a TMM with SD that I can try tomorrow. Hopefully someone with hardware knowledge can review your schematic, too.
 
I don't think you can use any SPI pins for this, unless you know what to edit in the library. The pins are all hardcoded for the IMXRT1062 chip in the SDFat library.
If you use the recommended pins (34,35,36,37,38,39) for the SD card for Teensy 4.0, it should work ok.

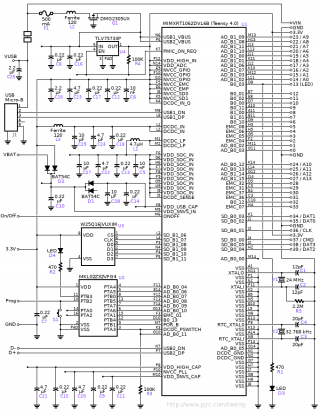
schematic40.png
 
The T_4.0 can support the SDIO access bus - but that is the bottom side [Board and Card] pads that are pins 34-35.

T_4.1 also SDIO uses same MCU 1062 pins - but diff sketch pin #'s - though not relevant to T_4.0.

For Standard SPI access with a T_4.0 it would map to those SPI pins as used on the PJRC SD pjrc.com/store/teensy3_audio.html or perhaps the older 5V capable pjrc.com/store/sd_adaptor.html
> not sure which of those is easier to follow showing pin mapping to the SD socket and what other support 'stuff' needed.
 
Looks like this really should work with SD.begin(10).

The wiring on your PCB looks correct, at least with this SD socket's unusual pinout. The only possible issue I can see is the connection for +3.3V power takes a pretty long path along the edge of the PCB and there is no power supply decoupling capacitor located close to the SD socket.

screenshot.jpg
 
Looks like this really should work with SD.begin(10).

The wiring on your PCB looks correct, at least with this SD socket's unusual pinout. The only possible issue I can see is the connection for +3.3V power takes a pretty long path along the edge of the PCB and there is no power supply decoupling capacitor located close to the SD socket.

View attachment 31835

Thank you Paul, I soldered a small decoupling cap on to 3.3v and still no joy. ¯\_(ツ)_/¯

In fairness this seems more like a PCB-design problem and not a teensy problem, so I'll try to handle it myself.
 
Thanks. Would you mind trying SD\Examples\SdFatUsage? Also, what version of TeensyDuino are you using? For a while now, SD has been just a wrapper on SdFat, and that's the example that helped me understand SdFat a little better. I don't have a T4.0 with SD card, but I do have a TMM with SD that I can try tomorrow. Hopefully someone with hardware knowledge can review your schematic, too.

Using SD\Examples\SdFatUsage with the decoupling cap that Paul suggested ( and const int chipSelect = 10; ) results in:
Code:
Initializing SD card...initialization failed!
 
Last edited:
The T_4.0 can support the SDIO access bus - but that is the bottom side [Board and Card] pads that are pins 34-35.

T_4.1 also SDIO uses same MCU 1062 pins - but diff sketch pin #'s - though not relevant to T_4.0.

For Standard SPI access with a T_4.0 it would map to those SPI pins as used on the PJRC SD pjrc.com/store/teensy3_audio.html or perhaps the older 5V capable pjrc.com/store/sd_adaptor.html
> not sure which of those is easier to follow showing pin mapping to the SD socket and what other support 'stuff' needed.

Doesnt the documentation on https://www.pjrc.com/store/teensy3_audio.html specifically show I can use pins 10-13 for a teensy 4.0?

H0EHeDN.png


and:

QAGdfHj.png
 
Last edited:
Doesnt the documentation on https://www.pjrc.com/store/teensy3_audio.html specifically show I can use pins 10-13 for a teensy 4.0?

...

Yes, that is what that shows. If wired and programmed like that used for the Audio adapter there must be "a PCB-design problem" as indicated in p#8.

Perhaps a 'breadboard', or other wiring test, using a 'spare' Micro SD adapter to match the p#10 image from PJRC could be done to make sure the pin ordering is right and take the PCB wires out of use?
 
Back
Top