TelephoneBill
Well-known member
Paul has kindly made some modifications to Teensyduino beta version (https://forum.pjrc.com/threads/2774...ns-to-support-it?p=65193&viewfull=1#post65193) which allows ARM Cortex-M4 assembly and AVR Assembly code to work directly with the Arduino 1.6.0 IDE. Load up the Arduino 1.6.0 IDE and then run this beta version of Teensyduino. You will then be ready to start coding.
You may then create separate ASM (Assembly) child functions/modules that you can call directly from the parent ".ino" sketch file. The child function/module needs to be in a simple text file with the name of "filename2.s" in the SAME FOLDER as the "filename1.ino" file. Note that it is ".s" and not ".S" as a suffix extension, and filename2 can be different to filename1. Any files created with this new name will be automatically loaded as a new tab when you open the original "filename.ino" file (or you can use the down triangle button far right to make one).
When you compile the sketch file (.ino) then the assembly file (.s) will automatically be "assembled" into machine code and linked with the main C/C++ code. In this way, you can declare a function to be "extern" in the main tab, and you can write that function wholly in assembler language in your child tab. You can then obviously use that function in your C/C++ code just as you would any other.
The advantage is that you are coding down at a low level and have complete control over the microcontroller. The disadvantages are that (i) you need to learn ARM or AVR assembler language, and (ii) you can do a lot of mischief with the processor or memory.
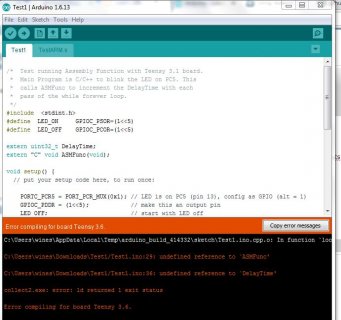
I have attached an example zip for Teensy 3.1 (ARM architecture) which contains an example project called Test1. The zip has a "Test1.ino" file and also has a ASM file called "TestARM.s". When compiled/assembled under the Arduino IDE, you can use the Teensy downloader as normal to store inside Teensy 3.1.
The example code will blink the LED but it calls an ASM function to increase the delay time between blinks (up to a short limit and then it resets). This proves that the ASM function is being called and working correctly.
If you want to learn ARM Assembly language, a good place to start is (http://thinkingeek.com/2013/01/09/arm-assembler-raspberry-pi-chapter-1/). If you want to learn AVR Assembly language a good place to start is (https://www.youtube.com/watch?v=IVy7Yiwbj-Y).
Don't ask me about Linux - I was taught Windows from being knee high and my example works well under Win7.
best of luck for those brave enough to try (it actually isn't that hard once you know a few things),
regards
TelephoneBill
You may then create separate ASM (Assembly) child functions/modules that you can call directly from the parent ".ino" sketch file. The child function/module needs to be in a simple text file with the name of "filename2.s" in the SAME FOLDER as the "filename1.ino" file. Note that it is ".s" and not ".S" as a suffix extension, and filename2 can be different to filename1. Any files created with this new name will be automatically loaded as a new tab when you open the original "filename.ino" file (or you can use the down triangle button far right to make one).
When you compile the sketch file (.ino) then the assembly file (.s) will automatically be "assembled" into machine code and linked with the main C/C++ code. In this way, you can declare a function to be "extern" in the main tab, and you can write that function wholly in assembler language in your child tab. You can then obviously use that function in your C/C++ code just as you would any other.
The advantage is that you are coding down at a low level and have complete control over the microcontroller. The disadvantages are that (i) you need to learn ARM or AVR assembler language, and (ii) you can do a lot of mischief with the processor or memory.
I have attached an example zip for Teensy 3.1 (ARM architecture) which contains an example project called Test1. The zip has a "Test1.ino" file and also has a ASM file called "TestARM.s". When compiled/assembled under the Arduino IDE, you can use the Teensy downloader as normal to store inside Teensy 3.1.
The example code will blink the LED but it calls an ASM function to increase the delay time between blinks (up to a short limit and then it resets). This proves that the ASM function is being called and working correctly.
If you want to learn ARM Assembly language, a good place to start is (http://thinkingeek.com/2013/01/09/arm-assembler-raspberry-pi-chapter-1/). If you want to learn AVR Assembly language a good place to start is (https://www.youtube.com/watch?v=IVy7Yiwbj-Y).
Don't ask me about Linux - I was taught Windows from being knee high and my example works well under Win7.
best of luck for those brave enough to try (it actually isn't that hard once you know a few things),
regards
TelephoneBill