You are using an out of date browser. It may not display this or other websites correctly.
You should upgrade or use an alternative browser.
You should upgrade or use an alternative browser.
[queued] TriantaduoWS2811, a 32-channel WS* library for Teensy 4.0 using FlexIO & DMA
- Thread starter Ward
- Start date
MaltWhiskey
Active member


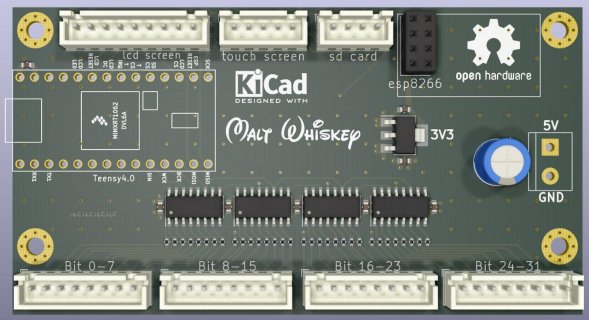
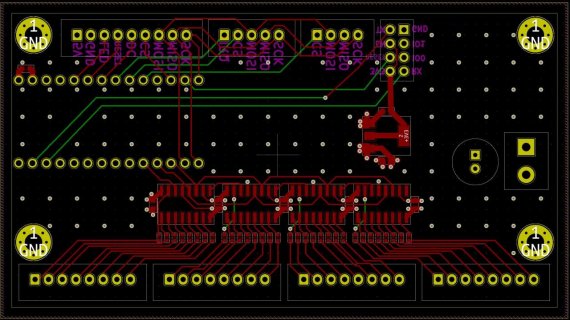
Made a new board, going to flexio2 those pins are closer. Going to test out if I get the software to work before ordering this PCB with assembly, because no way I can solder this by hand anymore....
Hopefully this board will work do the job....
Any comments on the design? I started 2 years ago with microcontrollers and electronics as a hobby and the first thing I did was explode my lights in the house, came a long way since then
Last edited:
MaltWhiskey
Active member
Quick test program cycling a rainbow using FlexIO2 pin 8,9 and 10 and 1 or 2 DMA channels depending on the LED type (PL9823 or WS2811).
I have not tested my new board design, but KiCad files are included.
https://github.com/MaltWhiskey/Mega-Cube
I have not tested my new board design, but KiCad files are included.
https://github.com/MaltWhiskey/Mega-Cube
MaltWhiskey
Active member
PCB board was delivered from China today. I can confirm it working without any glitches for PL9823 leds 128 leds/channel all 32 channels. Not tested anything else, life gets in the way....
Origional problem may have come from too long 100mhz trace, giving reflections?
Using 2 boards with connection wire instead of single pcb -> grounding issues?
74ahct959 datasheet states minimal 5.5ns for Pulse, so complete signal is minimal 11ns. Running at 102.4 MHz means 9.77ns so this is beyond datasheet, but pl9823 is slower. I noticed no problems with ws2812b, so there is some room in the 5.5ns....
I orders 5 assembled boards from jlcpcb for 17 euros (I had a discount coupon for 8$) all caps, resistors, ldo, frittered and ahct595 were included in assembly.
https://youtu.be/8qtkQFaaffg
Get the pcb if you want and the code from my github.
Can't believe there isn't any more interest in this, only 3 wires, cheap pcb with level shifter, ability to control thousands of leds..... at zero processor cycles. I think if you parallel the FlexIO to shift more than 1 bit, for example 4 bits, you can have 4x32 channels with no problem. I think 16x32 is the max for flexio2? So it's likely this can be scaled up beyond insane.... and there is also flexio1.. Flexio3 has no DMA so this is a bit useless...
Since not many responses/interest i'll leave it at this.
I registered just make this comment.
Just to let you know I am very interested! I think you have designed something very interesting. I've recently switched over to Teensy for some LED projects and this forum is absolutely one of the best I've encountered. I'm reading so much and trying to learn heaps at the moment and my list of bookmarks to return to and study in more detail grows by the day. This project is firmly on that list.
I just wanted to say that I really appreciate your work and it will I'm sure be useful to me in the future. Thank you.
Woody
Just to let you know I am very interested! I think you have designed something very interesting. I've recently switched over to Teensy for some LED projects and this forum is absolutely one of the best I've encountered. I'm reading so much and trying to learn heaps at the moment and my list of bookmarks to return to and study in more detail grows by the day. This project is firmly on that list.
I just wanted to say that I really appreciate your work and it will I'm sure be useful to me in the future.
Woody
MaltWhiskey
Active member
https://youtu.be/mgr0I7CNi-A
Well running 4096 leds, with quick and dirty code, no double buffering. Sometimes there is a dataglitch indeed on last channel (31 counted from 0) But it seems a bit random. If i turn it off and on again, somethings the glitch is gone.
I think it’s fixable. Anyway, i have also other projects to do, so i’ll fix it when i fix it
billfisher
Banned
View attachment 22734
View attachment 22735
Made a new board, going to flexio2 those pins are closer. Going to test out if I get the software to work before ordering this PCB with assembly, because no way I can solder this by hand anymore....
Hopefully this board will work do the job....
Any comments on the design? I started 2 years ago with microcontrollers and electronics as a hobby and the first thing I did was explode my lights in the house, came a long way since then
Great, I remembered how 20 years ago in technical school we were designing boards with p-cad.
MaltWhiskey
Active member
After a bit of tinkering 16x16x16 Led cube begins to look respectable https://youtu.be/rLcbkJqM98Q
Haven’t checked the framerate but should be well above 100Hz
Haven’t checked the framerate but should be well above 100Hz
ShadowLight8
Member
Wow! That's quite the impressive build. Thanks for sharing!! I've been looking for examples of how much power the Teensy 4's have for WS2811s. I've been using a Teensy 3.2 to run ~2400 WS2811/2813s @ 58fps and this looks like a way to really push that up!
MaltWhiskey
Active member
Well i checked with theory and with serial monitor.
I use 450ns per 1/4 bit so 1800 ns per bit and i use 50 bits for reset, 128 leds per channel and 24 bits per led
that’s 1800*(24*128+50) => 0,0056196s so the display frame rate is 177,95hz
The serial printed 0,01124 seconds because my animation routine took 2 display frames to complete the render,
using sin math functions and floating points so even a teensy 4.0 uses some time for that
If i skip rendering i get 0,00562 printed in the serial monitor, so the real display frame rate is 177,94 hz.....
Thats kind of insane lol
Last edited:
MaltWhiskey
Active member
Ok crazy fast, running animations and display refresh at 178 fps
https://youtu.be/GKh33_mIz6Y
And data glitch fixed, no more disbehaving pixels.
https://youtu.be/GKh33_mIz6Y
And data glitch fixed, no more disbehaving pixels.
I registered to this forum to thank Ward for his awesom library and and to thank MaltWhiskey for his efford in the timingchanges but currently I struggle to get this library to work with some WS2811 Leds.
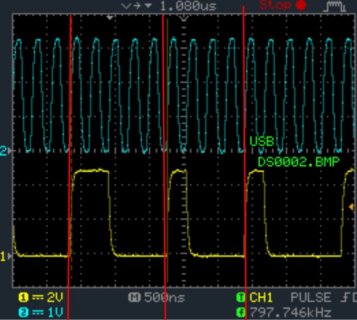
When I use the library as it is on github (https://github.com/wramsdell/TriantaduoWS2811) and measure the output timing on the shiftbuffer outputs I allways get a period time of 1250ns per bit, which is nice, but the high time of a logical one is 880ns and the high time of a logical zero is 440ns. According to the datasheet of the WS2811 chip the high time (in high speed mode) should be 600ns for a logical one and 250ns for a logical zero, +-75ns so the timing I get out of the shiftbuffers is quite out of spec for my WS2811 leds.
When I apply the pll5 changes MaltWhiskey mentioned on github (https://github.com/wramsdell/TriantaduoWS2811/issues/5) + I changed BF to FF in the TIMCMP[0] register. The high times on the shiftbuffer output are much better, I get 300ns for a logical 0 and 600ns for a logical 1 but now the period time changes with every bit. Logical ones have a period time of 1400ns and 5 latch clock cycles, and locical zeros have 1160ns and 4 latch clock cycles.
Channel one is the shiftbuffer output and channel two is the latchclock (sorry for the bad oscilloscope picture but I have nothing better at home right now)

Im am not sure if the alternating period time is the culprit but still my leds are only glitching when the teensy resets but do nothing when they are updated by the library.
The code I used for testing does not change too much from the example from github
Does anyone now what else could be wrong? or did I forgot to change something in the library?
When I use the library as it is on github (https://github.com/wramsdell/TriantaduoWS2811) and measure the output timing on the shiftbuffer outputs I allways get a period time of 1250ns per bit, which is nice, but the high time of a logical one is 880ns and the high time of a logical zero is 440ns. According to the datasheet of the WS2811 chip the high time (in high speed mode) should be 600ns for a logical one and 250ns for a logical zero, +-75ns so the timing I get out of the shiftbuffers is quite out of spec for my WS2811 leds.
When I apply the pll5 changes MaltWhiskey mentioned on github (https://github.com/wramsdell/TriantaduoWS2811/issues/5) + I changed BF to FF in the TIMCMP[0] register. The high times on the shiftbuffer output are much better, I get 300ns for a logical 0 and 600ns for a logical 1 but now the period time changes with every bit. Logical ones have a period time of 1400ns and 5 latch clock cycles, and locical zeros have 1160ns and 4 latch clock cycles.
Channel one is the shiftbuffer output and channel two is the latchclock (sorry for the bad oscilloscope picture but I have nothing better at home right now)

Im am not sure if the alternating period time is the culprit but still my leds are only glitching when the teensy resets but do nothing when they are updated by the library.
The code I used for testing does not change too much from the example from github
Code:
#include <Arduino.h>
#include "TDWS2811.h"

TDWS2811 td;
uint8_t channel = 0;

void setup() {
  Serial.begin(115200);
  pinMode(0, OUTPUT);
  pinMode(13, OUTPUT);
  Serial.println("Start Setup");
  td.setChannelType(channel,RGB);
  td.setChannelType(channel+1,RGB);
  Serial.printf("Setup complete!\n");
}

void loop() {
  digitalWrite(13, !digitalRead(13));
  color_t col1 = {0,0,128};
  color_t col2 = {0,128,0};

  for(uint8_t i=0; i<50; i++){
    td.setLed(channel,i,col1);
    td.setLed(channel+1,i,col1);
  }
  delay(1000);

  for(uint8_t i=0; i<50; i++){
    td.setLed(channel,i,col2);
    td.setLed(channel+1,i,col2);
  }
  delay(1000);
}
Does anyone now what else could be wrong? or did I forgot to change something in the library?
MaltWhiskey
Active member
I can’t really help with the library since i made my own display class for flexio 2 on pin’s 8,9 and 10. I only use the dmachannel library. Everything i did was checked wirh the rt1060 manual you can download from nxp. I documented the source code with reference to the manual. And everything is explaned. So mabe this will help you?
Attachments
Awesome! Thanks this library works perfect, and also I really like that you also implemented a framesync mechanism 
For the WS2811 leds I had to increase the dmaBufferLow array to a size of 220 because the datasheed I had seems to be quite outdatet. Newer version of the WS2811 chips need a 280µs low period instead of 50µs to latch the data into the leds.
For the WS2811 leds I had to increase the dmaBufferLow array to a size of 220 because the datasheed I had seems to be quite outdatet. Newer version of the WS2811 chips need a 280µs low period instead of 50µs to latch the data into the leds.
MaltWhiskey
Active member
Awesome! Thanks this library works perfect, and also I really like that you also implemented a framesync mechanism
For the WS2811 leds I had to increase the dmaBufferLow array to a size of 220 because the datasheed I had seems to be quite outdatet. Newer version of the WS2811 chips need a 280µs low period instead of 50µs to latch the data into the leds.
Good to hear it is working now! So you ended up using my Display class ? Or still on the original library?
Anyway took some time to make it all a bit nicer, nice fade in and out, sparkling fireworks etc. Starting to look like a real work of art.
Everything non blocking, so hopefully I can work in that touchscreen and wifi at a later time. For now I'll call it done. My wife needs me to make a ceiling light
https://www.youtube.com/watch?v=xidPiL3ZEh8
Hi MaltWhiskey
I'm definitely interested in the amazing work you have done and are just coming up to speed reading all the info.
i'm trying to decipher/digest your code at the moment to help understand the DMA/FLEXIO architecture and outputting of animations
i do want to build one of these 16X16X16 , so why not use the latest addressable tech and performance possibilities of DMA.
One question, so from GITHUB the "32Bit shift register v2" folder has the latest gerber files to send off to a PCB manufacturer. ?
Who did you use to do the assembly of components on the board, the same company producing the board ?
Or would you happen to have an extra assembled board that you now have no need for which i could purchase ?
I believe you are going to do a smaller cube with more detailed instructions of build and software so look forward to it
cheers
Trev
PCB board was delivered from China today. I can confirm it working without any glitches for PL9823 leds 128 leds/channel all 32 channels. Not tested anything else, life gets in the way....
Can't believe there isn't any more interest in this, only 3 wires, cheap pcb with level shifter, ability to control thousands of leds..... at zero processor cycles. I think if you parallel the FlexIO to shift more than 1 bit, for example 4 bits, you can have 4x32 channels with no problem. I think 16x32 is the max for flexio2? So it's likely this can be scaled up beyond insane.... and there is also flexio1.. Flexio3 has no DMA so this is a bit useless...
Since not many responses/interest i'll leave it at this.
I'm definitely interested in the amazing work you have done and are just coming up to speed reading all the info.
i'm trying to decipher/digest your code at the moment to help understand the DMA/FLEXIO architecture and outputting of animations
i do want to build one of these 16X16X16 , so why not use the latest addressable tech and performance possibilities of DMA.
One question, so from GITHUB the "32Bit shift register v2" folder has the latest gerber files to send off to a PCB manufacturer. ?
Who did you use to do the assembly of components on the board, the same company producing the board ?
Or would you happen to have an extra assembled board that you now have no need for which i could purchase ?
I believe you are going to do a smaller cube with more detailed instructions of build and software so look forward to it
cheers
Trev
MaltWhiskey
Active member
You upload the board with assembly instructions. The components to use are in the assembly file. I used jlcpcb (in the assembly file are their components id’s) Some through hole / connectors you need to solder yourself. But the smd components will all be placed.
I ordered 5 boards so i have 4 spares.
The small cube won’t use this board, that would be major overkill.
I ordered 5 boards so i have 4 spares.
The small cube won’t use this board, that would be major overkill.
Hi,
So i presume that you want to keep all 4 spares ?
All good if so, and i'll look into placing an order myself. would the latest and greatest be in "32Bit shift register v2\32Bit SR Gerbers-fixed.zip"
i am ambitious and looking at the 16x16x16 build , already done a standard non-addressable 8x8x8 RGB
Thanks btw for all the hours in creating these files ( PCB / jigs etc ) as save me a heap of time
Still probably take me a year to build , unless i get really motivated
cheers
You upload the board with assembly instructions. The components to use are in the assembly file. I used jlcpcb (in the assembly file are their components id’s) Some through hole / connectors you need to solder yourself. But the smd components will all be placed.
I ordered 5 boards so i have 4 spares.
The small cube won’t use this board, that would be major overkill.
So i presume that you want to keep all 4 spares ?
All good if so, and i'll look into placing an order myself. would the latest and greatest be in "32Bit shift register v2\32Bit SR Gerbers-fixed.zip"
i am ambitious and looking at the 16x16x16 build , already done a standard non-addressable 8x8x8 RGB
Thanks btw for all the hours in creating these files ( PCB / jigs etc ) as save me a heap of time
Still probably take me a year to build , unless i get really motivated
cheers
hi,
I have almost finished my 15x LED cube. First attempts with Octows2811 + Teensy 4.0 or WLED + ESP 32 were satisfactory.
Now I found this example, I even had the shift registers lying around... and put it together temporarily
Unfortunately it does not work. only some LED lights are static white, after reset... What am I doing wrong
Attachments
kd5rxt-mark
Well-known member
- which example did you find ??hi,
I have almost finished my 15x LED cube. First attempts with Octows2811 + Teensy 4.0 or WLED + ESP 32 were satisfactory.
Now I found this example, I even had the shift registers lying around... and put it together temporarily
Unfortunately it does not work. only some LED lights are static white, after reset... What am I doing wrong
- can you post the sourcecode for the sketch that you are using ??
- can you post pictures of your hardware ??
- which Teensy version are you using ??
- which build environment are you using ??
- which OS are you building under ??
Without these kinds of details, the only possible help that you might receive would be a pure guess, and that's not likely to be much help at all !!
Mark J Culross
KD5RXT
it is this on the top of this threet
https://github.com/wramsdell/TriantaduoWS2811
i use arduino ide 1,8,13 on win 10 and the latest teensyduino ... with the new ide>2.0 i have to much problems
i'm test it with teensy 4.0 and 4.1
and sorry for my bad english
https://github.com/wramsdell/TriantaduoWS2811
i use arduino ide 1,8,13 on win 10 and the latest teensyduino ... with the new ide>2.0 i have to much problems
i'm test it with teensy 4.0 and 4.1
and sorry for my bad english
Attachments
kd5rxt-mark
Well-known member
I have not studied the picture of your wiring in detail, but as a general suggestion (based upon the comment on the github site that you referenced: in the "Electrical Elements" section of the "Top Level Design": "This means that good layout practices are a must for the three high-speed, timing critical lines: bit clock, latch clock, and serial data."), I would rotate your T4.0 180 degrees (be careful with rewiring power & ground after this rotation), move it closer to the shift registers, & make the three white wires as short and as straight as possible.
Also, if you would like to post your sketch, rather than posting a picture (which makes it hard to see & impossible for someone else to load up if they want to try to reproduce the problem that you are seeing), you can highlight the code in the sketch, copy it to your clipboard, and paste it here in the forum. Just make sure to use the "Code" button (It looks like this: "</>") at the top of the text area where you are composing your post when pasting into your comment.
Hope that helps !!
Mark J Culross
KD5RXT
I realize that the breakout board variant would not produce good results, but "some flickering" would be expected.
i think the error is somewhere else
here the code..
i think the error is somewhere else
here the code..
Code:
#include <Arduino.h>
#include "TDWS2811.h"

TDWS2811 td;
uint8_t channel = 0;

void setup() {
  Serial.begin(115200);
  pinMode(0, OUTPUT);
  pinMode(13, OUTPUT);
  Serial.println("Start Setup");
  td.setChannelType(channel,RGB);
  td.setChannelType(channel+1,RGB);
  Serial.printf("Setup complete!\n");
}

void loop() {
  digitalWrite(13, !digitalRead(13));
  color_t col1 = {0,0,128};
  color_t col2 = {0,128,0};

  for(uint8_t i=0; i<50; i++){
    td.setLed(channel,i,col1);
    td.setLed(channel+1,i,col1);
  }
  delay(1000);

  for(uint8_t i=0; i<50; i++){
    td.setLed(channel,i,col2);
    td.setLed(channel+1,i,col2);
  }
  delay(1000);
}
Last edited:
For now, let me get this...
15 channel at 225 led..works fine

 github.com
Now I'm going to start programming simple animations.Does anyone have a tip for these crazy 3D waves?
15 channel at 225 led..works fine
Parallel Output
The FastLED library for colored LED animation on Arduino. Please direct questions/requests for help to the FastLED Reddit community: http://fastled.io/r We'd like to use github "issues&...
Now I'm going to start programming simple animations.Does anyone have a tip for these crazy 3D waves?


![IMG_20240218_023326[1].jpg](/data/attachments/29/29913-5a390ee4207931b4e58e39292867a3bb.jpg)
![IMG_20240218_064610[1].gif](/data/attachments/29/29914-9c019b1198907adf123291d633f42043.jpg)