Teensy 4.1 flashing, very hot and non responsive (cannot be detected by computer)

Diodes "switch on" when the forward voltage is over a certain threshold, typically around 0.6V, but like anything that has to deal with real world physics they can't change state instantly. It takes a while for a protection diode to start to conduct and so protect the rest of the system, during this time the voltage can get significantly higher than the steady state clamping level you are expecting. How much higher depends on system capacitance, inductance, circuit layout and lots of other factors. Parts specifically designed for circuit protection will normally switch on faster than general purpose diodes and so provide better protection.

Check your physical layout, the motors and their controllers may have built in protection but if you have digital IO lines running very close to the motors you could get some nasty voltage spikes induced onto wires that have nothing to do with the motors.

One other thing you could look at for protection is adding series resistors to the IO pins. 200-300 ohms in series isn't normally going to have a meaningful impact on a digital signal unless you are toggling it very quickly. It won't protect you from everything but it will limit the currents to the point the chip has a fighting chance of surviving if you drive a signal into an output pin or accidentally put 5 V on to an input.
Thank you that makes more sense about what they meant about the speed of diodes.

As for the IO lines being close to the motors we have been forced to fit this entire circuit onto one breadboard so spacing is difficult however the 12V power line which the motors use are separated by a few rows (as much as possible) from the IO teensy pins.

Having to add resistors to every IO pin would be quite difficult given the limitation of space we currently have. However I will definitely look more into this in the future when we get to finalise our PCB designs and ordering them.
 
@General_Hex: I know the fact that your robot has been running for some time may sound reassuring, but I will emphasize again that any electronics subjected to any "out-of-spec" conditions *may* result in failure over time. The actual failure (and its actual cause) is the thing to focus on, not how long it took to get there.

As an analogy, a swimming pool filled using a firehose will likely overflow very quickly. The same swimming pool filled using a garden hose will take much longer to overflow, but it will certainly overflow at some point. It's the action of adding too much water that causes the overflow (the actual problem to be addressed). The amount of time that the pool takes to overflow is influenced merely by the rate at which water is supplied. However, unless the flow of water is completely cutoff (eliminating the actual cause of the overflow), the (overflow) problem will still occur.

This analogy does nothing to help solve your current challenge, but hopefully it helps to understand that running your robot successfully for a long time is no guarantee that there is not some actual underlying problem (e.g. with power, or with something else) that is zapping your T4.1s. . .

Mark J Culross
KD5RXT
Yeah I understand thank you. If possible can you please tell me generic preventative measures I can quickly implement so that the teensy is protected even in the case of malfunction or error.

i.e Would these three steps help:
  1. Place one Diode (1A rated) on all motors' ground and power to protect teensy from reverse pulse
  2. Place Diode (1A rated) on the VIN pin of the teensy to protect from reverse polarisation
  3. Place 150mA fast burn Fuse on the VIN of the teensy to protect from high current

and which of these diodes seem good as "fast" diodes?

thank you being understanding and trying to assist me
 
Hi all,

I have taken the photos as requested however the forum is not allowing me to upload them strangely despite them being around 1-2mb. But I have put all of the photos I have taken of my circuit in this link on Google Drive. In the photos you will find many angles of the original circuit as described here:
the main power source for the entire robot is a 12V battery which directly powers 4 12V DC motors. Then a wire from the 12V line goes to a voltage step down which decreases the voltage to around 4.7V which is then used to power the Teensy.


The teensy's 3V pin is connected to a power line which is used to power:
  • IMU (Gyro Sensor)
  • 3 ultrasonic sensors
  • IR Sensor (its a Building Blocks robotics IR sensor)

Connected to the teensy's other pins are:
  • PWM wire for each of the 4 motors
  • Direction wire for each of the 4 motors
  • I2C connection for IR sensor
  • I2C connection for IMU
Voltage step down has 2A diode soldered to it to protect it from reverse polarisation.
All ground wires of all components including Teensy are connected to the same ground line.

Then there are two photos (titled fuse.png and fuse2.png) which are showing the new method I have implemented of adding a fuse with a diode (ultra fast diode) underneath before connecting to the VIN pin of the teensy. The reason I was forced to solder the diode to the bottom of the fuse clip like that was because there was no space for the diode to connect to the fuse clip and to the 5V line. That is two of the safety steps I plan on taking. The third is adding a diode (ultra fast) to each of my motors, however I am a little confused how I am meant to do that, do I bridge the ground wire and positive wire of the motors together with the diode with the stripped end (the cathode end I believe it is) towards the positive? and then do I plug the power and ground wires into the bread board like normal? A diagram or image would help in explaining please.

Note that the teensy in that photo is the one that burned on Monday and is flashing 9 times, I just used it for demonstration purposes.
You can also select different sections of the photos and "add comments" which may help with me replying to them explaining what they are/answering any questions and also with you expaning things to me.

Apologies again as I know the circuit is very messy but is the best we could do given the fact that this is our first time with these sorts of circuits and having to fit everything on one bread board.

Please let me know if you have any questions about what components or wires are and I will explain them. I also have the robot with me tonight so if need be I can take more photos however I have now taken out almost all of the wires in preparation for the safety measures.
 
Last edited:
Hi all,

Please try to view the images above soon because tomorrow is the last day I have to set up our robot and then out competition is on Saturday (note that I am in Perth WA so the timezone is different). We currently only have 1 teensy left because the new ones ordered won't arrive in time so we quite literally cannot afford to burn this one. I have added flow back diodes to the motors (using ultra fast diodes), a fuse to the teensy's VIN pin (rated for 150mA) and a diode (again ultra fast) soldered to the bottom of the fuse to also protect it from reverse polarisation. Is there anything else I can do to protect my teensy?

Regards,
Ryan
 
Last edited:
To be honest if you have 1 day left then there isn't much you can do other than make sure all the wires are in securely and hope. Given that birds nest of wires I'd be afraid of making any change this close to the final date.

For future projects like this spin a board, even if it's just a holder for the dev boards with the connections between them it will be a lot neater and more reliable. Yes it's an extra cost, especially if you need to make more than one version, but it's cheep compared to the price of the parts you're putting in there and risking damage to. Or at the very least get a bigger breadboard, spread things out more and use rigid wires running flat along the board rather than looping up into the air like that. It takes longer to do things neatly like that but you get a more reliable and easier to debug system out of it.
 
In the future we are designing PCBs so there will be little to no wires. We almost finished designing them but we just ran out of time and they would not arrive in time. we are assembling a new robot so I will have to remake the circuit anyways and I have already taken it apart so if there is anything else I can do to even further protect my teensy (adding more diodes etc) please let me know so I can do any soldering or anything required today/tomorrow.

Edit: Also do you believe that the measures I have taken so far are good/correct measures to protect the teensy from being burned?
 
Your system is suffering a condition that results in something somewhere going out of spec. What and when is unknown, this may be constantly the case or only occasionally.
You've not posted schematics. You've not posted oscilloscope traces. All we have to go on are some photos showing a mess of unshielded wires and a circuit description.
That's not enough for anyone to be able to give you a definite root cause, all we can do is speculate and make guesses.

If you're looking for someone to say "That will fix it" or "Do this and it'll be good" then sorry, that's not going to happen. Being certain you've fixed this sort of thing is tricky enough when you have the hardware in front of you and access to all the tools you need. Doing it remotely is virtually impossible.

It sounds like you've implemented all the obvious things that are practical given the current hardware and timescales. I can't think of anything else that is practical beyond a tidy up to reduce wire loops and where possible twist signal/power and ground pairs to reduce noise emissions/susceptibility. Is that enough? You'll have to let us know after the competition.
 
Couldn't view the images. Google wants a login that isn't working for my browser.

Also do you believe that the measures I have taken so far are good/correct measures to protect the teensy from being burned?

Remember, I still haven't seen any photo or diagram. Based only on your recent words, fast diodes across the inductive loads is good step.

But the fuse for Teensy's power won't help. Generally speaking, fuses rarely prevent circuitry from damage. Their main purpose is to prevent damaged circuitry from starting a fire.

Another thing you can (maybe) do is add a resistor between each Teensy pin and the wire connecting to other stuff. The idea is to limit the current which can flow back into the Teensy pin if something terrible happens on the wire, like accidentally touching 12V. The I/O pins have tiny diodes built in, mainly meant to protect against slight ESD while handling the part. These aren't like regular diodes you would buy. If they had specs rated (companies like NXP are rather secretive about the internal design of their chips) they might be rated for a current like 5mA. But the way these diodes are (usually) made inside chips is far from ideal because some of the current escapes into the body of the chip and can cause other problems. You really don't want to put current through those diodes. But they are inside the chip and will offer some very limited protection. A resistor connected directly to the pin before any wire will help limit the current in a bad case scenario. However, a resistor also limits how strongly the pin can control whatever you've connected. Often a value like 1K or 2.2K offers quite a bit of protection and might still allow most things (other than LEDs) to work. Probably not much point going higher than 10K. Even 100 ohms might help a bit, if you have something that needs a stronger drive. If you only have time to add a few resistors, prioritize everything that might get exposed to 12 volts!

If you want to share pictures so anyone can easily view, usually you can use copy to clipboard in most browsers or graphics programs like Photoshop, Gimp, MS Paint, etc. Then just paste here on the forum. But the forum does limit the size, so if they are large high-res photos directly from a camera you might need to use one of those graphics programs to reduce to a web friendly size like 800 or 1024 or 1280 pixels.
 
Last edited:
Couldn't view the images. Google wants a login that isn't working for my browser.


Remember, I still haven't seen any photo or diagram. Based only on your recent words, fast diodes across the inductive loads is good step.

But the fuse for Teensy's power won't help. Generally speaking, fuses rarely prevent circuitry from damage. Their main purpose is to prevent damaged circuitry from starting a fire.

Another thing you can (maybe) do is add a resistor between each Teensy pin and the wire connecting to other stuff. The idea is to limit the current which can flow back into the Teensy pin if something terrible happens on the wire, like accidentally touching 12V. The I/O pins have tiny diodes built in, mainly meant to protect against slight ESD while handling the part. These aren't like regular diodes you would buy. If they had specs rated (companies like NXP are rather secretive about the internal design of their chips) they might be rated for a current like 5mA. But the way these diodes are (usually) made inside chips is far from ideal because some of the current escapes into the body of the chip and can cause other problems. You really don't want to put current through those diodes. But they are inside the chip and will offer some very limited protection. A resistor connected directly to the pin before any wire will help limit the current in a bad case scenario. However, a resistor also limits how strongly the pin can control whatever you've connected. Often a value like 1K or 2.2K offers quite a bit of protection and might still allow most things (other than LEDs) to work. Probably not much point going higher than 10K. Even 100 ohms might help a bit, if you have something that needs a stronger drive. If you only have time to add a few resistors, prioritize everything that might get exposed to 12 volts!

If you want to share pictures so anyone can easily view, usually you can use copy to clipboard in most browsers or graphics programs like Photoshop, Gimp, MS Paint, etc. Then just paste here on the forum. But the forum does limit the size, so if they are large high-res photos directly from a camera you might need to use one of those graphics programs to reduce to a web friendly size like 800 or 1024 or 1280 pixels.
I tried copy and pasting the images but it would get stuck on "uploading" and never upload despite the image only being 1.5mb. However as @AndyA said, the images aren't that helpful as the wires and circuit are a mess and if anything it is more confusing.

On the note of protecting the teensy:
  1. Do you believe I should still keep the fuse just in case (because one of the times I saw smoke coming from the teensy and before I was able to turn it off it burned, so maybe a fuse could still help?)
  2. It would be near impossible for me to add resistors to every IO pin of the teensy we are using as we are putting the entire circuit onto one breadboard and there is no way for me to have time to solder a resistor to the end of every wire that goes to an IO pin ( and I can't just put resistors in as the electricity takes the path of least resistance and still goes to the teensy).
  3. However almost all of our components are as separated from the 12V as possible and now with the edition of the diodes on the motors they should be pretty safe

I just thought, is there a possibility that the cause of this is because the voltage step down which is powering the teensy is outputting too much current rather than too much voltage? If this is the case would using resistors help decrease the current and if yes: 1. How can I test the current output of the voltage step down (using a multimeter) without putting the good teensy at risk (would using the flashing one work?) 2. what size resistors should we use and 3. would the increased resistance cause an increase in voltage?

P.S Thank you very much for trying to help me, I fully understand how difficult it is to try to help me when I am only able to provide so little information.

regards,
Ryan
 
just thought, is there a possibility that the cause of this is because the voltage step down which is powering the teensy is outputting too much current rather than too much voltage?
No, it's Voltage which causes the current to flow. You cannot force more current through a device without increasing the voltage.
Using the water analogy, think of voltage as water pressure and current as rate of water flow.
The water will not flow any faster without increasing the pressure.
 
@General_Hex:

Sorry, I am unable to make evaluations and/or recommendations when it comes to hardware, as that is not my strong suit . . . I'm more of a software specialist that merely dabbles in hardware. We'll have to wait for an answer from someone with more hardware expertise.

Mark J Culross
KD5RXT
 
No, it's Voltage which causes the current to flow. You cannot force more current through a device without increasing the voltage.
Using the water analogy, think of voltage as water pressure and current as rate of water flow.
The water will not flow any faster without increasing the pressure.
so its not possible that the voltage step down it outputting too much current? Because that was the only other reason I could think of which would cause the teensy to burn.
 
@General_Hex:

Sorry, I am unable to make evaluations and/or recommendations when it comes to hardware, as that is not my strong suit . . . I'm more of a software specialist that merely dabbles in hardware. We'll have to wait for an answer from someone with more hardware expertise.

Mark J Culross
KD5RXT
That's ok, I certainly understand as my main role is the software developer of my team however the work of having to create the preliminary circuits before we can get our PCBs has fallen on my shoulders and I am trying the best I can given that I have no experience and no one around me does either so I can't ask anyone directly for any such advice.

Thank you for giving your time in trying to help me
 
@BillFM The motors do not have a motor controller because we specifically bought brushless DC motors with high torque and high enough RPM that also came with a built in encoder. However here is the link to the motors with the built in encoder we bought and you can also find the data sheet on this website too: Motor Link
 
is there a possibility that the cause of this is because the voltage step down which is powering the teensy is outputting too much current rather than too much voltage?

Does "the voltage step down" have a part number? Or a datasheet or even a web page basic tech specs? Maybe I missed details about earlier in 41 messages?

Generally speaking, power supplies output a fixed voltage and the current varies depending on how much power Teensy and other connected circuitry actually consumes. Usually the current spec is a maximum amount. Some power supplies also have a minimum amount to work properly, but those aren't common. If no minimum spec is given, you can assume it's supposed to work correctly with Teensy+circuits consuming anywhere from 0 to the max rated current.

We have occasionally seen low quality power supplies. Back in the early days of Teensy 3.0 and 3.1, a certain Traco power supply caused a lot of problems. Its datasheet recommended adding an extra capacitor at its input, but said that was only needed if the input voltage was on the upper end of the allowed range. Turns out that particular Traco unit would behave terribly during Teensy power-up without an extra input capacitor, even with relatively lower input voltages. Extensive testing showed the datasheet was just plain wrong! Adafruit edited their web page, at first recommending output capacitance (which makes the problem even worse), then finally with the right recommendation to add the capacitor at the input.

But those cases of poorly made power supplies are pretty rare. That particular Traco unit has come up several times over the years, but it's certainly not the norm.


Edit: while rare, there are some exceptions to the general rule of power supplies always having fixed voltage output. Some power supplies meant for the backlights in televisions & computer monitor screens and maybe other displays output a fixed current. They're generally meant to be used with many LEDs connected in series. LED light output is proportional to the current (because each electron can emit 1 photon as is crosses the diode charge depletion region), so those power supplies deliver a fixed current and the voltage adjusts automatically as needed (which can happen as the LED diodes and connecting materials change temperature).
 
Last edited:
Apologies @PaulStoffregen, here is the link to the exact voltage step down we are using and the data sheet is on this website too under "downloads" : Voltage Step Down

There is nothing in the data sheet that states that a diode or anything is required and there is no minimum current however they do even specifically say to "Use it to run your 5V Duinotech projects from a 6v, 9v or even 12v Supply" so in theory it shouldn't be an issue however I do not know how true that is.
 
Yes, that DCDC converter is probably fine. While not documented on that site, it uses LM2596 which is a good quality part. Though whether it's a genuine TI part or leftover inventory from before TI acquired National Semicondutor (the marking is hard to see in that photo but looks like the old National logo) or a Chinese counterfeit of LM2596 is a good question.

I have personally used those LM2596-based converters on a few occasions. They worked fine.
 
[re: resistors in IO pins] and I can't just put resistors in as the electricity takes the path of least resistance and still goes to the teensy
The resistors aren't there to stop the electricity. They are there to limit the current.

Just about all digital inputs have clamping diodes (either explicitly or as a side effect of how the parts are made) that limit the input voltage on each pin so that it is clamped between -0.6V and Vcc+0.6V. This is why almost all devices list those numbers as the absolute limits on IO pins and why you should never apply a voltage to the IO pins of a device that is powered down.

These internal diodes can't cope with much current, if you connect a 5V power supply into a Teensy input pin then a large current will flow through that clamping diode and either 1) burn it out breaking either just that pin or the whole part or 2) raise the internal Vcc over the intended voltage and break the part.

If you put a 100 ohm resistor in series on the IO pin then if you connect 5V to the pin the current through the clamping diode is (5-(3.3+0.6))/100 = 11mA. At that point the internal diode has a fighting chance of surviving and you may not destroy anything. Ideally you'd use at least 2-300 ohms which would further reduce that current. How high you can get away with going will depend on the exact nature of the input signal.
This isn't something you should ever count on, if you know a pin could exceed the maximum voltage you should add both a series resistor and an external clamping diode or even better a buffer device, but it is a simple way to improve survivability of rare and unexpected conditions.
I understand that but what I meant was that for the resistor to be connected in series it means that one end needs to connect to the IO pin of the teensy and the other end needs to connect to the input/output wire correct? Because my issue is that on this small breadboard i have no way of fitting a resistor between every IO pin and input/output wire in series. However after this weekend when we begin finalising our PCB designs I will certainly try to implement such resistors on the IO pins. However my worry is that these resistors would inhibit the effectiveness/control of the IO wires, is there any resistance amount where I can get good current protection but I can also be sure that my use cases such as I2C communication, PWM and analog controls are unaffected?
 
Nobody can give you a single simple answer. It's a matter of trade-offs and optimizing for your specific usage. And I believe you can understand how even after 46 messages we're still not very well informed about the specifics of your circuitry...

Even with I2C, what series resistor you can use will depend on the pullup resistor(s) you already have. If you have 1K pullup, using even 100 ohms could give a logic low around 0.3 volts which is likely to work, but not great. Again, how detrimental depends on the specific I2C chips and what voltage they require for logic low. But if your total pullup resistance is 4.7K, then 100 or even 220 ohms is probably find. Can you see how this again comes back to details about your specific circuitry?

I know you want a simple and easy answer. But that's not how designing electronics works.

But you did ask for additional suggestions about ways you could make your build more resilient. This is a pretty good way. It's also pretty cheap, requiring only inexpensive resistors. But it's not a simple matter of a universal recommendation for 1 resistor value. You need to look carefully at the circuit requirements. We could help you with that... but again, there's not much we can do when you keep us in so much in the dark about the exact parts you're using and how you've really connected them.
 
I understand that electronics is complicated and I apologise again for not being able to better describe or show my circuit. Thank you to everyone who has tried to help me this week your time and advice is greatly appreciated. While there is not much more I can do between now and Saturday, I will update you on how it goes with the current new mitigation method and whether our final good teensy burns or not. After the competition I will also put a schematic of our final PCB design with in the following few weeks (once it is finalised) to see if it is created well enough and whether it is protecting the teensy enough.

Thank you again for all your help and time and apologies again for my troubles trying to explain/show my circuit.
Regards,
Ryan
 
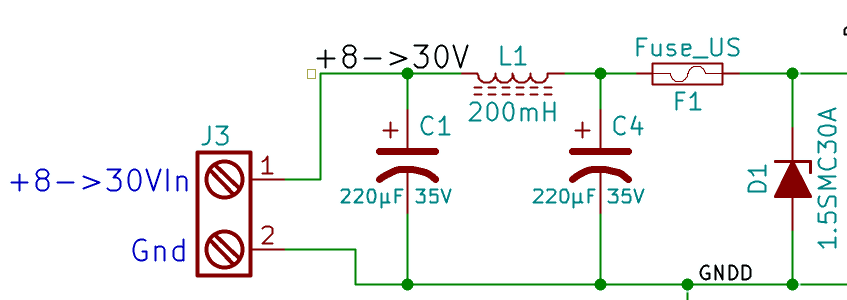
General:
This circuit will protect your Teensy from just about anything the outside world can throw at it. It was originally designed to protect military circuits from EMP developed from Nuclear weapons. I have been using it on sensitive circuits since 1980, I designed a clock/weather station around a Teensy 3.0, 3.1, 3.2 and I have used it in at least 25 countries without a single problem for at least 10 years.
 

Attachments

  • Screen Shot 2024-08-22 at 10.17.55 AM.png
    Screen Shot 2024-08-22 at 10.17.55 AM.png
    32.6 KB · Views: 43
Thank you SOOO MUCH @sbfreddie. can you please outline what those components are specifically so I do not accidentally mix anything up and so I can use the exact components.

main questions are:
  • what type of diode is D1? would an ultra fast or normal diode work in its place?
  • What component is L1
  • Is J3 representing the teensy or the power source to the 5V line?
(apologies as I am not well versed in electronic symbols)
 
Back
Top